Creating and removing users
Creating users in Ubuntu can be done with one of two commands: adduser and useradd. This can be a little confusing at first, because both of these commands do the same thing (in different ways) and are named very similarly. I’ll go over the useradd command first and then I’ll explain how adduser differs. You may even prefer the latter, but we’ll get to that in a moment.
Using useradd
First, here’s an example of the useradd command in action:
sudo useradd -d /home/jdoe -m jdoe
With this command, I created a user named jdoe. With the -d option, I’m clarifying that I would like a home directory created for this user, and following that, I called out /home/jdoe as the user’s home directory. The -m flag tells the system that I would like the home directory to be created during the process; otherwise, I would’ve had to create the directory myself. Finally, I called out the username for my new user (in this case, jdoe).
As we go along in this book, there will be commands that require root privileges in order to execute. The preceding command was an example of this. For commands that require such permissions, I’ll prefix the commands with sudo. When you see these, it just means that root privileges are required to run the command. For these, you can also log in as root (if root is enabled) or switch to root to execute these commands as well. However, as I mentioned before, using sudo instead of using the root account is strongly encouraged.
Now, list the storage of /home using the following command:
ls -l /home
You should see a folder listed there for our new user:

Figure 2.1: Listing the contents of /home after our first user was created
What about creating our user’s password? We may have been asked for our current user’s password due to using sudo, but we weren’t asked for a password for the new user. To create a password for the user, we can use the passwd command. The passwd command defaults to allowing you to change the password for the user you’re currently logged in as, but it also allows you to set a password for any other user if you run it as root or with sudo. If you enter passwd by itself, the command will first ask you for your current password, then your new password, and then it will ask you to confirm your new password again. If you prefix the command with sudo and then specify a different user account, you can set the password for any user you wish. An example of the output of this process is as follows:

Figure 2.2: Changing the password of a user
As you can see in the previous screenshot, you won’t see any asterisks or any kind of output when you type a password using the passwd command. This is normal. Although you won’t see any visual indication of input, your input is being recognized.
Now we have a new user and we were able to set a password for that user. The jdoe user will now be able to access the system with the password we’ve chosen. This user won’t have access to sudo by default, but we’ll cover how to change this later on in the chapter.
Using adduser
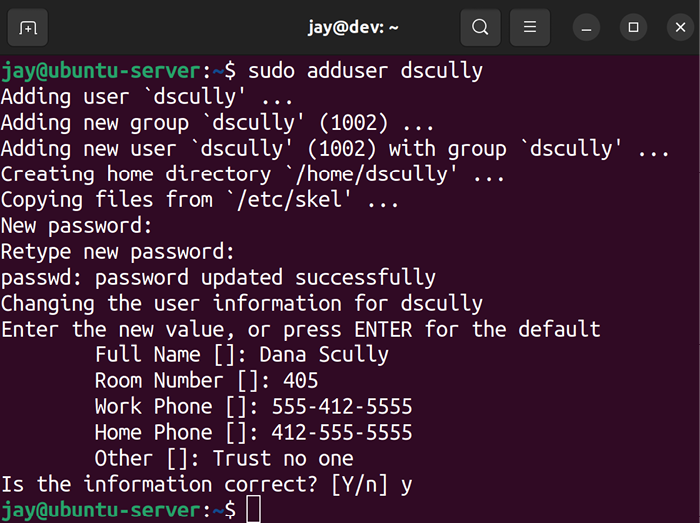
Earlier, I mentioned the adduser command as another way of creating a user. The difference (and convenience) of this command should become apparent immediately once you’ve used it. Go ahead and give it a try; execute adduser along with a username for a user you wish to create. An example run of this process is as follows:

Figure 2.3: Creating a user with the adduser command
In the preceding process, I executed sudo adduser dscully (commands that modify users require sudo or root) and then I was asked a series of questions regarding how I wanted the user to be created. I was asked for the password (twice), Full Name, Room Number, Work Phone, and Home Phone. In the Other field, I entered the comment Trust no one, which is a great mindset to adopt while managing users. The latter prompts prior to the final confirmation were all optional: I didn’t have to enter Full Name, Room Number, and so on. I could’ve pressed Enter to skip those prompts if I wanted to. The only things that are really required are the username and the password.
From the output, we can see that the adduser command performed quite a bit of work for us. The command defaulted to using /home/dscully as the home directory for the user, the account was given the next available User ID (UID) and Group ID (GID) of 1002, and it also copied files from /etc/skel into our new user’s home directory. In fact, both the adduser and useradd commands copy files from /etc/skel, but adduser is more verbose regarding the actions it performs.
Don’t worry if you don’t understand what UID, GID, and /etc/skel are yet. We’ll work through those concepts soon.
In a nutshell, the adduser command is much more convenient in the sense that it prompts you for various options while it creates the user without requiring that you memorize command-line options. It also gives you detailed information about what it has done. At this point, you may be wondering why someone would want to use useradd at all, considering how much more convenient adduser seems to be. Unfortunately, adduser is not available on all distributions of Linux. It’s best to familiarize yourself with useradd in case you find yourself on a Linux system that’s not Ubuntu.
It may be interesting for you to see what exactly the adduser command is. It’s not even a binary program—it’s a shell script. A shell script is simply a text file that can be executed as a program. You don’t have to worry too much about scripting now, as we will cover it in Chapter 6, Boosting Your Command-line Efficiency. In the case of adduser, it’s a script written in Perl, which is a programming language that is sometimes used for administrative tasks. Since it’s not binary, you can even open it in a text editor in order to view all the code that it executes behind the scenes. However, make sure you don’t open the file in a text editor with root privileges, to ensure that you don’t accidentally save changes to the file and break the script. The following command will open adduser in a text editor on an Ubuntu Server system:
nano /usr/sbin/adduser
Use your up/down arrows as well as the Page Up and Page Down keys to scroll through the file. When you’re finished, press Ctrl + x on your keyboard to exit the text editor. If the editor prompts you to save changes, don’t do so. Anyway, those of you with keen eyes will likely notice that the adduser script is calling useradd to perform its actual work. So either way, you’re either directly or indirectly using useradd.
Now that we know how to create users, it will be useful to understand how to remove them as well.
Removing users
Removing or disabling an account is very important when a user no longer needs to access a system, as unmanaged accounts often become a security risk. To remove a user account, we’ll use the userdel command.
Before removing an account, though, there is one very important question you should ask yourself. Will you (or another person) need access to the user’s files? Most companies have retention policies in place that detail what should happen to a user’s data when they leave the organization. Sometimes, these files are copied into an archive for long-term storage. Often, a manager, coworker, or new hire will need access to the former user’s files, perhaps to continue working on a project where they left off. It’s important to understand this policy ahead of managing users. If you don’t have a policy in place that outlines retention requirements for files when users resign, you should probably work with your management team and create one.
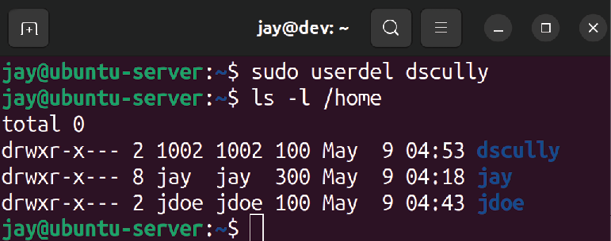
By default, the userdel command does not remove the contents of the user’s home directory. Here, we use the following command to remove dscully from the system:
sudo userdel dscully
We can see that the files for the dscully user still exist by entering the following command:
ls -l /home
The preceding commands will result in the following outputs:

Figure 2.4: The home directory for the user dscully still exists, even though we removed the user
With the /home directory for dscully still existing, we’re able to move the contents of this directory anywhere we would like to. If we had a directory called /store/file_archive, for example, we could easily move the files there:
sudo mv /home/dscully /store/file_archive
Of course, it’s up to you to create the directory where your long-term storage will ultimately be, but you get the idea.
If you weren’t already aware, you can create a new directory with the mkdir command. You can create a directory within any other directory that your logged-in user has access to. The following command will create the file_archive directory I mentioned in the preceding example:
sudo mkdir -p /store/file_archive
The -p flag simply creates the parent directory if it didn’t already exist.
If you do actually want to remove a user’s home directory at the same time that you remove an account, just add the -r option. This will eliminate the user and their data in one shot:
sudo userdel -r dscully
To remove the /home directory for the user after the account was already removed (if you didn’t use the -r parameter the first time), use the rm -r command to get rid of it, as you would any other directory:
sudo rm -r /home/dscully
It probably goes without saying, but the rm command can be extremely dangerous. If you’re logged in as root or using sudo while using rm, you can easily destroy your entire installed system if you’re not careful. DO NOT run this command, but as a hypothetical example, the following command (while seemingly innocent at first glance) will likely completely destroy your entire filesystem:
sudo rm -r / home/dscully
Notice the typo: I accidentally typed a space after the first forward slash. I literally accidentally told my system to remove the contents of the entire filesystem. If that command were executed, the server probably wouldn’t even boot the next time we attempted to start it. All user and program data would be wiped out. If there was ever any single reason for us to be protective over the root account, the rm command is most certainly it!
At this point, we understand how to add and remove users. In the next section, we’ll look deeper into passwords.


