Search icon CANCEL
Subscription
0
Cart icon
Your Cart (0 item)
Close icon
You have no products in your basket yet
Arrow left icon
Explore Products
Best Sellers
New Releases
Books
Videos
Audiobooks
Learning Hub
Conferences
Free Learning
Arrow right icon
Arrow up icon
GO TO TOP
Elevate SwiftUI Skills by Building Projects

You're reading from   Elevate SwiftUI Skills by Building Projects Build four modern applications using Swift, Xcode 14, and SwiftUI for iPhone, iPad, Mac, and Apple Watch

Arrow left icon
Product type Paperback
Published in Sep 2023
Publisher Packt
ISBN-13 9781803242071
Length 268 pages
Edition 1st Edition
Languages
Tools
Arrow right icon
Author (1):
Arrow left icon
Frahaan Hussain Frahaan Hussain
Author Profile Icon Frahaan Hussain
Frahaan Hussain
Arrow right icon
View More author details
Toc

Table of Contents (12) Chapters Close

Preface 1. Chapter 1: Swift and SwiftUI Recap 2. Chapter 2: iPhone Project – Tax Calculator Design FREE CHAPTER 3. Chapter 3: iPhone Project – Tax Calculator Functionality 4. Chapter 4: iPad Project – Photo Gallery Overview 5. Chapter 5: iPad Project – Photo Gallery Enhanced View 6. Chapter 6: Mac Project – App Store Bars 7. Chapter 7: Mac Project – App Store Body 8. Chapter 8: Watch Project – Fitness Companion Design 9. Chapter 9: Watch Project – Fitness Companion UI 10. Index 11. Other Books You May Enjoy

Implementing the main body

In this section, we will complete the third project in this book by implementing the main body of our application. Our first step will be to code the Highlight banner, followed by the app icons.

Coding the highlight banner

Firstly, we will add the code for a Highlight banner. The banner is simply going to be an image that spans the width of the body; we will give it some spacing for aesthetic purposes. It is common to add multiple banners throughout the page to highlight different applications and have carousel banners, which provide the ability to showcase multiple banners in a single section through a transition such as sliding. We will implement a single banner; however, adding more is simple. Follow these steps:

  1. Let’s start by adding a banner image. My image is 728x90 pixels. Feel free to modify this to suit your needs. Select Assets from the Project Navigator:
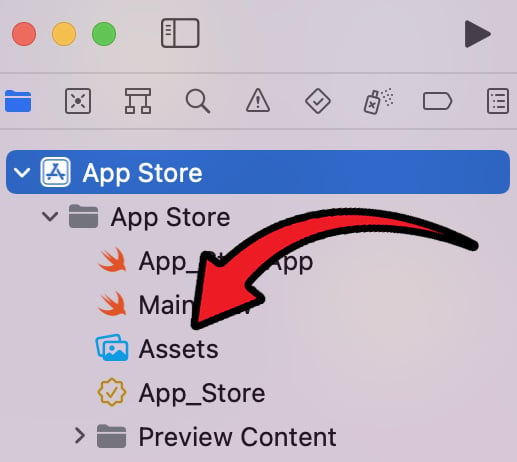
Figure 7.5 – Assets location in Project Navigator

Figure 7.5 – Assets location in Project Navigator

  1. Now, the Assets view will appear. Importing an image into Assets can be done in one of two ways
    1. Dragging and dropping the files into the Assets section:
Figure 7.6 – Dragging and dropping asset

Figure 7.6 – Dragging and dropping asset

  1. Right-clicking the Assets section and selecting Import…:
Figure 7.7 – Import… button

Figure 7.7 – Import… button

Once the asset(s) have been imported, the Assets view will look as follows:

Figure 7.8 – Asset(s) imported

Figure 7.8 – Asset(s) imported

Note

I am using the banner for my developer-centric podcast FireDEV. Feel free to use it and tune in to my podcast every Thursday at the following links:

  1. We will add an Image component after the List code:
    }.searchable( text: $searchText )
        .onSubmit( of: .search )
        {
            print( searchText )
        }
    Image( "FireDEV Banner" )

    This will result in the following:

Figure 7.9 – Banner added

Figure 7.9 – Banner added

  1. If you try and resize the window, there are restrictions. We need to make the banner resizable and maintain its original aspect ratio. Update the image code as follows:
    Image( "FireDEV Banner" )
        .resizable( )
        .padding( .horizontal )
        .scaledToFit( )

    We made the image resizable, which allows it to change size based on the size of the window. This is very useful as the user will run the App Store on different screen sizes and may not always have it fullscreen. We then added horizontal padding to make sure it doesn’t touch the left or right edges. This can be omitted if you like, or you can specify a set amount of padding. Finally, we set it to scaledToFit, which maintains the original aspect ratio. Distortion is never a good idea. All of this results in the following:

Figure 7.10 – Banner updated

Figure 7.10 – Banner updated

  1. As of now, the banner is always in the center. We want it at the top of the view. To achieve this result, we will enclose the image code we added previously within a ScrollView with an alignment of topLeading. Update the code like so:
    ScrollView
    {
        Color.clear
        Image( "FireDEV Banner" )
            .resizable( )
            .padding( .horizontal )
            .scaledToFit( )
    }

    We also add a Color.clear instruction to make sure there is no background color, all of which results in the following awesome banner:

Figure 7.11 – Banner positioned at the top

Figure 7.11 – Banner positioned at the top

The highlight banner has been finished, which can be converted into a carousel. Moving forward, the app groups will be coded to showcase a list of application icons.

lock icon The rest of the chapter is locked
Register for a free Packt account to unlock a world of extra content!
A free Packt account unlocks extra newsletters, articles, discounted offers, and much more. Start advancing your knowledge today.
Unlock this book and the full library FREE for 7 days
Get unlimited access to 7000+ expert-authored eBooks and videos courses covering every tech area you can think of
Renews at $19.99/month. Cancel anytime