Search icon CANCEL
Subscription
0
Cart icon
Your Cart (0 item)
Close icon
You have no products in your basket yet
Save more on your purchases! discount-offer-chevron-icon
Savings automatically calculated. No voucher code required.
Arrow left icon
Explore Products
Best Sellers
New Releases
Books
Videos
Audiobooks
Learning Hub
Free Learning
Arrow right icon
Arrow up icon
GO TO TOP
Unreal Engine 4 Virtual Reality Projects

You're reading from   Unreal Engine 4 Virtual Reality Projects Build immersive, real-world VR applications using UE4, C++, and Unreal Blueprints

Arrow left icon
Product type Paperback
Published in Apr 2019
Publisher Packt
ISBN-13 9781789132878
Length 632 pages
Edition 1st Edition
Languages
Tools
Arrow right icon
Authors (2):
Arrow left icon
Robert Ruud Robert Ruud
Author Profile Icon Robert Ruud
Robert Ruud
Kevin Mack Kevin Mack
Author Profile Icon Kevin Mack
Kevin Mack
Arrow right icon
View More author details
Toc

Table of Contents (20) Chapters Close

Title Page
About Packt
Contributors
Preface
1. Thinking in VR FREE CHAPTER 2. Setting Up Your Development Environment 3. Hello World - Your First VR Project 4. Getting Around the Virtual World 5. Interacting with the Virtual World - Part I 6. Interacting with the Virtual World - Part II 7. Creating User Interfaces in VR 8. Building the World and Optimizing for VR 9. Displaying Media in VR 10. Creating a Multiplayer Experience in VR 11. Taking VR Further - Extending Unreal Engine 12. Where to Go from Here 1. Useful Mind Hacks 2. Research and Further Reading 3. Other Books You May Enjoy Index

Adding an interactive UI


Now it's time to give ourselves a way to change our companion pawn's state. To do this, we're going to add a widget component to our player pawn, along with a widget interaction component we can use to interact with it:

  1. In the Content Browser, find the location of BP_VRPawn—our player pawn.
  2. In the same directory, create a UI | Widget Blueprint, and name it WBP_CompanionController.
  3. Save it and open it.
  4. In its Designer window, change Fill Screen to Custom as we did with our previous widget.
  5. Set its size to Width=300, Height=300.
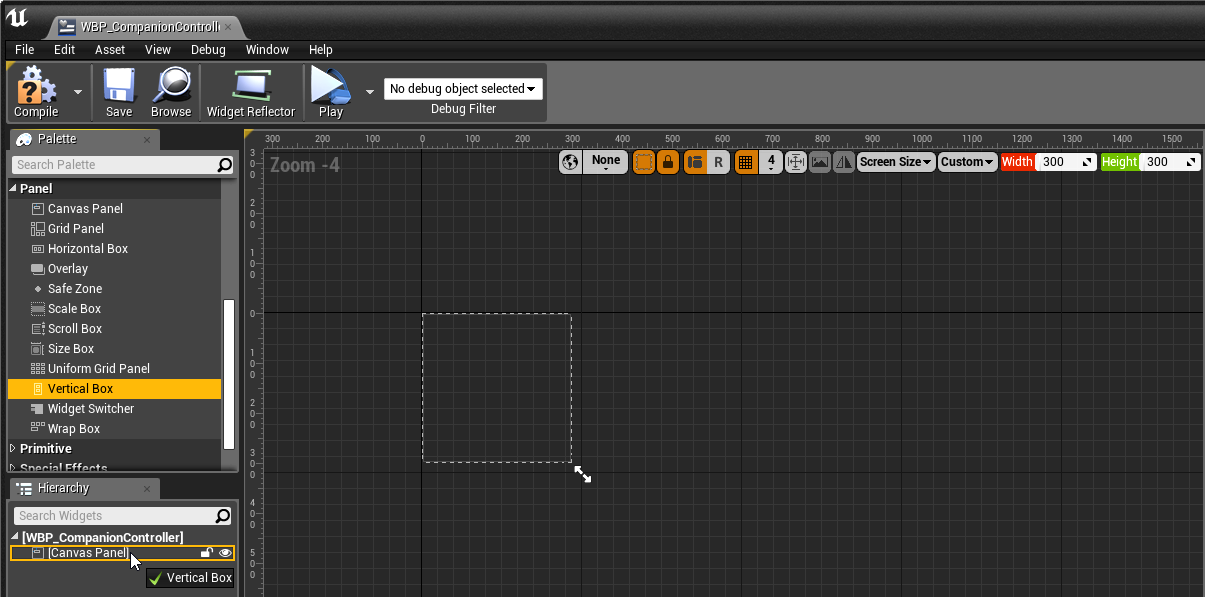
  6. From the Palette, select Panel | Vertical Box, and drag it onto your Hierarchy as a child of the Canvas Panel:
  1. Set its Anchors to fill the entire panel by selecting the lower-rightmost option (in addition to managing placement rules, anchors can also manage stretching rules):
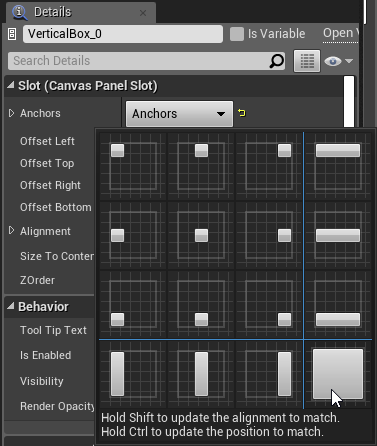
  1. Set its Offset Left, Offset Top, Offset Right, and Offset Bottom to 0.0.
  2. From the Palette, select Common | Button, and drag it onto the Vertical Box. Name it btn_Follow.
  3. Drag another...
lock icon The rest of the chapter is locked
Register for a free Packt account to unlock a world of extra content!
A free Packt account unlocks extra newsletters, articles, discounted offers, and much more. Start advancing your knowledge today.
Unlock this book and the full library FREE for 7 days
Get unlimited access to 7000+ expert-authored eBooks and videos courses covering every tech area you can think of
Renews at $19.99/month. Cancel anytime
Banner background image