To create a button-navigable multi-scene game, follow these steps:
- Create a new Unity 2D project.
- Save the current (empty) scene in a new folder called _Scenes, naming the scene page1.
- Add a UI Text object positioned at the top center of the scene containing large white text that says Main Menu (page 1).
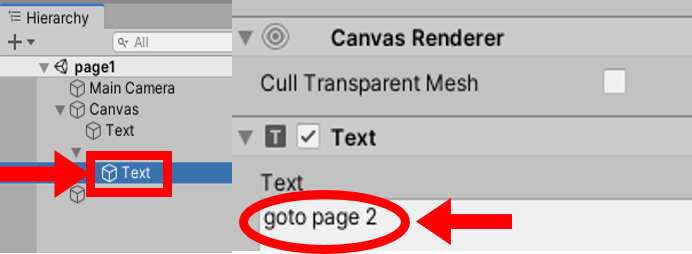
- Add a UI Button to the scene positioned in the middle-center of the screen. In the Hierarchy window, click on the show children triangle to display the Text child of this GameObject button. Select the Text GameObject and, in the Inspector window for the Text property of the Text (Script) component, enter the text goto page 2:

Figure 2.4 – UI Button Text child
- Create a second scene, named page2, with UI Text = Instructions (page 2) and a UI Button with the goto page 1 text. You can either repeat the preceding steps or you can duplicate the page1 scene file, naming the duplicate page2, and then edit the UI Text and UI Button Text appropriately.
- Add both scenes to the build, which is the set of scenes that will end up in the actual application built by Unity. To add scene1 to the build, open the page1 scene and go to File | Build Settings.... Then, click on the Add Open Scenes button so that the page1 scene becomes the first scene in the list of Scenes in the build. Now open page2 and repeat this process so that both scenes have been added to the build.
We cannot tell Unity to load a scene that has not been added to the list of scenes in the build. This makes sense since when an application is built, we should never try to open a scene that isn't included as part of that application.
- Ensure you have the page1 scene open.
- Create a C# script class called SceneLoader, in a new folder called _Scripts that contains the following code. Then, add an instance of the SceneLoader as a scripted component to Main Camera:
using UnityEngine;
using UnityEngine.SceneManagement;

public class SceneLoader : MonoBehaviour {
    public void LoadOnClick(int sceneIndex) {
        SceneManager.LoadScene(sceneIndex);
    }
}
- Select Button in the Hierarchy window and click on the plus (+) button at the bottom of the Button (Script) component, in the Inspector window, to create a new OnClick event handler for this button (that is, an action to perform when the button is clicked).
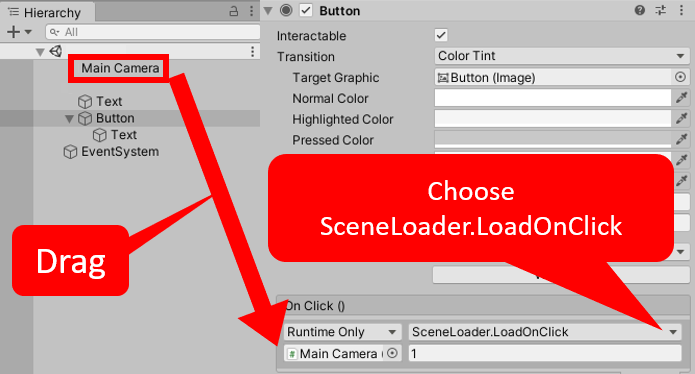
- Drag Main Camera from the Hierarchy window over the Object slot immediately below the menu that says Runtime Only. This means that when the button receives an OnClick event, we can call a public method from a scripted object inside Main Camera.
- Select the LoadOnClick method from the SceneLoader drop-down list (initially showing No Function). Type 1 (the index of the scene we want to be loaded when this button is clicked) in the text box, below the method's drop-down menu. This integer, 1, will be passed to the method when the button receives an OnClick event message, as shown here:

Figure 2.5 – Button (Script) settings
- Save the current scene (page1).
- Open page2 and follow the same steps to make the page2 button load page1. That is, add an instance of the SceneLoader script class to Main Camera and then add an OnClick event action to the button that calls LoadOnClick and passes an integer of 0 so that page1 is loaded.
- Save page2.
- When you run the page1 scene, you will be presented with your Main Menu text and a button that, when clicked, makes the game load the page2 scene. On page2, you'll have a button to take you back to page1.


