Search icon CANCEL
Subscription
0
Cart icon
Your Cart (0 item)
Close icon
You have no products in your basket yet
Arrow left icon
Explore Products
Best Sellers
New Releases
Books
Videos
Audiobooks
Learning Hub
Conferences
Free Learning
Arrow right icon
Arrow up icon
GO TO TOP
Serverless Web Applications with React and Firebase

You're reading from   Serverless Web Applications with React and Firebase Develop real-time applications for web and mobile platforms

Arrow left icon
Product type Paperback
Published in Apr 2018
Publisher Packt
ISBN-13 9781788477413
Length 284 pages
Edition 1st Edition
Languages
Arrow right icon
Authors (2):
Arrow left icon
Harmeet Singh Harmeet Singh
Author Profile Icon Harmeet Singh
Harmeet Singh
Mayur Tanna Mayur Tanna
Author Profile Icon Mayur Tanna
Mayur Tanna
Arrow right icon
View More author details
Toc

Setting up Firebase Admin SDK

For using Firebase Admin SDK, we'll need a Firebase project where we have service account to communicate with the Firebase services and a configuration file that includes the service account's credentials.

To configure the Firebase Admin SDK, follow these steps:

  1. Log in to Firebase Console, select the <project_name> project, and click on the setting icon in Project Overview:
Overview tab
  1. Go to the Service Accounts tab inside Project Settings.
  2. Click on the GENERATE PRIVATE KEY button at the bottom of Firebase admin section; it will generate the JSON file that contains the service account credentials:
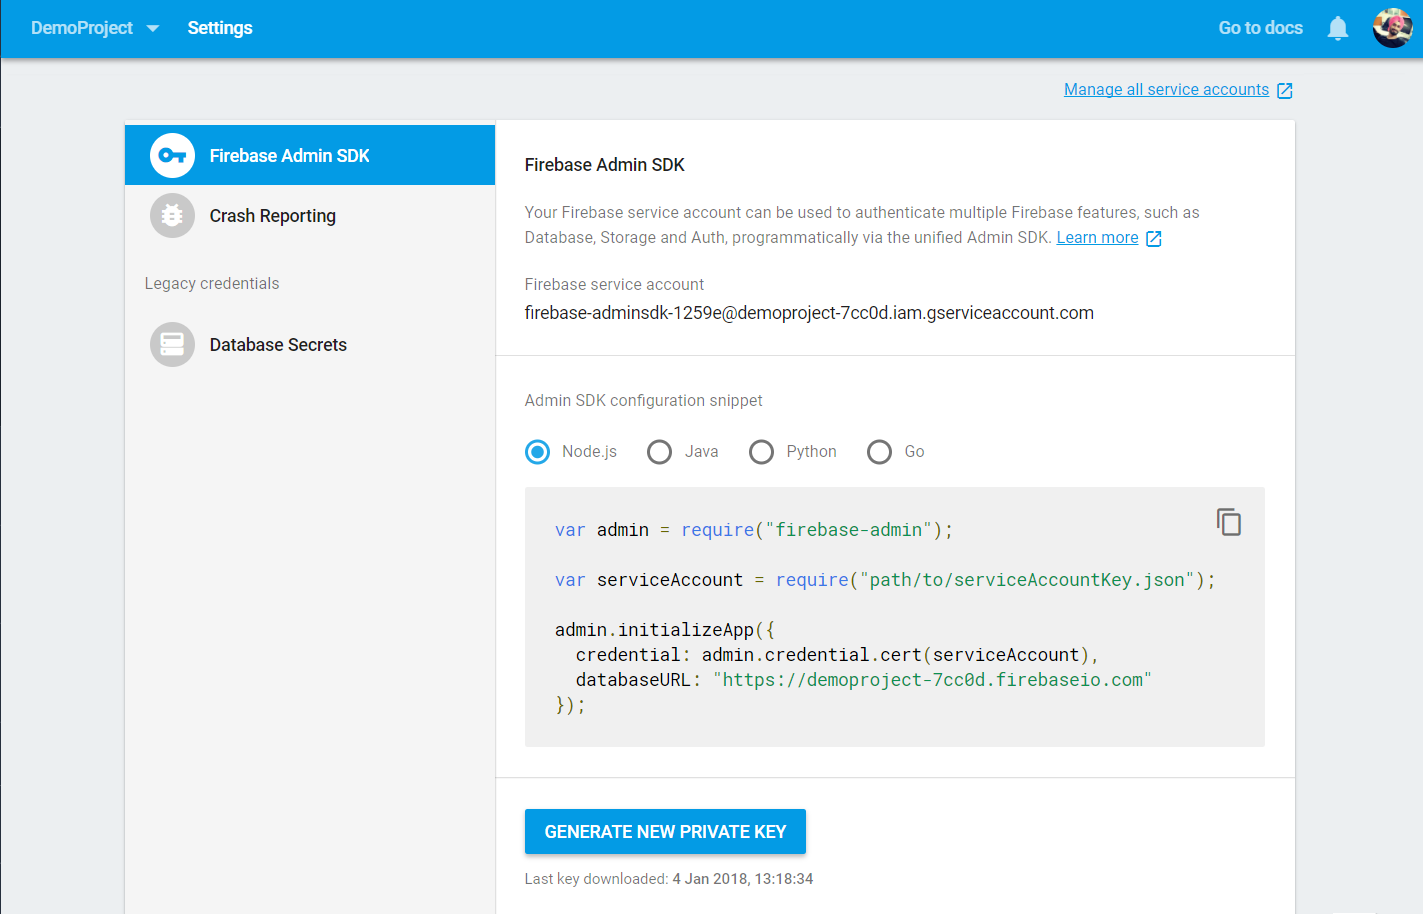
This JSON file contains very sensitive information about your service account and private encryption key. So never share and store it in a public repository; keep it confidential. If we lose this file because of any reason then, we can generate it again, and we'll no longer access Firebase Admin SDK with the old file.

Firebase CLI

Firebase provides a command-line interface, which provides a variety of tools to create, manage, view, and deploy Firebase projects. Using Firebase CLI, we can easily deploy and host our application on production grade static hosting, and it is automatically served by HTTPS and backed by global CDN in one single command.

Installation

Before the installation, ensure that we have installed Node.js 4.0+ on our machine. If not installed, then download the latest version of Node.js 8 "LTS" from https://nodejs.org Once we're done with the installation, we can download the Firebase CLI from npm (node package manager).

Run this command to install Firebase CLI globally on your system:

npm install -g firebase-tools

To verify the installation, run the following command; it prints the Firebase CLI version if it's installed properly on your system:

firebase --version

Firebase Admin Integration

Now that we've successfully installed Firebase CLI, let's copy the existing application code from Chapter 3, Authentication with Firebase, to the new directory in Chapter 5, User Profile and Access Management. Here, we'll initialize the Firebase app and run the following command to log in to the Firebase console before initializing the app:

firebase login

Once you are successfully logged in to the Firebase console, run the following command to initialize the project:

firebase init

Once we run this command, it will prompt you to select the Firebase feature, project, and directory folder (relative to your project directory) that will contain hosting assets to be uploaded with the firebase deploy command (by default, it is public).

We can also add features later on in our project, and it's also possible to associate multiple projects with the same directory.

Once Firebase initialization is complete, run the following command to install the project dependencies and then build the project:

//run this command to install the project dependencies
npm install

//run this command to build the project
npm run build

To run our application locally to verify before deploying to the production, run the following command:

firebase serve

It will start the server locally from build directory or whatever the name you have defined in the firebase.json file:

This is what our folder structure looks like after firebase initialization using the firebase CLI.

Using the Firebase Admin Auth API with React

The Firebase Admin SDK will give us the power to integrate your own server using the Firebase Auth API. With Firebase Admin SDK, we can manage our application users such as View, Create, Update, and Delete without requiring a user's credentials or manage authentication tokens without going to Firebase Admin Console.

To implement this, we will create Admin Panel in our existing React application.

Here's the list of features we'll integrate into our Admin Panel using Firebase Admin SDK:

  • Create and verify the custom token
  • User Level Access Roles with Custom user claims
  • View list of app users
  • Fetch user profile
  • Create, Delete, and Update the user information
  • Resolve the Ticket status

Initializing the Admin SDK

As we saw, Firebase admin SDK is only supported in Node.Js, so we'll create a new project with npm init and install the firebase admin from the npm package.

Run the following command to install firebase admin and save it in your package.json:

npm install firebase-admin --save

Copy the following snippet in your JS file and initialize the SDK; we have added the reference to the JSON file that we downloaded from the Firebase Admin Service account:

const admin = require('firebase-admin');
const serviceAccount = require('./firebase/serviceAccountKey.json');

admin.initializeApp({
credential: admin.credential.cert(serviceAccount),
databaseURL: "https://demoproject-7cc0d.firebaseio.com"
});

Now we'll just create Restful API to interact with client App to access Admin SDK features.

Run this command to start the node admin server:

node <fileName>

It will start the local server on a different port, such as http://localhost:3001.

Creating and verifying custom token

The Firebase Admin SDK provides us an ability to authenticate the user with an external mechanism such as LDAP server, or third-party OAuth provider, which Firebase doesn't support, such as Instagram or LinkedIn. We can do all these things with Firebase custom tokens method, which is built-in Admin SDK, or we can use any third-party JWT libraries.

Let's see how we can create and validate token with Admin SDK.

For creating a custom token, we must have a valid uid, which we need to pass in the createCustomToken() method:

function createCustomToken(req,res){
const userId = req.body.uid "guest_user"
admin.auth().createCustomToken(userId)
.then(function(customToken) {
res.send(customToken.toJSON());
})
.catch(function(error) {
console.log("Error creating custom token:", error);
});
}

In the preceding function, we have uid from client side when the user signs in with username and password, and if the credentials are valid, we'll return custom JWT (JSON Web Token) from the server that can be used by a client device to authenticate with Firebase:

app.get('/login', function (req, res) {
if(validCredentials(req.body.username,req.body.password)){
createCustomToken(req,res);
}
})

Once it's authenticated, this identity will be used for accessing Firebase services like Firebase Realtime Database and Cloud Storage. 

If need be, we can also add some additional fields to be included in the custom token. Consider this code:

function createCustomToken(req,res){
const userId = req.body.uid
const subscription = {
paid:true
}
admin.auth().createCustomToken(userId)
.then(function(customToken) {
res.send(customToken.toJSON());
})
.catch(function(error) {
console.log("Error creating custom token:", error);
});
}

These additional fields will be available in the auth/request.auth object in security rules.

Once the token is generated and received by the react method, we'll authenticate the user to the app by passing the custom token to the Firebase signInWithCustomToken() method:

const uid = this.state.userId
fetch('http://localhost:3000/login', {
method: 'POST', // or 'PUT'
body: JSON.stringify({idToken:idToken}),
headers: new Headers({
'Content-Type': 'application/json'
})
}).then(res => res.json())
.catch(error => console.error('Error:', error))
.then(res => {
console.log(res,"after token valid");
firebase.auth().signInWithCustomToken(res.customToken).catch(function(error) {
var errorCode = error.code;
var errorMessage = error.message;
});
})

After the successful authentication, the user signed in to our application with account specified by the uid, which we included in creating the custom token method.

In the same way, the other Firebase authentication methods works like signInWithEmailAndPassword() and signInWithCredential(), and the auth/request.auth object will be available in Firebase Realtime database security rules with the user uid. In the preceding example, we specified why to generate the custom token.

//Firebase Realtime Database Rules
{
"rules": {
"admin": {
".read": "auth.uid === 'guest_user'"
}
}
} //Google Cloud Storage Rules
service firebase.storage {
match /b/<firebase-storage-bucket-name>/o {
match /admin/{filename} {
allow read, write: if request.auth.uid == "guest_user";
}
}
}

In the same way, we can also access the additional passed objects, which are available in auth.token and request.auth.token:

//Firebase Realtime Database Rules
{
"rules": {
"subscribeServices": {
".read": "auth.token.paid === true"
}
}
} service firebase.storage {
match /b/<firebase-storage-bucket-name>/o {
match /subscribeServices/{filename} {
allow read, write: if request.auth.token.paid === true;
}
}
}

Firebase can also provide us the way to get the uid once the user logged into the app; it creates a corresponding ID token that uniquely identifies them, and we can send this token to the server for verifying and give them access to several resources of the application. For example, when we create a custom backend server to communicate with an app, we might need to identify the currently signed-in user on that server securely using HTTPS.

To retrieve the ID token from Firebase, ensure that the user has signed in to the application, and we can use the following method to retrieve the ID token in your react application:

firebase.auth().currentUser.getIdToken(/* forceRefresh */ true).then(function(idToken) {
// Send this token to custom backend server via HTTPS
}).catch(function(error) {
// Handle error
});

Once we have this ID token, we can send this JWT (JSON Web Token) to backend server Firebase Admin SDK or any third-party library to validate it.

For validating and decoding the ID token, Firebase Admin SDK has a built-in verifyIdToken(idToken) method; if the provided token is not expired, valid, and properly signed, this method returns the decoded ID token:

function validateToken(req,res){
const idToken= req.body.idToken;
admin.auth().verifyIdToken(idToken)
.then(function(decodedToken) {
var uid = decodedToken.uid;
//...
}).catch(function(error) {
// Handle error
});
}

Now, let's extend our existing application where the user can see only those tickets that they have submitted, and we'll also give the ability to the user to update the existing profile. We'll also create an admin panel in React and, based on the role, we show the admin UI to the user.

Custom claims for admin access and security rules

As we saw earlier, Firebase Admin SDK supports defining custom attributes with the token. These custom attributes give the ability to define different levels of access, including role-based control to the app, which is enforced in an application's security rules.

We need to define the user roles in the following common cases:

  • Giving a user the admin role for accessing the resources
  • Assigning different groups to the user
  • Giving a user multi-level access such as Paid, Regular user, Managers, Support Team, and such

We can also define the rules based on the database where we need give limited access, such as we have database node helpdesk/tickets/all, where all the data tickets' data can be accessed. However, we want only the admin user to be able to see the all the tickets. To achieve this objective more efficiently, verify the email ID and add the custom user claim named admin with the following Realtime Database rule:

{
"rules": {
"helpdesk":{
"tickets":{
"all": {
".read": "auth.token.admin === true",
".write": "auth.token.admin === true",
}
}
}
}
}
Do not confuse Custom claims with Custom Authentication and Firebase Authentication. It applies to users already signed in with supported providers (Email/Password, Github, Google, Facebook, phone, and such), but custom authentication is used when we use different authentication, which is not supported by Firebase. For example, a user signed in with Firebase Auth's Email/Password provider can have access control defined using custom claims.

Adding custom claim with Admin SDK

In the Firebase Admin SDK, we can apply custom claims using the setCustomUserClaims() method, which comes built-in with Firebase:

admin.auth().setCustomUserClaims(uid, {admin: true}).then(() => {
});

Verifying custom claim with Admin SDK sending the app

Firebase Admin SDK also provides us the method to verify the token using the verifyIdToken() method:

 admin.auth().verifyIdToken(idToken).then((claims) => {
if (claims.admin === true) {
// Allow access to admin resource.
}
});

We can also check whether the custom claim is available or not in the user object:

admin.auth().getUser(uid).then((userRecord) => {
console.log(userRecord.customClaims.admin);
});

Now, let's see how we can implement this in our existing application.

First, let's create a restful API in the Node Admin SDK backend server:

app.post('/setCustomClaims', (req, res) => {
// Get the ID token passed by the client app.
const idToken = req.body.idToken;
console.log("accepted",idToken,req.body);
// Verify the ID token
admin.auth().verifyIdToken(idToken).then((claims) => {
// Verify user is eligible for admin access or not
if (typeof claims.email !== 'undefined' &&
claims.email.indexOf('@adminhelpdesk.com') != -1) {
// Add custom claims for admin access.
admin.auth().setCustomUserClaims(claims.sub, {
admin: true,
}).then(function() {
// send back to the app to refresh token and shows the admin UI.
res.send(JSON.stringify({
status: 'success',
role:'admin'
}));
});
} else if (typeof claims.email !== 'undefined'){
// Add custom claims for admin access.
admin.auth().setCustomUserClaims(claims.sub, {
admin: false,
}).then(function() {
// Tell client to refresh token on user.
res.send(JSON.stringify({
status: 'success',
role:'employee'
}));
});
}
else{
// return nothing
res.send(JSON.stringify({status: 'ineligible'}));
}
})
});

I have manually created one admin user with harmeet@adminhelpdesk.com in Firebase Console with help of admin SDK; we need to verify and add the custom claims for admin.

Now, open App.JSX and add the following code snippet; set the initial state of the application based on the role:

 constructor() {
super();
this.state = {
authenticated : false,
data:'',
userUid:'',
role:{
admin:false,
type:''
}
}
}

Now, calling the preceding API in the componentWillMount() component lifecycle method we need to get the idToken from user object from firebase.auth().onAuthStateChanged((user)) and send it to the server for verification:

this.getIdToken(user).then((idToken)=>{
console.log(idToken);
fetch('http://localhost:3000/setCustomClaims', {
method: 'POST', // or 'PUT'
body: JSON.stringify({idToken:idToken}),
headers: new Headers({
'Content-Type': 'application/json'
})
}).then(res => res.json())
.catch(error => console.error('Error:', error))
.then(res => {
console.log(res,"after token valid");
if(res.status === 'success' && res.role === 'admin'){
firebase.auth().currentUser.getIdToken(true);
this.setState({
authenticated:true,
data:user.providerData,
userUid:user.uid,
role:{
admin:true,
type:'admin'
}
})
}
else if (res.status === 'success' && res.role === 'employee'){
this.setState({
authenticated:true,
data:user.providerData,
userUid:user.uid,
role:{
admin:false,
type:'employee'
}
})
}
else{
ToastDanger('Invalid Token !!')
}

In the preceding code, we are using the fetch API to send the HTTP request. It's similar to XMLHttpRequest, but it has the new feature and is more powerful. Based on the response, we are setting the state of the component and registering the component into the router.

This is how our router component looks:

{
this.state.authenticated && !this.state.role.admin
?
(
<React.Fragment>
<Route path="/view-ticket" render={() => (
<ViewTicketTable userId = {this.state.userUid} />
)}/>
<Route path="/add-ticket" render={() => (
<AddTicketForm userId = {this.state.userUid} userInfo = {this.state.data} />
)}/>
<Route path="/user-profile" render={() => (
<ProfileUpdateForm userId = {this.state.userUid} userInfo = {this.state.data} />
)}/>
</React.Fragment>
)
:
(
<React.Fragment>
<Route path="/get-alluser" component = { AppUsers }/>
<Route path="/tickets" component = { GetAllTickets }/>
<Route path="/add-new-user" component = { NewUserForm }/>
</React.Fragment>
)
}

Here's the list of components that we are registering and rendering admin component if the user is an admin:

  • AppUser: To get the list of user for application, which is also responsible for deleting the user and searching the user by different criteria
  • Tickets: To see the list of all tickets and change the status of the ticket
  • NewUserForm: To add the new user to the application

We are performing the preceding operation with Node.js Firebase Admin SDK server.

Create a folder with the name of admin and create a file in it, called getAllUser.jsx. In that, we will create a React component, which is responsible for fetching and displaying the list of the user into UI; we'll also add the functionality of searching the user by different criteria, such as email ID, phone number, and more.

In the getAllUser.jsx file, this is how our render method looks:

<form className="form-inline">
//Search Input
<div className="form-group" style={marginRight}>
<input type="text" id="search" className="form-control"
placeholder="Search user" value={this.state.search} required
/>
</div>
//Search by options
<select className="form-control" style={marginRight}>
<option value="email">Search by Email</option>
<option value="phone">Search by Phone Number</option>
</select>
<button className="btn btn-primary btn-sm">Search</button>
</form>

We have also added the table in the render method to display the list of users:

 <tbody>
{
this.state.users.length > 0 ?
this.state.users.map((list,index) => {
return (
<tr key={list.uid}>
<td>{list.email}</td>
<td>{list.displayName}</td>
<td>{list.metadata.lastSignInTime}</td>
<td>{list.metadata.creationTime}</td>
<td>
<button className="btn btn-sm btn-primary" type="button" style={marginRight} onClick={()=> {this.deleteUser(list.uid)}}>Delete User</button>
<button className="btn btn-sm btn-primary" type="button" onClick={()=> {this.viewProfile(list.uid)}}>View Profile</button>
</td>
</tr>
)
}) :
<tr>
<td colSpan="5" className="text-center">No users found.</td>
</tr>
}
</tbody>

This is the table body, which is displaying the list of users with action buttons, and now we need to call the users API in the componentDidMount() method:

fetch('http://localhost:3000/users', {
method: 'GET', // or 'PUT'
headers: new Headers({
'Content-Type': 'application/json'
})
}).then(res => res.json())
.catch(error => console.error('Error:', error))
.then(response => {
console.log(response,"after token valid");
this.setState({
users:response
})
console.log(this.state.users,'All Users');
})

Similarly, we need to call other APIs to delete, View User Profile, and search:

deleteUser(uid){
fetch('http://localhost:3000/deleteUser', {
method: 'POST', // or 'PUT'
body:JSON.stringify({uid:uid}),
headers: new Headers({
'Content-Type': 'application/json'
})
}).then(res => res.json())
.catch(error => console.error('Error:', error))
}
//Fetch User Profile
viewProfile(uid){
fetch('http://localhost:3000/getUserProfile', {
method: 'POST', // or 'PUT'
body:JSON.stringify({uid:uid}),
headers: new Headers({
'Content-Type': 'application/json'
})
}).then(res => res.json())
.catch(error => console.error('Error:', error))
.then(response => {
console.log(response.data,"User Profile");
})
}

For searching, Firebase Admin SDK has built-in methods: getUserByEmail() and getUserByPhoneNumber(). We can implement these in the same way as delete() and fetch(), which we created in the Firebase Admin API:

//Search User by Email
searchByEmail(emailId){
fetch('http://localhost:3000/searchByEmail', {
method: 'POST', // or 'PUT'
body:JSON.stringify({email:emailId}),
headers: new Headers({
'Content-Type': 'application/json'
})
}).then(res => res.json())
.catch(error => console.error('Error:', error))
.then(response => {
console.log(response.data,"User Profile");
this.setState({
users:response
})
})
}

Look at the following node.js API Code Snippet:

function listAllUsers(req,res) {
var nextPageToken;
// List batch of users, 1000 at a time.
admin.auth().listUsers(1000,nextPageToken)
.then(function(data) {
data = data.users.map((el) => {
return el.toJSON();
})
res.send(data);
})
.catch(function(error) {
console.log("Error fetching the users from firebase:", error);
});
}
function deleteUser(req, res){
const userId = req.body.uid;
admin.auth().deleteUser(userId)
.then(function() {
console.log("Successfully deleted user"+userId);
res.send({status:"success", msg:"Successfully deleted user"})
})
.catch(function(error) {
console.log("Error deleting user:", error);
res.send({status:"error", msg:"Error deleting user:"})
});
}
function searchByEmail(req, res){
const searchType = req.body.email;
admin.auth().getUserByEmail(userId)
.then(function(userInfo) {
console.log("Successfully fetched user information associated with this email"+userId);
res.send({status:"success", data:userInfo})
})
.catch(function(error) {
console.log("Error fetching user info:", error);
res.send({status:"error", msg:"Error fetching user informaition"})
});
}

Now, we'll create an API to call the preceding functions based on the user's request:

app.get('/users', function (req, res) {
listAllUsers(req,res);
})
app.get('/deleteUser', function (req, res) {
deleteUser(req,res);
})
app.post('/searchByEmail', function (req, res){
searchByEmail(req, res)
})

Now, let's take a quick look at our application in browser, see how it looks, and try to log in with admin user:

A screenshot of our application when logged in with admin credentials; the purpose is to show the UI and console when we log in as admin

That looks amazing! Just take a look at the preceding screenshot; it's showing different navigation for admin, and if you can see in the console, it's showing the token with custom claim object, which we added to this user to admin access:

It looks great! We can see the users of the application with action button and search UI.

Now, consider that we delete the user from the listing and, at the same time that user session is active and using the application. In this scenario, we need to manage the session for the user and give the prompt to reauthenticate, because every time the user logs in, the user credentials are sent to the Firebase Authentication backend and exchanged for a Firebase ID token (a JWT) and refresh token.

These are the common scenarios where we need to manage the session of the user:

  • User is deleted
  • User is disabled
  • Email address and password changed

The Firebase Admin SDK also gives the ability to revoke the specific user session using the revokeRefreshToken() method. It revokes active refresh tokens of a given user. If we reset the password, Firebase Authentication backend automatically revokes the user token.

Refer to the following code snippet of Firebase Cloud Function to revoke the user based on a specific uid:

const admin = require('firebase-admin');
admin.initializeApp(functions.config().firebase);
// Revoke all refresh tokens for a specified user for whatever reason.
function revokeUserTokens(uid){
return admin.auth().revokeRefreshTokens(uid)
.then(() => {
// Get user's tokensValidAfterTime.
return admin.auth().getUser(uid);
})
.then((userRecord) => {
// Convert to seconds as the auth_time in the token claims is in seconds too.
const utcRevocationTimeSecs = new Date(userRecord.tokensValidAfterTime).getTime() / 1000;
// Save the refresh token revocation timestamp. This is needed to track ID token
// revocation via Firebase rules.
const metadataRef = admin.database().ref("metadata/" + userRecord.uid);
return metadataRef.set({revokeTime: utcRevocationTimeSecs});
});
}

As we know, Firebase ID tokens are stateless JWT, which can only be verified by sending the request to Firebase Authentication backend server to check whether the token's status is revoked or not. For this reason, performing this check on your server is very costly and adds the extra effort, requiring an extra network request load. We can avoid this network request by setting up Firebase Rules that check for revocation, rather than sending the request to the Firebase Admin SDK.

This is the normal way to declare the rules with no client access to write to store revocation time per user:

{
"rules": {
"metadata": {
"$user_id": {
".read": "$user_id === auth.uid",
".write": "false",
}
}
}
}

However, if we want to allow only unrevoked and authenticated users to access the protected data, we must have the following rule configured:

{
"rules": {
"users": {
"$user_id": {
".read": "$user_id === auth.uid && auth.token.auth_time > (root.child('metadata').child(auth.uid).child('revokeTime').val() || 0)",
".write": "$user_id === auth.uid && auth.token.auth_time > (root.child('metadata').child(auth.uid).child('revokeTime').val() || 0)"
}
}
}
}

Any time a user's refresh on browser tokens are revoked, the tokensValidAfterTime UTC timestamp is saved in the database node.
When a user's ID token is to be verified, the additional check boolean flag has to be passed to the verifyIdToken() method. If the user's token is revoked, the user should be signed out from the app or asked to reauthenticate using reauthentication APIs provided by the Firebase Authentication client SDKs.

For example, we created one method above setCustomClaims in that method; just add the following code inside the catch method:

 .catch(error => {
// Invalid token or token was revoked:
if (error.code == 'auth/id-token-revoked') {
//Shows the alert to user to reauthenticate
// Firebase Authentication API gives the API to reauthenticateWithCredential /reauthenticateWithPopup /reauthenticateWithRedirect
}
});

Also, if the token is revoked, send the notification to the client app to reauthenticate.

Consider this example for email/password Firebase authentication providers:

let password = prompt('Please provide your password for reauthentication');
let credential = firebase.auth.EmailAuthProvider.credential(
firebase.auth().currentUser.email, password);
firebase.auth().currentUser.reauthenticateWithCredential(credential)
.then(result => {
// User successfully reauthenticated.
})
.catch(error => {
// An error occurred.
});

Now, let's click on the All Tickets link to see the list of tickets submitted by all the users:

As an admin user, we can change the status of the ticket that will get updated in Firebase Realtime Database. Now if you click on Create New User, it will display the form to add user information.

Let's create one new component and add the following code to the render method:

<form className="form" onSubmit={this.handleSubmitEvent}>
<div className="form-group">
<input type="text" id="name" className="form-control"
placeholder="Enter Employee Name" value={this.state.name} required onChange={this.handleChange} />
</div>
<div className="form-group">
<input type="text" id="email" className="form-control"
placeholder="Employee Email ID" value={this.state.email} required onChange={this.handleChange} />
</div>
<div className="form-group">
<input type="password" id="password" className="form-control"
placeholder="Application Password" value={this.state.password} required onChange={this.handleChange} />
</div>
<div className="form-group">
<input type="text" id="phoneNumber" className="form-control"
placeholder="Employee Phone Number" value={this.state.phoneNumber} required onChange={this.handleChange} />
</div>
<div className="form-group">
<input
type="file"
ref={input => {
this.fileInput = input;
}}
/>
</div>
<button className="btn btn-primary btn-sm">Submit</button>
</form>

On handleSubmitEvent(e), we need to call the createNewUser() Firebase admin SDK method, passing the form data into it:

e.preventDefault();
//React form data object
var data = {
email:this.state.email,
emailVerified: false,
password:this.state.password,
displayName:this.state.name,
phoneNumber:this.state.phoneNumber,
profilePhoto:this.fileInput.files[0],
disabled: false
}
fetch('http://localhost:3000/createNewUser', {
method: 'POST', // or 'PUT'
body:JSON.stringify({data:data}),
headers: new Headers({
'Content-Type': 'application/json'
})
}).then(res => res.json())
.catch(error => {
ToastDanger(error)
})
.then(response => {
ToastSuccess(response.msg)
});

Start the server again and open the application in your browser. Let's try to create the new user in our application with admin credentials:

Create New User component; the purpose of the image is to show the alert message when we fill the form and submit to the Firebase to create a new user

That looks awesome; we have successfully created the new user in our application and returned the automatic generated uid by Firebase for a new user.

Now, let's move on further and log in with a normal user:

If you take a look at the preceding screenshot, once we logged into the app using any Firebase Auth provider, on the dashboard, it shows all the tickets of the users, but it should only display the ones associated with this email ID. For this, we need to change the data structure and Firebase node ref.

This is the most important part of the application where we need to plan how data will be saved and retrieved to make the process as easy as possible.

How data is structured in a JSON tree

In Firebase Realtime Database, all data is stored as JSON objects, which is a cloud-hosted JSON tree. When we add data to the database, it becomes a node in the existing JSON structure with an associated key, which is autogenerated by Firebase. We can also provide our own custom keys, such as user IDs or any semantic names, or they can be provided using the push() method.

For example, in our Helpdesk Application, we are storing the tickets at a path, such as /helpdesk/tickets; now we'll replace this with /helpdesk/tickets/$uid/$ticketKey. Take a look at the following code:

var newTicketKey = firebase.database().ref('/helpdesk').child('tickets').push().key;
// Write the new ticket data simultaneously in the tickets list and the user's ticket list.
var updates = {};
updates['/helpdesk/tickets/' + userId + '/' + newTicketKey] = data;
updates['/helpdesk/tickets/all/'+ newTicketKey] = data;

This is how data structure looks for creating and retrieving the tickets from the database:

In the preceding image, the highlighted node is $uid, which belongs to the user who has submitted the ticket.

This is how our full code looks:

var newTicketKey = firebase.database().ref('/helpdesk').child('tickets').push().key;
// Write the new ticket data simultaneously in the tickets list and the user's ticket list.
var updates = {};
updates['/helpdesk/tickets/' + userId + '/' + newTicketKey] = data;
updates['/helpdesk/tickets/all/'+ newTicketKey] = data;

return firebase.database().ref().update(updates).then(()=>{
ToastSuccess("Saved Successfully!!");
this.setState({
issueType:"",
department:"",
comment:""
});
}).catch((error)=>{
ToastDanger(error.message);
});

Open the browser and submit the ticket again; now look at the ticket dashboard:

It looks great! Now the user can only see the tickets they have submitted. In the next chapter, we'll see how we can apply security rules and common security threats in our data in the database.

lock icon The rest of the chapter is locked
Register for a free Packt account to unlock a world of extra content!
A free Packt account unlocks extra newsletters, articles, discounted offers, and much more. Start advancing your knowledge today.
Unlock this book and the full library FREE for 7 days
Get unlimited access to 7000+ expert-authored eBooks and videos courses covering every tech area you can think of
Renews at $19.99/month. Cancel anytime
Banner background image