Introducing OpenGL
We have spent a lot of time so far talking about game loops and Visual Studio. We are finally going to discuss the main topic of this book: OpenGL!
What is OpenGL?
OpenGL makes it possible to render sophisticated 2D and 3D graphics on your computer screen. In fact, OpenGL is also the technology behind most mobile devices and tablet devices.
OpenGL works in conjunction with your device's graphics device to draw graphics on the screen. Most modern computing devices have two processors: the Central Processing Unit (CPU) and the Graphics Processing Unit (GPU).
Drawing modern 2D and 3D graphics is a very processor intensive task. In order to free the computer's main processor (the CPU) to do its job, the GPU takes on the task of rendering to the screen. OpenGL is a language that tells the GPU what to do and how to do it.
Tip
Technically, OpenGL is an API, or application programming interface. Another way to understand this is that OpenGL is a library of code that you can access once you have included the proper headers in your code. There are different versions of OpenGL. This book uses OpenGL 1.1. Although this is the very first version of OpenGL, it is included in all versions of Windows and provides the building blocks for all future versions.
The other GL
By the way, you have probably heard of the "other" graphics engine—Microsoft's DirectX. Similar to OpenGL, DirectX allows programmers to talk to the GPU. A lot of people want to know the differences between OpenGL and DirectX, and which is the best choice.
Although there are certainly going to be fans and defenders of both technologies, the only real difference between DirectX and OpenGL is the specific way that you code them. Both technologies are about the same when it comes to features and abilities.
There is one advantage that OpenGL has over DirectX. DirectX only works on Microsoft technologies, while OpenGL works on Microsoft technologies and many others, including most modern cell phones, and the Apple Mac line of computers.
Downloading OpenGL
I remember when I was first learning OpenGL. I searched in vain, looking for the link to download the OpenGL SDK. It turns out that you don't have to download the OpenGL SDK because it is already installed when you install Visual Studio.
You do want to make sure that you have the latest OpenGL driver for your video card. To do that, go to http://www.opengl.org/wiki/Getting_started#Downloading_OpenGL and follow the appropriate link.
Adding OpenGL to the project
In order to use OpenGL in our program, we will need to add some code. Open the RoboRacer2D project that we have been working on, and let's do this!
Linking to the OpenGL library
Everything that you need to use OpenGL is found in the OpenGL32.dll lib file. It's up to you to tell Visual Studio that you want to use the OpenGL library in your project.
Right-click on Project | RoboRacer2D properties.
Tip
By the way, Visual Studio first creates a solution, and then puts a project in the solution. The solution is the top entry in the Solution Explorer hierarchy, and the project is the first child. In this case, make sure you right-click on the project, not the solution.

- For the Configuration drop-down box, make sure you select All Configurations.
- Open the Configuration Properties branch, then the Linker branch.
- Select the Input option.
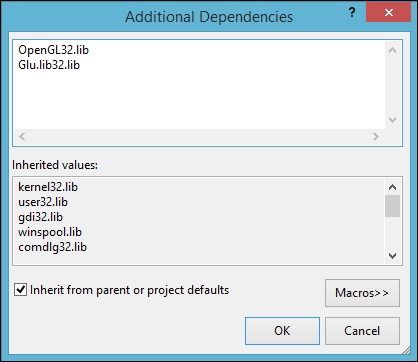
- Click the dropdown for Additional Dependencies and choose <Edit…>.
- Enter
OpenGL32.libinto the dialog window and click OK.
- Close the Property Pages window.
Even if you are writing a 64 bit application, you will use the OpenGL 32 bit library.
Next, we need to tell Visual Studio that you want to include the OpenGL headers in your program. If you take a look at the top of your code, you will see several headers already being loaded:
#include "stdafx.h"
#include "RoboRacer2D.h"
Just below these lines, add the following:
#include <Windows.h>
#include <gl\GL.h>
#include <gl\GLU.h>
Tip
GL.h is the main header for the OpenGL library. GLU.h stands for GL Utility and is an additional library of features that make OpenGL a little easier to use. These headers correspond to the OpenGL32.lib and Glu32.lib libraries that we added to the project.
Congratulations! You have set up the development environment to use OpenGL and you are now ready to program your first game.


