Managing Queries and Data Sources
There are two primary components of queries in Power BI: the data source and the query logic executed against this source. The data source includes the connection method (DirectQuery or Import), a privacy setting, and the authentication credentials. The query logic consists of the M expressions represented as queries in the Query Editor and stored internally as M documents.
In a typical corporate BI tool, such as SQL Server Reporting Services (SSRS), the properties of a data source such as the server and database name are defined separately from the queries that reference them. In Power BI Desktop, however, by default, each individual query created explicitly references a given data source (for example, server A and database B). This creates an onerous, manual process of revising each query if it becomes necessary to change the source environment or database.
This issue is addressed in the following steps by using dedicated M queries to centralize and isolate the data source information from the individual queries. Additionally, detail and reference information is provided on managing source credentials and data source privacy levels.
Getting ready
To prepare for this recipe, we will create a query from a database, which will serve as the source for other queries via the standard Get Data and Power Query Editor experience described in the previous recipe. To create this query, perform the following steps:
- Open Power BI Desktop.
- If you have already connected to your SQL Server, you can find the connection under Recent sources on the Home tab. Otherwise, on the Home tab, select Get Data from the ribbon, and choose SQL Server.
- Select a table or view, and click on Transform Data to import the data.
- The Power Query Editor window will launch and a preview of the data will appear. In this example, we have chosen the
DimEmployeetable from the AdventureWorksDW2019 database on our local SQL Server instance MSSQLSERVERDEV. The full code of the query can be viewed in the Advanced Editor window but is also shown below.let - Copy just the Source line (in bold in the previous step).
- Close the Advanced Editor window by clicking the Cancel button.
- Remain in the Power Query Editor window.
How to Manage Queries and Data Sources
In this example, a separate data source connection query is created and utilized by individual queries. By associating many individual queries with a single (or a few) data source queries, it is easy to change the source system or environment, such as when switching from a Development environment to a User Acceptance Testing (UAT) environment. We will then further separate out our data source queries and our data load queries using query groups. To start isolating our data source queries from our data load queries, follow these steps:
- Create a new, blank query by selecting New Source from the ribbon of the Home tab and then select Blank Query.
- Open the Advanced Editor and replace the Source line with the line copied from the query created in Getting ready. Be certain to remove the comma (,) at the end of the line. The line prior to the
inkeyword should never have a comma at the end of it. Your query should look like the following:let Source = Sql.Database("localhost\MSSQLSERVERDEV", "AdventureWorksDW2019") in Source - Click the Done button to close the Advanced Editor window.
- Rename the query by clicking on the query and editing the Name in the Query Settings pane. Alternatively, in the Queries pane, right-click the query and choose Rename. Give the source query an intuitive name, such as
AdWorksDW. - Now click on the original query created in the Getting ready section above. Open the Advanced Editor. Replace the Source step expression of the query with the name of the new query. As you type the name of the query, AdWorksDW, you will notice that IntelliSense will suggest possible values. The query should now look like the following:
let Source = AdWorksDW, dbo_DimEmployee = Source{[Schema="dbo",Item="DimEmployee"]}[Data] in dbo_DimEmployee - Click the Done button to come out of Advanced Editor. The preview data refreshes but continues to display the same data as before.
We can take this concept of isolating our data source queries from data loading queries further by organizing our queries into query groups. You should also use query groups to help isolate data source and staging queries from queries loaded to the dataset. To see how query groups work, follow these steps:
- Duplicate the revised data loading query that loads the DimEmployee table, created in Getting ready. Simply right-click the query in the Queries pane and choose Duplicate.
- With the new query selected in the Queries pane, click the gear icon next to the Navigation step in the APPLIED STEPS area of the Query Settings pane.
- Choose a different dimension table or view, such as DimAccount, and then click the OK button. Dimension tables and views start with "Dim".
- Rename this new query to reflect the new table or view being loaded.
- Create a new group by right-clicking in a blank area in the Queries window and then selecting New Group…
- In the New Group dialog, name the group Data Sources and click the OK button.
- Create another new group and name this group Dimensions.
- Move the AdWorksDW query to the Data Sources group by either dragging and dropping in the Queries pane or right-clicking the query and choosing Move To Group…, and then select the group.
- Move the other queries to the Dimensions group.
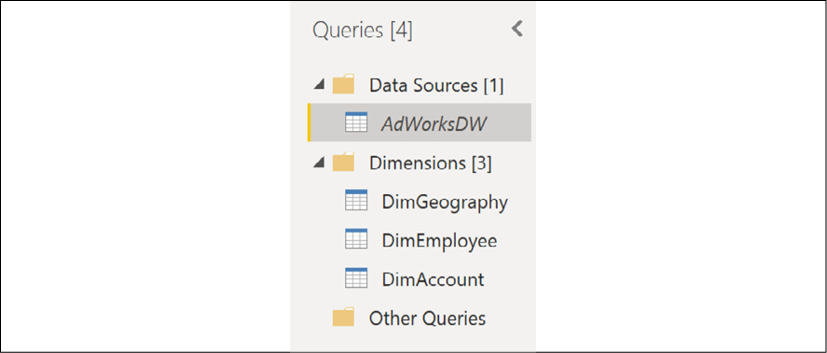
- Finally, ensure that the query in the Data Source group is not actually loaded as a separate table in the data model. Right-click on the query and uncheck the Enable Load option. This makes the query available to support data retrieval queries but makes the query invisible to the model and report layers. The query name will now be italicized in the Queries pane.
Your Queries pane should now look similar to that in Figure 2.11:

Figure 2.11: Queries organized into query groups
How it works
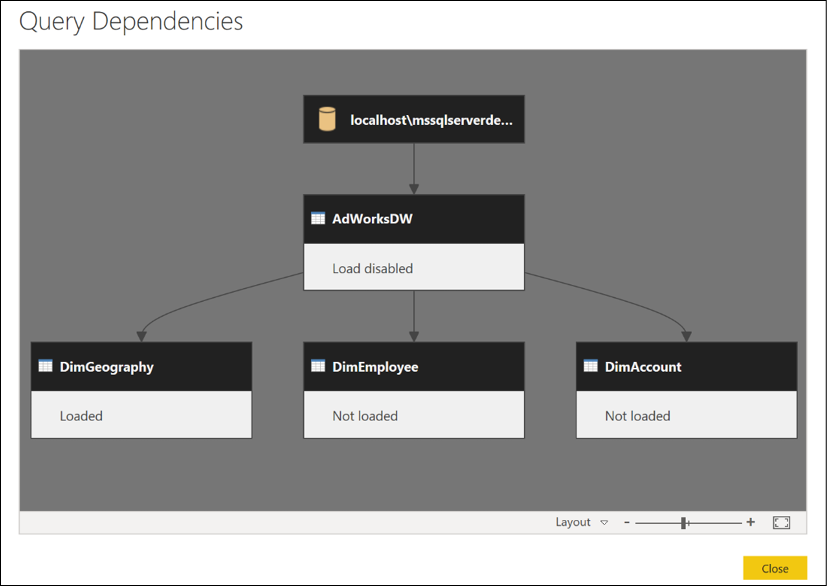
The Query Dependencies view in Power Query provides a visual representation of the relationships between the various queries. You can access this dialog by using the View tab and then selecting Query Dependencies in the ribbon.

Figure 2.12: The Query Dependencies View in Query Editor
In this example, a single query with only one expression is used by multiple queries, but more complex interdependencies can be designed to manage the behavior and functionality of the retrieval and analytical queries. This recipe illustrates the broader concept used in later recipes called "composability", where functions call other functions; this is one of the primary strengths of functional programming languages such as M, DAX, R, and F#.
There's more...
Power BI Desktop saves data source credentials for each data source defined, as well as a privacy level for that source. It is often necessary to modify these credentials as passwords change. In addition, setting privacy levels on data sources helps prevent confidential information from being exposed to external sources during the Query Folding process. Data source credentials and settings are not stored in the PBIX file, but rather on the computer of the installed application.
To manage data source credentials and privacy levels, perform the following steps:
- From Power BI Desktop (not the Power Query Editor), click on File in the menu, then click Options and settings, and finally click Data source settings.
- Click on the Global Permissions radio button such that your settings are persisted into other Power BI Desktop reports.
- Select a data source.
- Click the Edit Permissions button.
- From the Edit Permissions dialog, you can click the Edit button under the Credentials heading to set the authentication credentials for the data source. In addition, you can set the privacy level for the data source using the drop-down under the Privacy Level heading. Click OK to save your settings.

Figure 2.13: Edit credentials and privacy level for a data source
Definitions of the available Privacy Level settings are provided in Table 2.2.
|
Privacy Setting |
Description |
|
None |
No privacy level defined. |
|
Private |
A Private data source is completely isolated from other data sources during query retrieval. For example, marking a text file Private would prevent that data from being processed on an external server. |
|
Organizational |
An Organizational data source is isolated from all public data sources but is visible to other organizational data sources during retrieval. |
|
Public |
A Public data source is visible to other sources. Only files, internet sources, and workbook data can be marked as Public. |
Table 2.2: Privacy Level Settings
Just as relational databases such as SQL Server consider many potential query plans, the M engine also searches for the most efficient methods of executing queries, given that the data sources and query logic are defined. In the absence of data source privacy settings, the M engine is allowed to consider plans that merge disparate data sources. For example, a local text file of customer names can be merged with an external or third-party server, given the better performance of the server. Defining privacy settings isolates data sources from these operations thus increasing the likelihood of local resource usage, and hence query performance may be reduced.
See also
- Authentication with a data source: http://bit.ly/30It2tV
- Power BI Desktop privacy levels: http://bit.ly/29blFBR


