Creating a user
Now that our tenant has been set up, we can create our first user. This recipe will run through how to create your first user and then look at what is happening in the Graph API underneath.
Getting ready
Navigate to the Microsoft Entra portal at https://entra.microsoft.com/#home.
Here, you will find an overview of your tenant, including your tenant ID, which you will find yourself needing when setting up policies such as OneDrive within Intune. You cannot display it within Intune directly, so you will have to navigate back to Entra ID to find it.
Within Entra ID, click on Users, then All users; you will see the user you set up when enrolling the tenant. This user will have Global Administrator access across the whole tenant, so we will create a new user to test role assignment, license assignment, and group membership.
How to do it…
Follow these steps to create an additional non-admin user in your tenant. The new user screen runs across a few pages, so we will concentrate on cropped screenshots of the appropriate areas:
- Click on + New user and then Create new user.
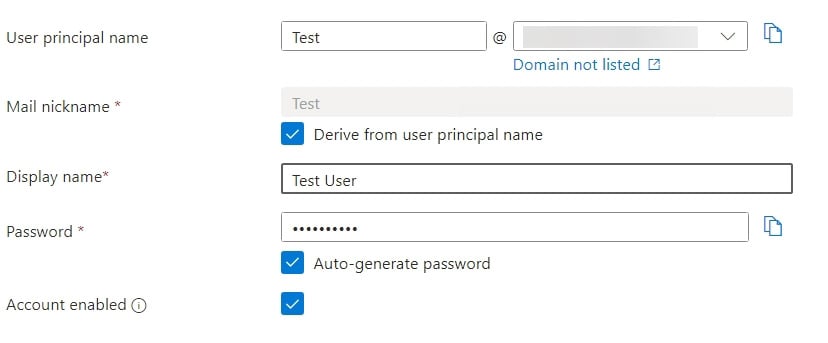
- Fill in the basic details. You will be prompted to change your password on your first login, but if you are auto-generating, click the eye icon to show the password so that you can use it to log in later:

Figure 1.2 – Entra user details
- Leave Groups and Roles empty for now; we will run through those in the Creating Entra ID groups recipe.
- Add a Usage location value on this screen; it will not let you assign a license without one set:

Figure 1.3 – Entra user license details
- Optionally, you can fill in Job Info, but this is not a requirement at this stage.
- Finally, click Create.
With that, you have created your first account in your new tenant.
Automating it
Now, we can learn how to automate user creation.
You will need the PowerShell ISE or VS Code running for this, as we will be setting variables to send to Microsoft Graph.
Follow these steps in a new PowerShell script to create your user with Microsoft Graph:
- First, create the variables to populate – in this case, this is everything we set in the GUI. Setting these as variables instead of hardcoding them within the JSON gives us the option to run within a loop and change the variables each time in the future:
$displayname = "User One"
$givenname = "User"
$surname = "One"
$usageLocation = "GB"
$mailNickname = "user1"
$password = "PASSWORD HERE"
$domainname = "DOMAIN HERE"
- Now, populate the JSON with these variables:
$json = @"
{
    "accountEnabled": true,
    "displayName": "$displayname",
    "givenName": "$givenname",
    "mailNickname": "$mailNickname",
    "passwordProfile": {
        "forceChangePasswordNextSignIn": true,
        "password": "$password"
    },
    "surname": "$surname",
    "usageLocation": "$usageLocation",
    "userPrincipalName": "$mailnickname@$domainname"
}
"@
As you can see, the JSON is a fairly straightforward array. Watch the names of the items as they are case sensitive; as an example,
accountEnabledwill fail if it is listed asAccountEnabledoraccountenabled. The error will be a standard malformed request, so it is always a good idea to start here with any troubleshooting.You can also see that
passwordProfileis a nested array as it has further child items. - Next, tell it where to send the request. There are two versions of the Graph API – V1.0 and Beta. The Beta API receives the latest features ahead of the general release. In this case, either will work, but when creating groups, some aspects, such as being able to assign roles to them, require the beta version.
- Next, we must point to the Users section of the Graph API:
$uri = "https://graph.microsoft.com/beta/users"
- Finally, send the request to Microsoft Graph. There are different types of requests you can use; we will run through them quickly so that you understand the difference:
GET: This simply retrieves values from Graph to manipulate, export, and morePOST: This sends new values to Graph that do not currently exist (a new user, new policy, and so on)PATCH: This updates an existing recordPUT: This is similar toPATCHbut needs a full URL, including the ID being createdDELETE: This deletes whatever you are pointing it at
This is a new account we are creating, and a
PUTrequest is more complex than aPOSTrequest, so we will stick withPOST:Invoke-MgGraphRequest -Method POST -Uri $uri -Body $json -ContentType "application/json"
This command sends a
POSTrequest to the URL we specified earlier (in this case,users) to pass the JSON we wrote. The content type tells it to look for JSON.
Now that we have our user, we can assign a role to it.


