Now that we have covered the range of features available to us with jQuery, we can examine how to put the library into action. To get started, we need to download a copy of jQuery.
Making our first jQuery-powered web page
Downloading jQuery
No installation is required. To use jQuery, we just need a publicly available copy of the file, no matter whether that copy is on an external site or our own. Since JavaScript is an interpreted language, there is no compilation or build phase to worry about. Whenever we need a page to have jQuery available, we will simply refer to the file's location from a <script> element in the HTML document.
The official jQuery website (http://jquery.com/) always has the most up-to-date stable version of the library, which can be downloaded right from the home page of the site. Several versions of jQuery may be available at any given moment; the most appropriate for us as site developers will be the latest uncompressed version of the library. This can be replaced with a compressed version in production environments.
As jQuery's popularity has grown, companies have made the file freely available through their Content Delivery Networks (CDNs). Most notably, Google (https://developers.google.com/speed/libraries/devguide), Microsoft (http://www.asp.net/ajaxlibrary/cdn.ashx), and the jQuery project itself (http://code.jquery.com) offer the file on powerful, low-latency servers distributed around the world for fast download, regardless of the user's location. While a CDN-hosted copy of jQuery has speed advantages due to server distribution and caching, using a local copy can be convenient during development. Throughout this book, we'll use a copy of the file stored on our own system, which will allow us to run our code whether we're connected to the Internet or not.
Setting up jQuery in an HTML document
There are three pieces to most examples of jQuery usage: the HTML document, CSS files to style it, and JavaScript files to act on it. For our first example, we'll use a page with a book excerpt that has a number of classes applied to portions of it. This page includes a reference to the latest version of the jQuery library, which we have downloaded, renamed jquery.js, and placed in our local project directory:
<!DOCTYPE html>
<html lang="en">
<head>
<meta charset="utf-8">
<title>Through the Looking-Glass</title>
<link rel="stylesheet" href="01.css">
<script src="jquery.js"></script>
<script src="01.js"></script>
</head>
<body>
<h1>Through the Looking-Glass</h1>
<div class="author">by Lewis Carroll</div>
<div class="chapter" id="chapter-1">
<h2 class="chapter-title">1. Looking-Glass House</h2>
<p>There was a book lying near Alice on the table,
and while she sat watching the White King (for she
was still a little anxious about him, and had the
ink all ready to throw over him, in case he fainted
again), she turned over the leaves, to find some
part that she could read, <span class="spoken">
"—for it's all in some language I don't know,"
</span> she said to herself.</p>
<p>It was like this.</p>
<div class="poem">
<h3 class="poem-title">YKCOWREBBAJ</h3>
<div class="poem-stanza">
<div>sevot yhtils eht dna ,gillirb sawT'</div>
<div>;ebaw eht ni elbmig dna eryg diD</div>
<div>,sevogorob eht erew ysmim llA</div>
<div>.ebargtuo shtar emom eht dnA</div>
</div>
</div>
<p>She puzzled over this for some time, but at last
a bright thought struck her. <span class="spoken">
"Why, it's a Looking-glass book, of course! And if
I hold it up to a glass, the words will all go the
right way again."</span></p>
<p>This was the poem that Alice read.</p>
<div class="poem">
<h3 class="poem-title">JABBERWOCKY</h3>
<div class="poem-stanza">
<div>'Twas brillig, and the slithy toves</div>
<div>Did gyre and gimble in the wabe;</div>
<div>All mimsy were the borogoves,</div>
<div>And the mome raths outgrabe.</div>
</div>
</div>
</div>
</body>
</html>
Immediately following the normal HTML preamble, the stylesheet is loaded. For this example, we'll use a simple one:
body {
  background-color: #fff;
  color: #000;
  font-family: Helvetica, Arial, sans-serif;
}
h1, h2, h3 {
  margin-bottom: .2em;
}
.poem {
  margin: 0 2em;
}
.highlight {
  background-color: #ccc;
  border: 1px solid #888;
  font-style: italic;
  margin: 0.5em 0;
  padding: 0.5em;
}
You can access the example code from the following GitHub repository:
https://github.com/PacktPublishing/Learning-jQuery-3.
After the stylesheet is referenced, the JavaScript files are included. It is important that the script tag for the jQuery library be placed before the tag for our custom scripts; otherwise, the jQuery framework will not be available when our code attempts to reference it.
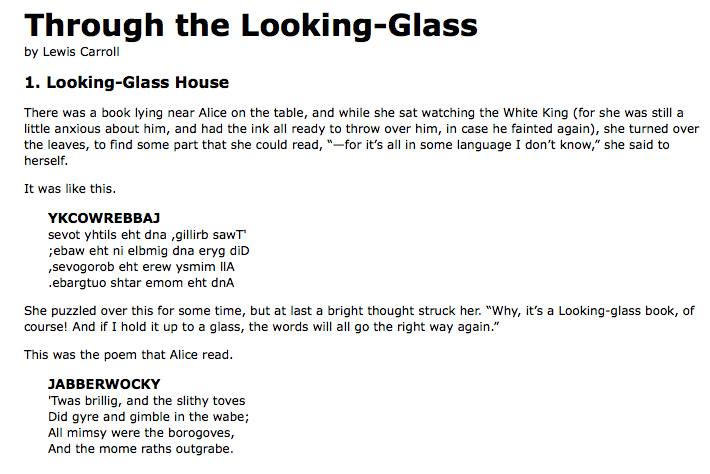
Now, we have a page that looks like this:

We will use jQuery to apply a new style to the poem text.
Adding our jQuery code
Our custom code will go in the second, currently empty, JavaScript file, which we included from the HTML using <script src="01.js"></script>. For this example, we only need three lines of code:
$(() => {
  $('div.poem-stanza').addClass('highlight')
});
Now let's step through this script piece by piece to see how it works.
Finding the poem text
The fundamental operation in jQuery is selecting a part of the document. This is done with the $() function. Typically, it takes a string as a parameter, which can contain any CSS selector expression. In this case, we wish to find all of the <div> elements in the document that have the poem-stanza class applied to them, so the selector is very simple. However, we will cover much more sophisticated options through the course of the book. We will walk through many ways of locating parts of a document in Chapter 2, Selecting Elements.
When called, the $() function returns a new jQuery object instance, which is the basic building block we will be working with from now on. This object encapsulates zero or more DOM elements and allows us to interact with them in many different ways. In this case, we wish to modify the appearance of these parts of the page and we will accomplish this by changing the classes applied to the poem text.
Injecting the new class
The .addClass() method, like most jQuery methods, is named self descriptively; it applies a CSS class to the part of the page that we have selected. Its only parameter is the name of the class to add. This method, and its counterpart, .removeClass(), will allow us to easily observe jQuery in action as we explore the different selector expressions available to us. For now, our example simply adds the highlight class, which our stylesheet has defined as italicized text with a gray background and a border.
Executing the code
Taken together, $() and .addClass() are enough for us to accomplish our goal of changing the appearance of the poem text. However, if this line of code is inserted alone in the document header, it will have no effect. JavaScript code is run as soon as it is encountered in the browser, and at the time the header is being processed, no HTML is yet present to style. We need to delay the execution of the code until after the DOM is available for our use.
With the $(() => {}) construct (passing a function instead of a selector expression), jQuery allows us to schedule function calls for firing once the DOM is loaded, without necessarily waiting for images to fully render. While this event scheduling is possible without the aid of jQuery, $(() => {}) provides an especially elegant cross-browser solution that includes the following features:
- It uses the browser's native DOM-ready implementations when available and adds a window.onload event handler as a safety net
- It executes functions passed to $() even if it is called after the browser event has already occurred
- It handles the event scheduling asynchronously to allow scripts to delay if necessary
The $() function's parameter can accept a reference to an already defined function, as shown in the following code snippet:
function addHighlightClass()  {
  $('div.poem-stanza').addClass('highlight');
}

$(addHighlightClass);
However, as demonstrated in the original version of the script and repeated in Listing 1.2, the method can also accept an anonymous function:
$(() =>
  $('div.poem-stanza').addClass('highlight')
);
This anonymous function idiom is convenient in jQuery code for methods that take a function as an argument when that function isn't reusable. Moreover, the closure it creates can be an advanced and powerful tool. If you're using arrow functions, you also get lexically bound this as a context, which avoids having to bind functions. It may also have unintended consequences and ramifications of memory use, however, if not dealt with carefully.
The finished product
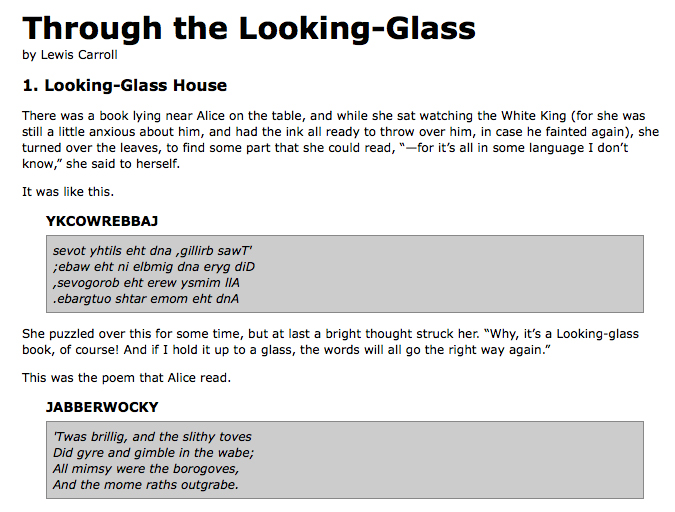
Now that our JavaScript is in place, the page looks like this:

The poem stanzas are now italicized and enclosed in boxes, as specified by the 01.css stylesheet, due to the insertion of the highlight class by the JavaScript code.


