Android Studio and our project – A very brief guided tour
I won't go into all the dozens of different windows and menu options because we will cover them as we need them but here are a few details to help begin getting familiar with Android Studio.
Have a look at the screen below and you will notice two major sections. One on the left and a larger window on the right:

Let's have a look at the panel on the left
The Project panel
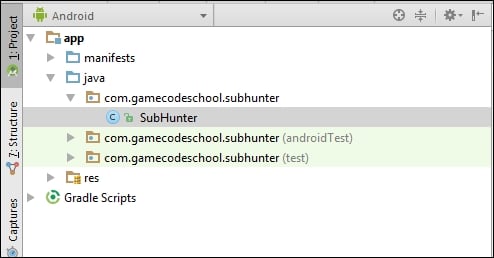
The panel on the left can be changed to various different views. We will need it just as it is for virtually the whole book. This is the Project panel/window. Let's take a closer look.

As you can see there are a few folders and sub-folders. For around 90% of every project, we will only need one folder. The folder I am referring to is the Java | com.gamecodeschool.subhunter folder. It is the one with the SubHunter file in it. The little blue C icon to the left of SubHunter indicates that this file is a class and we will explore classes throughout the entirety of this book. The extension of all class files is .java. The extension for class files is not shown in the Project panel. All we need to know for now is that a class file is a file with code in it.
Notice that below the com.gamecodeschool.subhunter folder (with the SubHunter class file in it) there are two more folders with the same name. These folders, however, are postfixed with the words (androidTest) and (test), respectively. Whenever we add new code files it will always be to the top folder, the one without any prefix, that contains the SubHunter class/file.
Feel free to explore the other folders. We will also be using the res folder in later projects to add sound files and graphics. We will be making brief adjustments to the file in the manifests folder in a moment as well.
The important points to take away from this section is that this is the Project panel and all our code will go in the top com.gamecodeschool.subhunter folder. If you entered a different company domain back in the Starting the first project – Sub Hunter section, then the name of the folders in your Project panel will be different but the exact same principle applies – use the top one.
Let's explore the place where the real action happens – the Editor window.
The Editor window
This is where, as the name suggests, we will edit our code. Typically, we will add multiple code files to the com.gamecodeschool.subhunter folder and add code to them through the editor window. We can have multiple code files ready for editing at once. Have a look at the next image of the code editor as it stands now.

Now, in preparation for the next section, open the manifests folder at the top of the Project panel. You do this by left-clicking on the little triangle to the left of the folder. I have highlighted this in the next image.

Inside the manifests folder, there is a single file, AndroidManifest.xml. Double-click the file and notice that it has been opened in the editor window and that we now have two tabs so that we can quickly switch between AndroidManifest.xml and SubHunter.java. This next image makes this clear.

Also, note that you can now see the .java extension of SubHunter. Now that we know where our code files will go, how to get to them and how to edit them we can move on to the Sub Hunter project.


