Chapter 4. Creating an Infographic with Character Animator
In this chapter, we will bring together all the things we have learned so far. We will continue building on the topics we've covered so far by creating an information-based project, jumping into the exciting world of character animation! We will rely heavily on assets from Illustrator. Artwork from Illustrator is vector-based and can be scaled. Adobe Character Animator and Illustrator must be installed on your machine to follow along with this lesson.
The following topics will be covered in this chapter:
- Kinetic typography
- Creative transitions
- Character animation
- Icon animation
Technical requirements
You need Photoshop, Illustrator installed and a web camera.
Infographics
Infographics are video projects that can be used to communicate information in exciting and memorable ways. Motion graphics animation tools are uniquely suited to this type of storytelling. The ability to create kinetic typography and dazzling transitions makes After Effects perfect for creating infographics. For this project, I want you to think of an issue that has factual data you can explain. Alternatively, you can choose to follow along and use the data and character I use, or you could base your project on an interesting article you have read. Another idea would be to create an infographic about a simple fact or food recipe. The important thing is that there is some information to be conveyed in the project. You should limit the amount of text in your project or it will be too overwhelming for viewers to read it. You could also include some subtle background music to help push your narrative along.
Text
In motion graphics, it's important to understand how to set good type so that it's visually pleasing, has a clear message, and is compositionally strong. It's also important to know how to edit your text. The power of well-designed text is used in the creation of film titles, videos, commercials, and animated gifs. Well-designed text can be an art form in itself. Take time to choose just the right font for your project. Consider what's the least amount of text you can put on the screen at a time to convey the information you want to communicate. It's also important to know how to tweak your text so that it's spaced correctly and stands out in its environment. Carefully consider which fonts to use. Color also makes a huge difference to the emotional impact and readability of text. Start looking at text all around you, in print and in the media. What makes text look good? What makes it stand out and be memorable? Try to recreate text treatments to understand the process of creating beautiful text.
We went over text in previous chapters, but in this chapter, let's discuss spacing features. On the far-right of the panel, near the Effects panel, we have our Character panel. This is where you control your text parameters. Create some text and let's go over these controls. In the top-left corner of the Character panel, you have different fonts to choose from. Click on the dropdown to reveal the different fonts installed on your computer:

Fonts
Under the fonts, you have different weights for your font. Click on this to see what weights are available for the font. Typically, you will have access to bold and italicized weights for your fonts.
To the right of the weights, there is a dropdown that provides you with all of the color selection options. This is where you can add a stroke to your font and change the color of it. You can change the font size underneath the font tab:

Font size
This tab is used to adjust the tracking or the spacing between letters. I use this a lot, because text isn't always perfect after typing. Most text needs to have the tracking adjusted:

Tracking
This is used to adjust the stroke width:

Stroke width
This is used to determine exactly where your stroke is on your type. You have different options, such as Fill Over Stroke and Stroke Over Fill. Experiment with these to see their differences:

Fill Over Stroke
Under this panel, there is the Paragraph panel. This helps you with text alignment:

Paragraph
Next, let's look at the Drop Shadow feature. Drop Shadow is located in the Effects & Presets panel. Add this to some text to see what this effect can do. I love this effect; it's so useful and versatile:

Drop Shadow
Play around with the Opacity, the Distance, Direction, and Softness to get comfortable with this tool:
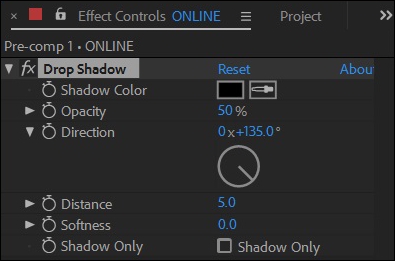
Drop Shadow adjustments
Creating text on a path
Have you seen those videos where text travels along a path? A custom path is a vector path that is drawn freehand using the pen tool in After Effects. In After Effects, you can make your type align with a path and travel along that path!
We can align our text to a path by following these steps:
- Create your type.
- Select the text layer.
- Create a path with the pen tool on the text layer.
- Twirl down Text.
- Twirl down Path Options.
- To the right, choose the path you just created (Mask 1):

Inserting text along a path
Animated text
For this project, we are creating an infographic video. Spend some time looking for some information you want to share in this project. You can also choose to download and use the same files I'm using, to follow along. Create your lines of text on two different layers, as follows:
- Create some text.
- Turn on title-safe guides.
- Make sure the text is centered.
- Create a background.
- Create text—
ONLINE LEARNING. - Turn on continuous rasterized on all layers.
- Use the following text presets:
- Fly in with a twist
- Straight in by word
Sometimes, when you select a text preset, you will need to adjust its settings. The text may not animate in the right place. You can adjust your preset starting position in the following way:
- Twirl down Text.
- Twirl down Animator 1.
- Twirl down Range Selector 1.
- Find Position and go to the start of the timeline. Adjust Position if necessary.
See the following screenshot for the correct Position parameter to adjust:

Adjusting preset position
Editing and importing Illustrator files
Understanding how to put your Illustrator artwork on individual layers is critical, because you can animate each of these layers in After Effects. These layers are vectors, so they can be scaled up without losing quality, and can easily be edited. Separating images from the background in Photoshop can be a long process. You can import ep files into Illustrator and save them as ai files. Make sure Illustrator is downloaded on your computer. Open up a file in Illustrator and let's take a look at layers!
In Illustrator, the layer stacking order is like Photoshop and After Effects; hierarchy is important. What's on the top layer will appear in front of everything else. To arrange these layers, simply select a layer and move it in the stacking order.
Very often, every element of an image will be on one layer. You can separate these and put them on their own layer in Illustrator. To see all of the elements of an image, twirl down Layers:

Illustrator twirl down
Creating a new layer in Illustrator
As you can see in this screenshot, there are other elements that make up this image. If you were to import this into After Effects, everything would be on one layer. You would not be able to animate these elements individually, though. Let's take a look at part of the interface of the Illustrator Layers panel. Look at the lower-right corner of the Illustrator window. There's a button called Create New Layer:

Illustrator new layer
Click on the Create New Layer button. This is how you create a new layer in Illustrator.
Once you've created a layer in Illustrator, you need to drag the element you want into that layer. If you double-click on that layer, you can rename it:

Dragging to a new layer
Now that you know how to create separate layers for your illustrations. Take a few moments to drag each element to its own layer. We are going to animate these elements in After Effects later:

Separate layers
You can edit your Illustrator file extensively. This is great for animation purposes.
The Eyedropper tool
One of my go-to editing tools for changing the color of an element is the Eyedropper tool, which can be used as follows:
- You use this tool by selecting the element you want to change.
- Go to the far-left of the Illustrator panel.
- Choose the Eyedropper Tool (I) or the fill icon:

Eyedropper
- Once you have selected either one of these, you can change the color of the element:

Changing the color of an element
Changing the color of text is done just as it is in After Effects. You can use the Eyedropper tool to choose a color onscreen to change your element to.
- To save your file, go up to the upper-left corner of the screen and, under the File tab, choose Save As...:

Save
This is where you can save your file in a variety of different formats. For our purposes, we want our illustrations saved as Illustrator files. Choose the Adobe Illustrator *AI file format.
Now jump back to After Effects. Once you import your Illustrator file into After Effects, you can jump back into Illustrator, modify the existing layers, save them, and they will automatically update in After Effects. However, any new layers created in the Illustrator file will not import into After Effects. If you need to add a new layer to an Illustrator file, I recommend you save a new Illustrator file. Import the new Illustrator file and incorporate that new layer into the After Effects project. Now we are ready to import our Illustrator files into After Effect and start animating them! I love this process because Illustrator files are so beautiful and easy to work with. So, the way we import our Illustrator files correctly is by choosing the following options:
- Import As: Composition - Retain Layer Sizes
- Import
Click on Create a composition.
Now that you have imported your Illustrator files, you should see a composition automatically appear in the project panel. Move it into your precomp folder:
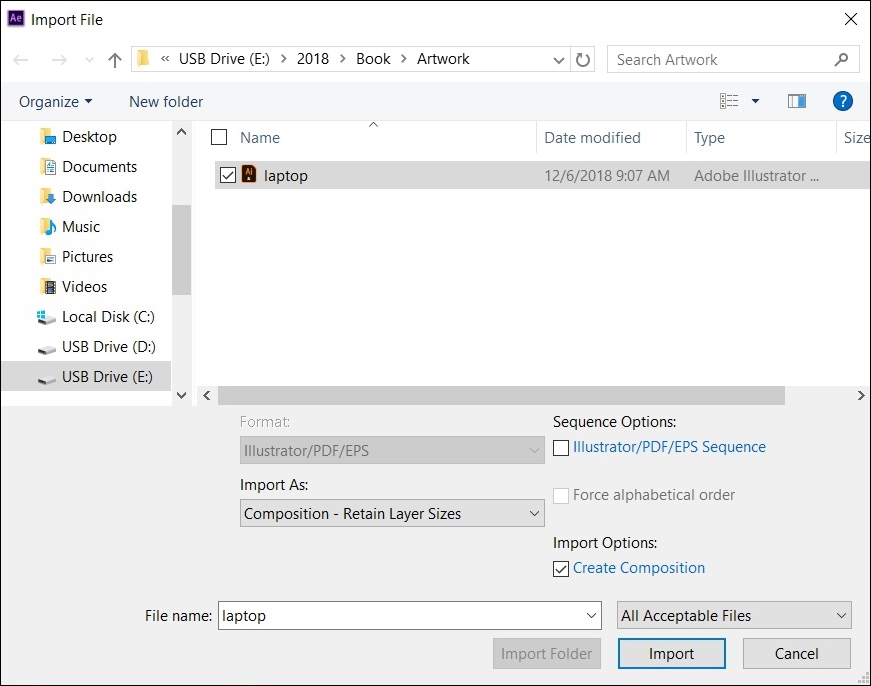
Importing an Illustrator file
This will also import a folder with the individual layers. Move this folder into the IMAGES folder. I love this—it's so organized if you set it up correctly in Illustrator! Take a look at the size of these IMAGES in the folder. This is important because bigger layers increase the render time. Smaller-sized layers are easier to animate. Since these are Illustrator files, they can be scaled up and not lose their quality:
- Navigate to the Illustrator precomp.
- Duplicate this so that you have a backup copy in After Effects.
- Double-click on one of these PRECOMPS. You will see your laptop's individual elements set up exactly how we created them in Illustrator.
- When you import Illustrator files, be sure to turn on continuously rasterize:

Continuously rasterize
Continuously rasterize is a way to make your layers render in full resolution. Since these are Illustrator files, they will look crisp no matter how much they are scaled up. Now we are going to parent all of our elements to our monitor:

Parent elements
Copy all of these elements and paste them into the composition with your type composition, then do the following:
- Name this composition
ONLINE LEARNING - Select the monitor layer you parented everything to
- Scale this layer down to fit in the scene
When you move this layer, all your elements will move with it, because you parented them to it:

Monitor resize
Let's take a look at what we have created so far and be proud of ourselves! We now have our first logo element set up and ready to be animated. Great job!
Animation principles
At this point, I am going to slow things down and talk about animation principles. We are about to animate our logo and I want you to have a greater understanding of how to move your elements in convincing dynamic ways. Walt Disney—one of the great pioneers of animation—created 12 animation principles that we still use today:
- Timing
- Ease in and out (or slow in and slow out)
- Arcs
- Anticipation
- Exaggeration
- Squash and stretch
- Secondary action
- Follow through and overlapping action
- Straight ahead action and pose-to-pose action
- Staging
- Appeal
- Personality
The ones I want to pay special attention to are timing, ease in and out, secondary action, and personality. Timing is everything in animation. I will repeat this many times in this book. A rule I almost always use is the rule of 10 key frames. It takes the eye about 10 key frames to visually register anything. Make sure you have at least 10 frames between each action. You may need more frames if you have a lot of information on the screen, but this is a good starting point. Take special care in deciding how long something should be onscreen. You do not want the viewer to be bored, so do not let your animations lag. This is something you will get the hang of the more you animate.
The next thing to pay attention to is ease in and out. This is one of the most important things in animating a convincing, elegant action. In the real world, objects need time to accelerate and slow down, like the human body does; most objects move in this way. There's always a gradual easing at the start and end of a movement. To accomplish this in After Effects, we use the Easy Ease key frame assistant. Adding this immediately makes your animation look better.
Secondary actions also add some personality and realism to your animation. Secondary actions are when your objects move into their positions and have a secondary movement after they land there. It isn't necessary to always use secondary movements, but it can add weight and believability to your movements. It also makes your animations imperfect, which generates interest and creates personality. We will go over these principles a lot more in this book.
Animating a monitor
Now let's get to animating our computer monitor:
- Move 10–20 key frames down the timeline after our text appears on the screen
- Move the anchor point of the monitor to the bottom edge of your monitor
To move your anchor point, choose the pan behind tool (Y) and move the anchor point. Now this object will animate around the anchor point. It's important to set this up before animating your object:

Monitor anchor point
At this point, we need to lock our parameters where they are. We do that by creating blank key frames:
- Set scale and rotate key frames at this point
- Move back in the timeline (to the left) 10 key frames
- Scale down the monitor to 0
- Turn on motion blur for everything
Now we are going to create a fake camera move. This will be used as a transition element for our infographic video. We create camera nulls by parenting everything but the background of the null object:
- Go to the point in the timeline after the monitor has been animated.
- Create a null object. Select everything except the background.
- Parent everything selected to the null object.
- Easy ease all of these key frames.
- Turn on motion blur for everything except the background. Remember, motion blur must be turned on in two locations:

Motion blur to icons
Easy Ease will soften your movements and will make them look more organic. Select the key frames for the monitor and the null. Go to Animation | Keyframe Assistance | Easy Ease:
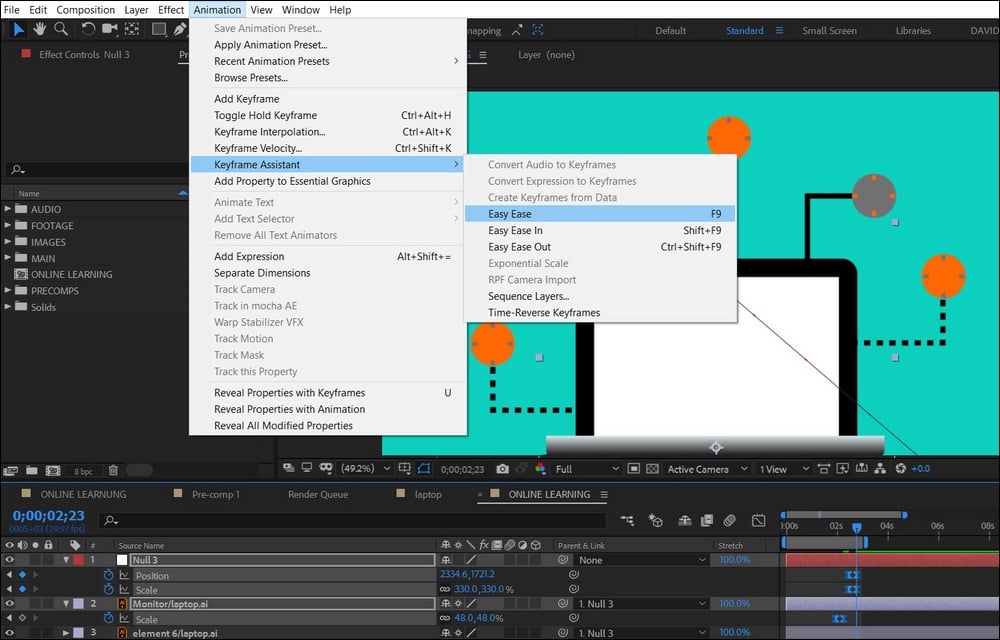
Easy Ease
Now let's animate our fake camera push on our monitor. Here are the steps:
- Stay at the point where the monitor has been animated.
- Create a key frame for the scale and position of the null object.
- Jump down (to the right) 10 key frames.
- Adjust the Position parameter and scale so that the monitor fills the screen:

Monitor full screen
Now we are going to animate all of our element pieces. The following are the steps to do that:
- Go to the point in the timeline where the monitor fills the screen and select all your elements to your monitor.
- Parent them to your monitor.
- For each of these elements, position the anchor points at the end of the line.
This will ensure our elements are animating from the correct spot:

Anchor point element
Now that your anchor points and your elements are parented correctly to the monitor, we can start animating them. Here's how we can do that:
- Select the first element and make a key frame for scale
- Jump down the timeline 10 key frames (to the right) and set key frames for scale
- Jump back to the previous scale key frame and scale that element down to 0
Great! Let's preview what we have so far! You should see your animated text on the screen. The next thing you should see is the monitor. Next, you should see your fake camera push in and one of your elements scaling up from the background. (All your elements should be in the background.)
The next step is to create a secondary scale movement. Go to the last key frame position, go 10 key frames to the right, then create a blank key frame.
This is how you create a blank key frame. This is helpful for holding a key frame. Also, you can use these triangles to jump between key frames:
- Jump backward to the keyframe (to the left).
- Scale that key frame up to 120:

Adding a blank key frame
Next, you need to Easy Ease these scale key frames:
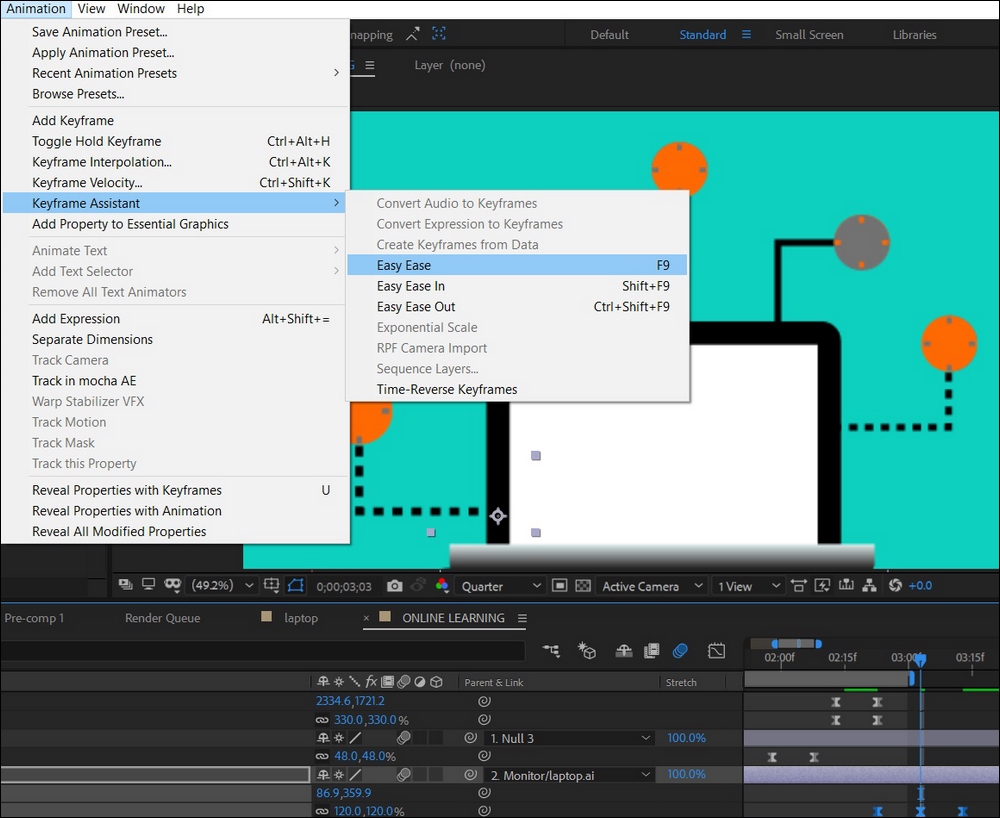
Easy Ease elements
Excellent! Let's look at what we've accomplished. On previewing your work, you should have your monitor element animating on with secondary movement, with motion blur turned on. If turning motion blur on makes your computer run too slowly, you can turn motion blur off temporarily. You will need to remember to turn it back on before you render your project. Repeat the steps to animate the rest of your elements on for your monitor.
At this point, you have all the powerful tools for animating a text with text presets. You also know how to use a camera null. You are grooving along! The next thing we are going to do is animate more type using the same tools we used for the online learning introduction. Be certain that you have time to see the monitor animate on fully with all its pieces and the camera push in. Timing is everything. If you start your text animation too soon, it won't be a pretty sight. Let it rest for a bit, then start animating on the next message. Take a while to animate the text (today's schools are under pressure to do more with less). Be sure to pause in between the lines of text—this will give the viewer time to read it. We are going to add an adjustment layer in between the text and the monitor elements:
- Go to the Layer tab.
- Then go to Adjustment Layer.
- This will add an adjustment layer to your timeline:

Adjustment layer
Adjustment layers are similar to null objects. They are like a blank layer that you can add effects to and will affect everything underneath them. I'm dropping some important knowledge here; be sure to pick it up and remember it! Effects on an adjustment layer affect everything underneath it in the stacking order. We don't want it to affect the new animated type, so put the adjustment layer under the new type.
Now that we've added our adjustment layer, we can add an effect to it. Here's how we can do that:
Go to the point in the timeline where your monitor and all the elements are completely animated on
- Go to your effects and add a Fast Box Blur
- While the box radius is at
0, hit the stopwatch in the effects panel - Move down the timeline 10 key frames
- Increase the box radius to
60 - Turn on Repeat Edge Pixels
After turning on these settings, your screen should look similar to this:
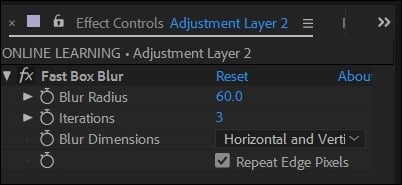
Fast box blur
Great! Let's take a look at what we are working with here. As the fake camera moves in and out on the monitor, all the elements animated on the screen blur as the next message is animating on. I just taught you another transition effect. This is a rack focus transition. You have a lot of tools under your belt so far. Take a breather to be proud of what you have accomplished so far. Next, we are moving on to character animation—my favorite subject.
Text
In motion graphics, it's important to understand how to set good type so that it's visually pleasing, has a clear message, and is compositionally strong. It's also important to know how to edit your text. The power of well-designed text is used in the creation of film titles, videos, commercials, and animated gifs. Well-designed text can be an art form in itself. Take time to choose just the right font for your project. Consider what's the least amount of text you can put on the screen at a time to convey the information you want to communicate. It's also important to know how to tweak your text so that it's spaced correctly and stands out in its environment. Carefully consider which fonts to use. Color also makes a huge difference to the emotional impact and readability of text. Start looking at text all around you, in print and in the media. What makes text look good? What makes it stand out and be memorable? Try to recreate text treatments to understand the process of creating beautiful text.
We went over text in previous chapters, but in this chapter, let's discuss spacing features. On the far-right of the panel, near the Effects panel, we have our Character panel. This is where you control your text parameters. Create some text and let's go over these controls. In the top-left corner of the Character panel, you have different fonts to choose from. Click on the dropdown to reveal the different fonts installed on your computer:

Fonts
Under the fonts, you have different weights for your font. Click on this to see what weights are available for the font. Typically, you will have access to bold and italicized weights for your fonts.
To the right of the weights, there is a dropdown that provides you with all of the color selection options. This is where you can add a stroke to your font and change the color of it. You can change the font size underneath the font tab:

Font size
This tab is used to adjust the tracking or the spacing between letters. I use this a lot, because text isn't always perfect after typing. Most text needs to have the tracking adjusted:

Tracking
This is used to adjust the stroke width:

Stroke width
This is used to determine exactly where your stroke is on your type. You have different options, such as Fill Over Stroke and Stroke Over Fill. Experiment with these to see their differences:

Fill Over Stroke
Under this panel, there is the Paragraph panel. This helps you with text alignment:

Paragraph
Next, let's look at the Drop Shadow feature. Drop Shadow is located in the Effects & Presets panel. Add this to some text to see what this effect can do. I love this effect; it's so useful and versatile:

Drop Shadow
Play around with the Opacity, the Distance, Direction, and Softness to get comfortable with this tool:

Drop Shadow adjustments
Creating text on a path
Have you seen those videos where text travels along a path? A custom path is a vector path that is drawn freehand using the pen tool in After Effects. In After Effects, you can make your type align with a path and travel along that path!
We can align our text to a path by following these steps:
- Create your type.
- Select the text layer.
- Create a path with the pen tool on the text layer.
- Twirl down Text.
- Twirl down Path Options.
- To the right, choose the path you just created (Mask 1):

Inserting text along a path
Animated text
For this project, we are creating an infographic video. Spend some time looking for some information you want to share in this project. You can also choose to download and use the same files I'm using, to follow along. Create your lines of text on two different layers, as follows:
- Create some text.
- Turn on title-safe guides.
- Make sure the text is centered.
- Create a background.
- Create text—
ONLINE LEARNING. - Turn on continuous rasterized on all layers.
- Use the following text presets:
- Fly in with a twist
- Straight in by word
Sometimes, when you select a text preset, you will need to adjust its settings. The text may not animate in the right place. You can adjust your preset starting position in the following way:
- Twirl down Text.
- Twirl down Animator 1.
- Twirl down Range Selector 1.
- Find Position and go to the start of the timeline. Adjust Position if necessary.
See the following screenshot for the correct Position parameter to adjust:

Adjusting preset position
Editing and importing Illustrator files
Understanding how to put your Illustrator artwork on individual layers is critical, because you can animate each of these layers in After Effects. These layers are vectors, so they can be scaled up without losing quality, and can easily be edited. Separating images from the background in Photoshop can be a long process. You can import ep files into Illustrator and save them as ai files. Make sure Illustrator is downloaded on your computer. Open up a file in Illustrator and let's take a look at layers!
In Illustrator, the layer stacking order is like Photoshop and After Effects; hierarchy is important. What's on the top layer will appear in front of everything else. To arrange these layers, simply select a layer and move it in the stacking order.
Very often, every element of an image will be on one layer. You can separate these and put them on their own layer in Illustrator. To see all of the elements of an image, twirl down Layers:

Illustrator twirl down
Creating a new layer in Illustrator
As you can see in this screenshot, there are other elements that make up this image. If you were to import this into After Effects, everything would be on one layer. You would not be able to animate these elements individually, though. Let's take a look at part of the interface of the Illustrator Layers panel. Look at the lower-right corner of the Illustrator window. There's a button called Create New Layer:

Illustrator new layer
Click on the Create New Layer button. This is how you create a new layer in Illustrator.
Once you've created a layer in Illustrator, you need to drag the element you want into that layer. If you double-click on that layer, you can rename it:

Dragging to a new layer
Now that you know how to create separate layers for your illustrations. Take a few moments to drag each element to its own layer. We are going to animate these elements in After Effects later:

Separate layers
You can edit your Illustrator file extensively. This is great for animation purposes.
The Eyedropper tool
One of my go-to editing tools for changing the color of an element is the Eyedropper tool, which can be used as follows:
- You use this tool by selecting the element you want to change.
- Go to the far-left of the Illustrator panel.
- Choose the Eyedropper Tool (I) or the fill icon:

Eyedropper
- Once you have selected either one of these, you can change the color of the element:

Changing the color of an element
Changing the color of text is done just as it is in After Effects. You can use the Eyedropper tool to choose a color onscreen to change your element to.
- To save your file, go up to the upper-left corner of the screen and, under the File tab, choose Save As...:

Save
This is where you can save your file in a variety of different formats. For our purposes, we want our illustrations saved as Illustrator files. Choose the Adobe Illustrator *AI file format.
Now jump back to After Effects. Once you import your Illustrator file into After Effects, you can jump back into Illustrator, modify the existing layers, save them, and they will automatically update in After Effects. However, any new layers created in the Illustrator file will not import into After Effects. If you need to add a new layer to an Illustrator file, I recommend you save a new Illustrator file. Import the new Illustrator file and incorporate that new layer into the After Effects project. Now we are ready to import our Illustrator files into After Effect and start animating them! I love this process because Illustrator files are so beautiful and easy to work with. So, the way we import our Illustrator files correctly is by choosing the following options:
- Import As: Composition - Retain Layer Sizes
- Import
Click on Create a composition.
Now that you have imported your Illustrator files, you should see a composition automatically appear in the project panel. Move it into your precomp folder:

Importing an Illustrator file
This will also import a folder with the individual layers. Move this folder into the IMAGES folder. I love this—it's so organized if you set it up correctly in Illustrator! Take a look at the size of these IMAGES in the folder. This is important because bigger layers increase the render time. Smaller-sized layers are easier to animate. Since these are Illustrator files, they can be scaled up and not lose their quality:
- Navigate to the Illustrator precomp.
- Duplicate this so that you have a backup copy in After Effects.
- Double-click on one of these PRECOMPS. You will see your laptop's individual elements set up exactly how we created them in Illustrator.
- When you import Illustrator files, be sure to turn on continuously rasterize:

Continuously rasterize
Continuously rasterize is a way to make your layers render in full resolution. Since these are Illustrator files, they will look crisp no matter how much they are scaled up. Now we are going to parent all of our elements to our monitor:

Parent elements
Copy all of these elements and paste them into the composition with your type composition, then do the following:
- Name this composition
ONLINE LEARNING - Select the monitor layer you parented everything to
- Scale this layer down to fit in the scene
When you move this layer, all your elements will move with it, because you parented them to it:

Monitor resize
Let's take a look at what we have created so far and be proud of ourselves! We now have our first logo element set up and ready to be animated. Great job!
Animation principles
At this point, I am going to slow things down and talk about animation principles. We are about to animate our logo and I want you to have a greater understanding of how to move your elements in convincing dynamic ways. Walt Disney—one of the great pioneers of animation—created 12 animation principles that we still use today:
- Timing
- Ease in and out (or slow in and slow out)
- Arcs
- Anticipation
- Exaggeration
- Squash and stretch
- Secondary action
- Follow through and overlapping action
- Straight ahead action and pose-to-pose action
- Staging
- Appeal
- Personality
The ones I want to pay special attention to are timing, ease in and out, secondary action, and personality. Timing is everything in animation. I will repeat this many times in this book. A rule I almost always use is the rule of 10 key frames. It takes the eye about 10 key frames to visually register anything. Make sure you have at least 10 frames between each action. You may need more frames if you have a lot of information on the screen, but this is a good starting point. Take special care in deciding how long something should be onscreen. You do not want the viewer to be bored, so do not let your animations lag. This is something you will get the hang of the more you animate.
The next thing to pay attention to is ease in and out. This is one of the most important things in animating a convincing, elegant action. In the real world, objects need time to accelerate and slow down, like the human body does; most objects move in this way. There's always a gradual easing at the start and end of a movement. To accomplish this in After Effects, we use the Easy Ease key frame assistant. Adding this immediately makes your animation look better.
Secondary actions also add some personality and realism to your animation. Secondary actions are when your objects move into their positions and have a secondary movement after they land there. It isn't necessary to always use secondary movements, but it can add weight and believability to your movements. It also makes your animations imperfect, which generates interest and creates personality. We will go over these principles a lot more in this book.
Animating a monitor
Now let's get to animating our computer monitor:
- Move 10–20 key frames down the timeline after our text appears on the screen
- Move the anchor point of the monitor to the bottom edge of your monitor
To move your anchor point, choose the pan behind tool (Y) and move the anchor point. Now this object will animate around the anchor point. It's important to set this up before animating your object:

Monitor anchor point
At this point, we need to lock our parameters where they are. We do that by creating blank key frames:
- Set scale and rotate key frames at this point
- Move back in the timeline (to the left) 10 key frames
- Scale down the monitor to 0
- Turn on motion blur for everything
Now we are going to create a fake camera move. This will be used as a transition element for our infographic video. We create camera nulls by parenting everything but the background of the null object:
- Go to the point in the timeline after the monitor has been animated.
- Create a null object. Select everything except the background.
- Parent everything selected to the null object.
- Easy ease all of these key frames.
- Turn on motion blur for everything except the background. Remember, motion blur must be turned on in two locations:

Motion blur to icons
Easy Ease will soften your movements and will make them look more organic. Select the key frames for the monitor and the null. Go to Animation | Keyframe Assistance | Easy Ease:

Easy Ease
Now let's animate our fake camera push on our monitor. Here are the steps:
- Stay at the point where the monitor has been animated.
- Create a key frame for the scale and position of the null object.
- Jump down (to the right) 10 key frames.
- Adjust the Position parameter and scale so that the monitor fills the screen:

Monitor full screen
Now we are going to animate all of our element pieces. The following are the steps to do that:
- Go to the point in the timeline where the monitor fills the screen and select all your elements to your monitor.
- Parent them to your monitor.
- For each of these elements, position the anchor points at the end of the line.
This will ensure our elements are animating from the correct spot:

Anchor point element
Now that your anchor points and your elements are parented correctly to the monitor, we can start animating them. Here's how we can do that:
- Select the first element and make a key frame for scale
- Jump down the timeline 10 key frames (to the right) and set key frames for scale
- Jump back to the previous scale key frame and scale that element down to 0
Great! Let's preview what we have so far! You should see your animated text on the screen. The next thing you should see is the monitor. Next, you should see your fake camera push in and one of your elements scaling up from the background. (All your elements should be in the background.)
The next step is to create a secondary scale movement. Go to the last key frame position, go 10 key frames to the right, then create a blank key frame.
This is how you create a blank key frame. This is helpful for holding a key frame. Also, you can use these triangles to jump between key frames:
- Jump backward to the keyframe (to the left).
- Scale that key frame up to 120:

Adding a blank key frame
Next, you need to Easy Ease these scale key frames:

Easy Ease elements
Excellent! Let's look at what we've accomplished. On previewing your work, you should have your monitor element animating on with secondary movement, with motion blur turned on. If turning motion blur on makes your computer run too slowly, you can turn motion blur off temporarily. You will need to remember to turn it back on before you render your project. Repeat the steps to animate the rest of your elements on for your monitor.
At this point, you have all the powerful tools for animating a text with text presets. You also know how to use a camera null. You are grooving along! The next thing we are going to do is animate more type using the same tools we used for the online learning introduction. Be certain that you have time to see the monitor animate on fully with all its pieces and the camera push in. Timing is everything. If you start your text animation too soon, it won't be a pretty sight. Let it rest for a bit, then start animating on the next message. Take a while to animate the text (today's schools are under pressure to do more with less). Be sure to pause in between the lines of text—this will give the viewer time to read it. We are going to add an adjustment layer in between the text and the monitor elements:
- Go to the Layer tab.
- Then go to Adjustment Layer.
- This will add an adjustment layer to your timeline:

Adjustment layer
Adjustment layers are similar to null objects. They are like a blank layer that you can add effects to and will affect everything underneath them. I'm dropping some important knowledge here; be sure to pick it up and remember it! Effects on an adjustment layer affect everything underneath it in the stacking order. We don't want it to affect the new animated type, so put the adjustment layer under the new type.
Now that we've added our adjustment layer, we can add an effect to it. Here's how we can do that:
Go to the point in the timeline where your monitor and all the elements are completely animated on
- Go to your effects and add a Fast Box Blur
- While the box radius is at
0, hit the stopwatch in the effects panel - Move down the timeline 10 key frames
- Increase the box radius to
60 - Turn on Repeat Edge Pixels
After turning on these settings, your screen should look similar to this:

Fast box blur
Great! Let's take a look at what we are working with here. As the fake camera moves in and out on the monitor, all the elements animated on the screen blur as the next message is animating on. I just taught you another transition effect. This is a rack focus transition. You have a lot of tools under your belt so far. Take a breather to be proud of what you have accomplished so far. Next, we are moving on to character animation—my favorite subject.
Creating text on a path
Have you seen those videos where text travels along a path? A custom path is a vector path that is drawn freehand using the pen tool in After Effects. In After Effects, you can make your type align with a path and travel along that path!
We can align our text to a path by following these steps:
- Create your type.
- Select the text layer.
- Create a path with the pen tool on the text layer.
- Twirl down Text.
- Twirl down Path Options.
- To the right, choose the path you just created (Mask 1):

Inserting text along a path
Animated text
For this project, we are creating an infographic video. Spend some time looking for some information you want to share in this project. You can also choose to download and use the same files I'm using, to follow along. Create your lines of text on two different layers, as follows:
- Create some text.
- Turn on title-safe guides.
- Make sure the text is centered.
- Create a background.
- Create text—
ONLINE LEARNING. - Turn on continuous rasterized on all layers.
- Use the following text presets:
- Fly in with a twist
- Straight in by word
Sometimes, when you select a text preset, you will need to adjust its settings. The text may not animate in the right place. You can adjust your preset starting position in the following way:
- Twirl down Text.
- Twirl down Animator 1.
- Twirl down Range Selector 1.
- Find Position and go to the start of the timeline. Adjust Position if necessary.
See the following screenshot for the correct Position parameter to adjust:

Adjusting preset position
Editing and importing Illustrator files
Understanding how to put your Illustrator artwork on individual layers is critical, because you can animate each of these layers in After Effects. These layers are vectors, so they can be scaled up without losing quality, and can easily be edited. Separating images from the background in Photoshop can be a long process. You can import ep files into Illustrator and save them as ai files. Make sure Illustrator is downloaded on your computer. Open up a file in Illustrator and let's take a look at layers!
In Illustrator, the layer stacking order is like Photoshop and After Effects; hierarchy is important. What's on the top layer will appear in front of everything else. To arrange these layers, simply select a layer and move it in the stacking order.
Very often, every element of an image will be on one layer. You can separate these and put them on their own layer in Illustrator. To see all of the elements of an image, twirl down Layers:

Illustrator twirl down
Creating a new layer in Illustrator
As you can see in this screenshot, there are other elements that make up this image. If you were to import this into After Effects, everything would be on one layer. You would not be able to animate these elements individually, though. Let's take a look at part of the interface of the Illustrator Layers panel. Look at the lower-right corner of the Illustrator window. There's a button called Create New Layer:

Illustrator new layer
Click on the Create New Layer button. This is how you create a new layer in Illustrator.
Once you've created a layer in Illustrator, you need to drag the element you want into that layer. If you double-click on that layer, you can rename it:

Dragging to a new layer
Now that you know how to create separate layers for your illustrations. Take a few moments to drag each element to its own layer. We are going to animate these elements in After Effects later:

Separate layers
You can edit your Illustrator file extensively. This is great for animation purposes.
The Eyedropper tool
One of my go-to editing tools for changing the color of an element is the Eyedropper tool, which can be used as follows:
- You use this tool by selecting the element you want to change.
- Go to the far-left of the Illustrator panel.
- Choose the Eyedropper Tool (I) or the fill icon:

Eyedropper
- Once you have selected either one of these, you can change the color of the element:

Changing the color of an element
Changing the color of text is done just as it is in After Effects. You can use the Eyedropper tool to choose a color onscreen to change your element to.
- To save your file, go up to the upper-left corner of the screen and, under the File tab, choose Save As...:

Save
This is where you can save your file in a variety of different formats. For our purposes, we want our illustrations saved as Illustrator files. Choose the Adobe Illustrator *AI file format.
Now jump back to After Effects. Once you import your Illustrator file into After Effects, you can jump back into Illustrator, modify the existing layers, save them, and they will automatically update in After Effects. However, any new layers created in the Illustrator file will not import into After Effects. If you need to add a new layer to an Illustrator file, I recommend you save a new Illustrator file. Import the new Illustrator file and incorporate that new layer into the After Effects project. Now we are ready to import our Illustrator files into After Effect and start animating them! I love this process because Illustrator files are so beautiful and easy to work with. So, the way we import our Illustrator files correctly is by choosing the following options:
- Import As: Composition - Retain Layer Sizes
- Import
Click on Create a composition.
Now that you have imported your Illustrator files, you should see a composition automatically appear in the project panel. Move it into your precomp folder:

Importing an Illustrator file
This will also import a folder with the individual layers. Move this folder into the IMAGES folder. I love this—it's so organized if you set it up correctly in Illustrator! Take a look at the size of these IMAGES in the folder. This is important because bigger layers increase the render time. Smaller-sized layers are easier to animate. Since these are Illustrator files, they can be scaled up and not lose their quality:
- Navigate to the Illustrator precomp.
- Duplicate this so that you have a backup copy in After Effects.
- Double-click on one of these PRECOMPS. You will see your laptop's individual elements set up exactly how we created them in Illustrator.
- When you import Illustrator files, be sure to turn on continuously rasterize:

Continuously rasterize
Continuously rasterize is a way to make your layers render in full resolution. Since these are Illustrator files, they will look crisp no matter how much they are scaled up. Now we are going to parent all of our elements to our monitor:

Parent elements
Copy all of these elements and paste them into the composition with your type composition, then do the following:
- Name this composition
ONLINE LEARNING - Select the monitor layer you parented everything to
- Scale this layer down to fit in the scene
When you move this layer, all your elements will move with it, because you parented them to it:

Monitor resize
Let's take a look at what we have created so far and be proud of ourselves! We now have our first logo element set up and ready to be animated. Great job!
Animation principles
At this point, I am going to slow things down and talk about animation principles. We are about to animate our logo and I want you to have a greater understanding of how to move your elements in convincing dynamic ways. Walt Disney—one of the great pioneers of animation—created 12 animation principles that we still use today:
- Timing
- Ease in and out (or slow in and slow out)
- Arcs
- Anticipation
- Exaggeration
- Squash and stretch
- Secondary action
- Follow through and overlapping action
- Straight ahead action and pose-to-pose action
- Staging
- Appeal
- Personality
The ones I want to pay special attention to are timing, ease in and out, secondary action, and personality. Timing is everything in animation. I will repeat this many times in this book. A rule I almost always use is the rule of 10 key frames. It takes the eye about 10 key frames to visually register anything. Make sure you have at least 10 frames between each action. You may need more frames if you have a lot of information on the screen, but this is a good starting point. Take special care in deciding how long something should be onscreen. You do not want the viewer to be bored, so do not let your animations lag. This is something you will get the hang of the more you animate.
The next thing to pay attention to is ease in and out. This is one of the most important things in animating a convincing, elegant action. In the real world, objects need time to accelerate and slow down, like the human body does; most objects move in this way. There's always a gradual easing at the start and end of a movement. To accomplish this in After Effects, we use the Easy Ease key frame assistant. Adding this immediately makes your animation look better.
Secondary actions also add some personality and realism to your animation. Secondary actions are when your objects move into their positions and have a secondary movement after they land there. It isn't necessary to always use secondary movements, but it can add weight and believability to your movements. It also makes your animations imperfect, which generates interest and creates personality. We will go over these principles a lot more in this book.
Animating a monitor
Now let's get to animating our computer monitor:
- Move 10–20 key frames down the timeline after our text appears on the screen
- Move the anchor point of the monitor to the bottom edge of your monitor
To move your anchor point, choose the pan behind tool (Y) and move the anchor point. Now this object will animate around the anchor point. It's important to set this up before animating your object:

Monitor anchor point
At this point, we need to lock our parameters where they are. We do that by creating blank key frames:
- Set scale and rotate key frames at this point
- Move back in the timeline (to the left) 10 key frames
- Scale down the monitor to 0
- Turn on motion blur for everything
Now we are going to create a fake camera move. This will be used as a transition element for our infographic video. We create camera nulls by parenting everything but the background of the null object:
- Go to the point in the timeline after the monitor has been animated.
- Create a null object. Select everything except the background.
- Parent everything selected to the null object.
- Easy ease all of these key frames.
- Turn on motion blur for everything except the background. Remember, motion blur must be turned on in two locations:

Motion blur to icons
Easy Ease will soften your movements and will make them look more organic. Select the key frames for the monitor and the null. Go to Animation | Keyframe Assistance | Easy Ease:

Easy Ease
Now let's animate our fake camera push on our monitor. Here are the steps:
- Stay at the point where the monitor has been animated.
- Create a key frame for the scale and position of the null object.
- Jump down (to the right) 10 key frames.
- Adjust the Position parameter and scale so that the monitor fills the screen:

Monitor full screen
Now we are going to animate all of our element pieces. The following are the steps to do that:
- Go to the point in the timeline where the monitor fills the screen and select all your elements to your monitor.
- Parent them to your monitor.
- For each of these elements, position the anchor points at the end of the line.
This will ensure our elements are animating from the correct spot:

Anchor point element
Now that your anchor points and your elements are parented correctly to the monitor, we can start animating them. Here's how we can do that:
- Select the first element and make a key frame for scale
- Jump down the timeline 10 key frames (to the right) and set key frames for scale
- Jump back to the previous scale key frame and scale that element down to 0
Great! Let's preview what we have so far! You should see your animated text on the screen. The next thing you should see is the monitor. Next, you should see your fake camera push in and one of your elements scaling up from the background. (All your elements should be in the background.)
The next step is to create a secondary scale movement. Go to the last key frame position, go 10 key frames to the right, then create a blank key frame.
This is how you create a blank key frame. This is helpful for holding a key frame. Also, you can use these triangles to jump between key frames:
- Jump backward to the keyframe (to the left).
- Scale that key frame up to 120:

Adding a blank key frame
Next, you need to Easy Ease these scale key frames:

Easy Ease elements
Excellent! Let's look at what we've accomplished. On previewing your work, you should have your monitor element animating on with secondary movement, with motion blur turned on. If turning motion blur on makes your computer run too slowly, you can turn motion blur off temporarily. You will need to remember to turn it back on before you render your project. Repeat the steps to animate the rest of your elements on for your monitor.
At this point, you have all the powerful tools for animating a text with text presets. You also know how to use a camera null. You are grooving along! The next thing we are going to do is animate more type using the same tools we used for the online learning introduction. Be certain that you have time to see the monitor animate on fully with all its pieces and the camera push in. Timing is everything. If you start your text animation too soon, it won't be a pretty sight. Let it rest for a bit, then start animating on the next message. Take a while to animate the text (today's schools are under pressure to do more with less). Be sure to pause in between the lines of text—this will give the viewer time to read it. We are going to add an adjustment layer in between the text and the monitor elements:
- Go to the Layer tab.
- Then go to Adjustment Layer.
- This will add an adjustment layer to your timeline:

Adjustment layer
Adjustment layers are similar to null objects. They are like a blank layer that you can add effects to and will affect everything underneath them. I'm dropping some important knowledge here; be sure to pick it up and remember it! Effects on an adjustment layer affect everything underneath it in the stacking order. We don't want it to affect the new animated type, so put the adjustment layer under the new type.
Now that we've added our adjustment layer, we can add an effect to it. Here's how we can do that:
Go to the point in the timeline where your monitor and all the elements are completely animated on
- Go to your effects and add a Fast Box Blur
- While the box radius is at
0, hit the stopwatch in the effects panel - Move down the timeline 10 key frames
- Increase the box radius to
60 - Turn on Repeat Edge Pixels
After turning on these settings, your screen should look similar to this:

Fast box blur
Great! Let's take a look at what we are working with here. As the fake camera moves in and out on the monitor, all the elements animated on the screen blur as the next message is animating on. I just taught you another transition effect. This is a rack focus transition. You have a lot of tools under your belt so far. Take a breather to be proud of what you have accomplished so far. Next, we are moving on to character animation—my favorite subject.
Animated text
For this project, we are creating an infographic video. Spend some time looking for some information you want to share in this project. You can also choose to download and use the same files I'm using, to follow along. Create your lines of text on two different layers, as follows:
- Create some text.
- Turn on title-safe guides.
- Make sure the text is centered.
- Create a background.
- Create text—
ONLINE LEARNING. - Turn on continuous rasterized on all layers.
- Use the following text presets:
- Fly in with a twist
- Straight in by word
Sometimes, when you select a text preset, you will need to adjust its settings. The text may not animate in the right place. You can adjust your preset starting position in the following way:
- Twirl down Text.
- Twirl down Animator 1.
- Twirl down Range Selector 1.
- Find Position and go to the start of the timeline. Adjust Position if necessary.
See the following screenshot for the correct Position parameter to adjust:

Adjusting preset position
Editing and importing Illustrator files
Understanding how to put your Illustrator artwork on individual layers is critical, because you can animate each of these layers in After Effects. These layers are vectors, so they can be scaled up without losing quality, and can easily be edited. Separating images from the background in Photoshop can be a long process. You can import ep files into Illustrator and save them as ai files. Make sure Illustrator is downloaded on your computer. Open up a file in Illustrator and let's take a look at layers!
In Illustrator, the layer stacking order is like Photoshop and After Effects; hierarchy is important. What's on the top layer will appear in front of everything else. To arrange these layers, simply select a layer and move it in the stacking order.
Very often, every element of an image will be on one layer. You can separate these and put them on their own layer in Illustrator. To see all of the elements of an image, twirl down Layers:

Illustrator twirl down
Creating a new layer in Illustrator
As you can see in this screenshot, there are other elements that make up this image. If you were to import this into After Effects, everything would be on one layer. You would not be able to animate these elements individually, though. Let's take a look at part of the interface of the Illustrator Layers panel. Look at the lower-right corner of the Illustrator window. There's a button called Create New Layer:

Illustrator new layer
Click on the Create New Layer button. This is how you create a new layer in Illustrator.
Once you've created a layer in Illustrator, you need to drag the element you want into that layer. If you double-click on that layer, you can rename it:

Dragging to a new layer
Now that you know how to create separate layers for your illustrations. Take a few moments to drag each element to its own layer. We are going to animate these elements in After Effects later:

Separate layers
You can edit your Illustrator file extensively. This is great for animation purposes.
The Eyedropper tool
One of my go-to editing tools for changing the color of an element is the Eyedropper tool, which can be used as follows:
- You use this tool by selecting the element you want to change.
- Go to the far-left of the Illustrator panel.
- Choose the Eyedropper Tool (I) or the fill icon:

Eyedropper
- Once you have selected either one of these, you can change the color of the element:

Changing the color of an element
Changing the color of text is done just as it is in After Effects. You can use the Eyedropper tool to choose a color onscreen to change your element to.
- To save your file, go up to the upper-left corner of the screen and, under the File tab, choose Save As...:

Save
This is where you can save your file in a variety of different formats. For our purposes, we want our illustrations saved as Illustrator files. Choose the Adobe Illustrator *AI file format.
Now jump back to After Effects. Once you import your Illustrator file into After Effects, you can jump back into Illustrator, modify the existing layers, save them, and they will automatically update in After Effects. However, any new layers created in the Illustrator file will not import into After Effects. If you need to add a new layer to an Illustrator file, I recommend you save a new Illustrator file. Import the new Illustrator file and incorporate that new layer into the After Effects project. Now we are ready to import our Illustrator files into After Effect and start animating them! I love this process because Illustrator files are so beautiful and easy to work with. So, the way we import our Illustrator files correctly is by choosing the following options:
- Import As: Composition - Retain Layer Sizes
- Import
Click on Create a composition.
Now that you have imported your Illustrator files, you should see a composition automatically appear in the project panel. Move it into your precomp folder:

Importing an Illustrator file
This will also import a folder with the individual layers. Move this folder into the IMAGES folder. I love this—it's so organized if you set it up correctly in Illustrator! Take a look at the size of these IMAGES in the folder. This is important because bigger layers increase the render time. Smaller-sized layers are easier to animate. Since these are Illustrator files, they can be scaled up and not lose their quality:
- Navigate to the Illustrator precomp.
- Duplicate this so that you have a backup copy in After Effects.
- Double-click on one of these PRECOMPS. You will see your laptop's individual elements set up exactly how we created them in Illustrator.
- When you import Illustrator files, be sure to turn on continuously rasterize:

Continuously rasterize
Continuously rasterize is a way to make your layers render in full resolution. Since these are Illustrator files, they will look crisp no matter how much they are scaled up. Now we are going to parent all of our elements to our monitor:

Parent elements
Copy all of these elements and paste them into the composition with your type composition, then do the following:
- Name this composition
ONLINE LEARNING - Select the monitor layer you parented everything to
- Scale this layer down to fit in the scene
When you move this layer, all your elements will move with it, because you parented them to it:

Monitor resize
Let's take a look at what we have created so far and be proud of ourselves! We now have our first logo element set up and ready to be animated. Great job!
Animation principles
At this point, I am going to slow things down and talk about animation principles. We are about to animate our logo and I want you to have a greater understanding of how to move your elements in convincing dynamic ways. Walt Disney—one of the great pioneers of animation—created 12 animation principles that we still use today:
- Timing
- Ease in and out (or slow in and slow out)
- Arcs
- Anticipation
- Exaggeration
- Squash and stretch
- Secondary action
- Follow through and overlapping action
- Straight ahead action and pose-to-pose action
- Staging
- Appeal
- Personality
The ones I want to pay special attention to are timing, ease in and out, secondary action, and personality. Timing is everything in animation. I will repeat this many times in this book. A rule I almost always use is the rule of 10 key frames. It takes the eye about 10 key frames to visually register anything. Make sure you have at least 10 frames between each action. You may need more frames if you have a lot of information on the screen, but this is a good starting point. Take special care in deciding how long something should be onscreen. You do not want the viewer to be bored, so do not let your animations lag. This is something you will get the hang of the more you animate.
The next thing to pay attention to is ease in and out. This is one of the most important things in animating a convincing, elegant action. In the real world, objects need time to accelerate and slow down, like the human body does; most objects move in this way. There's always a gradual easing at the start and end of a movement. To accomplish this in After Effects, we use the Easy Ease key frame assistant. Adding this immediately makes your animation look better.
Secondary actions also add some personality and realism to your animation. Secondary actions are when your objects move into their positions and have a secondary movement after they land there. It isn't necessary to always use secondary movements, but it can add weight and believability to your movements. It also makes your animations imperfect, which generates interest and creates personality. We will go over these principles a lot more in this book.
Animating a monitor
Now let's get to animating our computer monitor:
- Move 10–20 key frames down the timeline after our text appears on the screen
- Move the anchor point of the monitor to the bottom edge of your monitor
To move your anchor point, choose the pan behind tool (Y) and move the anchor point. Now this object will animate around the anchor point. It's important to set this up before animating your object:

Monitor anchor point
At this point, we need to lock our parameters where they are. We do that by creating blank key frames:
- Set scale and rotate key frames at this point
- Move back in the timeline (to the left) 10 key frames
- Scale down the monitor to 0
- Turn on motion blur for everything
Now we are going to create a fake camera move. This will be used as a transition element for our infographic video. We create camera nulls by parenting everything but the background of the null object:
- Go to the point in the timeline after the monitor has been animated.
- Create a null object. Select everything except the background.
- Parent everything selected to the null object.
- Easy ease all of these key frames.
- Turn on motion blur for everything except the background. Remember, motion blur must be turned on in two locations:

Motion blur to icons
Easy Ease will soften your movements and will make them look more organic. Select the key frames for the monitor and the null. Go to Animation | Keyframe Assistance | Easy Ease:

Easy Ease
Now let's animate our fake camera push on our monitor. Here are the steps:
- Stay at the point where the monitor has been animated.
- Create a key frame for the scale and position of the null object.
- Jump down (to the right) 10 key frames.
- Adjust the Position parameter and scale so that the monitor fills the screen:

Monitor full screen
Now we are going to animate all of our element pieces. The following are the steps to do that:
- Go to the point in the timeline where the monitor fills the screen and select all your elements to your monitor.
- Parent them to your monitor.
- For each of these elements, position the anchor points at the end of the line.
This will ensure our elements are animating from the correct spot:

Anchor point element
Now that your anchor points and your elements are parented correctly to the monitor, we can start animating them. Here's how we can do that:
- Select the first element and make a key frame for scale
- Jump down the timeline 10 key frames (to the right) and set key frames for scale
- Jump back to the previous scale key frame and scale that element down to 0
Great! Let's preview what we have so far! You should see your animated text on the screen. The next thing you should see is the monitor. Next, you should see your fake camera push in and one of your elements scaling up from the background. (All your elements should be in the background.)
The next step is to create a secondary scale movement. Go to the last key frame position, go 10 key frames to the right, then create a blank key frame.
This is how you create a blank key frame. This is helpful for holding a key frame. Also, you can use these triangles to jump between key frames:
- Jump backward to the keyframe (to the left).
- Scale that key frame up to 120:

Adding a blank key frame
Next, you need to Easy Ease these scale key frames:

Easy Ease elements
Excellent! Let's look at what we've accomplished. On previewing your work, you should have your monitor element animating on with secondary movement, with motion blur turned on. If turning motion blur on makes your computer run too slowly, you can turn motion blur off temporarily. You will need to remember to turn it back on before you render your project. Repeat the steps to animate the rest of your elements on for your monitor.
At this point, you have all the powerful tools for animating a text with text presets. You also know how to use a camera null. You are grooving along! The next thing we are going to do is animate more type using the same tools we used for the online learning introduction. Be certain that you have time to see the monitor animate on fully with all its pieces and the camera push in. Timing is everything. If you start your text animation too soon, it won't be a pretty sight. Let it rest for a bit, then start animating on the next message. Take a while to animate the text (today's schools are under pressure to do more with less). Be sure to pause in between the lines of text—this will give the viewer time to read it. We are going to add an adjustment layer in between the text and the monitor elements:
- Go to the Layer tab.
- Then go to Adjustment Layer.
- This will add an adjustment layer to your timeline:

Adjustment layer
Adjustment layers are similar to null objects. They are like a blank layer that you can add effects to and will affect everything underneath them. I'm dropping some important knowledge here; be sure to pick it up and remember it! Effects on an adjustment layer affect everything underneath it in the stacking order. We don't want it to affect the new animated type, so put the adjustment layer under the new type.
Now that we've added our adjustment layer, we can add an effect to it. Here's how we can do that:
Go to the point in the timeline where your monitor and all the elements are completely animated on
- Go to your effects and add a Fast Box Blur
- While the box radius is at
0, hit the stopwatch in the effects panel - Move down the timeline 10 key frames
- Increase the box radius to
60 - Turn on Repeat Edge Pixels
After turning on these settings, your screen should look similar to this:

Fast box blur
Great! Let's take a look at what we are working with here. As the fake camera moves in and out on the monitor, all the elements animated on the screen blur as the next message is animating on. I just taught you another transition effect. This is a rack focus transition. You have a lot of tools under your belt so far. Take a breather to be proud of what you have accomplished so far. Next, we are moving on to character animation—my favorite subject.
Editing and importing Illustrator files
Understanding how to put your Illustrator artwork on individual layers is critical, because you can animate each of these layers in After Effects. These layers are vectors, so they can be scaled up without losing quality, and can easily be edited. Separating images from the background in Photoshop can be a long process. You can import ep files into Illustrator and save them as ai files. Make sure Illustrator is downloaded on your computer. Open up a file in Illustrator and let's take a look at layers!
In Illustrator, the layer stacking order is like Photoshop and After Effects; hierarchy is important. What's on the top layer will appear in front of everything else. To arrange these layers, simply select a layer and move it in the stacking order.
Very often, every element of an image will be on one layer. You can separate these and put them on their own layer in Illustrator. To see all of the elements of an image, twirl down Layers:

Illustrator twirl down
Creating a new layer in Illustrator
As you can see in this screenshot, there are other elements that make up this image. If you were to import this into After Effects, everything would be on one layer. You would not be able to animate these elements individually, though. Let's take a look at part of the interface of the Illustrator Layers panel. Look at the lower-right corner of the Illustrator window. There's a button called Create New Layer:

Illustrator new layer
Click on the Create New Layer button. This is how you create a new layer in Illustrator.
Once you've created a layer in Illustrator, you need to drag the element you want into that layer. If you double-click on that layer, you can rename it:

Dragging to a new layer
Now that you know how to create separate layers for your illustrations. Take a few moments to drag each element to its own layer. We are going to animate these elements in After Effects later:

Separate layers
You can edit your Illustrator file extensively. This is great for animation purposes.
The Eyedropper tool
One of my go-to editing tools for changing the color of an element is the Eyedropper tool, which can be used as follows:
- You use this tool by selecting the element you want to change.
- Go to the far-left of the Illustrator panel.
- Choose the Eyedropper Tool (I) or the fill icon:

Eyedropper
- Once you have selected either one of these, you can change the color of the element:

Changing the color of an element
Changing the color of text is done just as it is in After Effects. You can use the Eyedropper tool to choose a color onscreen to change your element to.
- To save your file, go up to the upper-left corner of the screen and, under the File tab, choose Save As...:

Save
This is where you can save your file in a variety of different formats. For our purposes, we want our illustrations saved as Illustrator files. Choose the Adobe Illustrator *AI file format.
Now jump back to After Effects. Once you import your Illustrator file into After Effects, you can jump back into Illustrator, modify the existing layers, save them, and they will automatically update in After Effects. However, any new layers created in the Illustrator file will not import into After Effects. If you need to add a new layer to an Illustrator file, I recommend you save a new Illustrator file. Import the new Illustrator file and incorporate that new layer into the After Effects project. Now we are ready to import our Illustrator files into After Effect and start animating them! I love this process because Illustrator files are so beautiful and easy to work with. So, the way we import our Illustrator files correctly is by choosing the following options:
- Import As: Composition - Retain Layer Sizes
- Import
Click on Create a composition.
Now that you have imported your Illustrator files, you should see a composition automatically appear in the project panel. Move it into your precomp folder:

Importing an Illustrator file
This will also import a folder with the individual layers. Move this folder into the IMAGES folder. I love this—it's so organized if you set it up correctly in Illustrator! Take a look at the size of these IMAGES in the folder. This is important because bigger layers increase the render time. Smaller-sized layers are easier to animate. Since these are Illustrator files, they can be scaled up and not lose their quality:
- Navigate to the Illustrator precomp.
- Duplicate this so that you have a backup copy in After Effects.
- Double-click on one of these PRECOMPS. You will see your laptop's individual elements set up exactly how we created them in Illustrator.
- When you import Illustrator files, be sure to turn on continuously rasterize:

Continuously rasterize
Continuously rasterize is a way to make your layers render in full resolution. Since these are Illustrator files, they will look crisp no matter how much they are scaled up. Now we are going to parent all of our elements to our monitor:

Parent elements
Copy all of these elements and paste them into the composition with your type composition, then do the following:
- Name this composition
ONLINE LEARNING - Select the monitor layer you parented everything to
- Scale this layer down to fit in the scene
When you move this layer, all your elements will move with it, because you parented them to it:

Monitor resize
Let's take a look at what we have created so far and be proud of ourselves! We now have our first logo element set up and ready to be animated. Great job!
Animation principles
At this point, I am going to slow things down and talk about animation principles. We are about to animate our logo and I want you to have a greater understanding of how to move your elements in convincing dynamic ways. Walt Disney—one of the great pioneers of animation—created 12 animation principles that we still use today:
- Timing
- Ease in and out (or slow in and slow out)
- Arcs
- Anticipation
- Exaggeration
- Squash and stretch
- Secondary action
- Follow through and overlapping action
- Straight ahead action and pose-to-pose action
- Staging
- Appeal
- Personality
The ones I want to pay special attention to are timing, ease in and out, secondary action, and personality. Timing is everything in animation. I will repeat this many times in this book. A rule I almost always use is the rule of 10 key frames. It takes the eye about 10 key frames to visually register anything. Make sure you have at least 10 frames between each action. You may need more frames if you have a lot of information on the screen, but this is a good starting point. Take special care in deciding how long something should be onscreen. You do not want the viewer to be bored, so do not let your animations lag. This is something you will get the hang of the more you animate.
The next thing to pay attention to is ease in and out. This is one of the most important things in animating a convincing, elegant action. In the real world, objects need time to accelerate and slow down, like the human body does; most objects move in this way. There's always a gradual easing at the start and end of a movement. To accomplish this in After Effects, we use the Easy Ease key frame assistant. Adding this immediately makes your animation look better.
Secondary actions also add some personality and realism to your animation. Secondary actions are when your objects move into their positions and have a secondary movement after they land there. It isn't necessary to always use secondary movements, but it can add weight and believability to your movements. It also makes your animations imperfect, which generates interest and creates personality. We will go over these principles a lot more in this book.
Animating a monitor
Now let's get to animating our computer monitor:
- Move 10–20 key frames down the timeline after our text appears on the screen
- Move the anchor point of the monitor to the bottom edge of your monitor
To move your anchor point, choose the pan behind tool (Y) and move the anchor point. Now this object will animate around the anchor point. It's important to set this up before animating your object:

Monitor anchor point
At this point, we need to lock our parameters where they are. We do that by creating blank key frames:
- Set scale and rotate key frames at this point
- Move back in the timeline (to the left) 10 key frames
- Scale down the monitor to 0
- Turn on motion blur for everything
Now we are going to create a fake camera move. This will be used as a transition element for our infographic video. We create camera nulls by parenting everything but the background of the null object:
- Go to the point in the timeline after the monitor has been animated.
- Create a null object. Select everything except the background.
- Parent everything selected to the null object.
- Easy ease all of these key frames.
- Turn on motion blur for everything except the background. Remember, motion blur must be turned on in two locations:

Motion blur to icons
Easy Ease will soften your movements and will make them look more organic. Select the key frames for the monitor and the null. Go to Animation | Keyframe Assistance | Easy Ease:

Easy Ease
Now let's animate our fake camera push on our monitor. Here are the steps:
- Stay at the point where the monitor has been animated.
- Create a key frame for the scale and position of the null object.
- Jump down (to the right) 10 key frames.
- Adjust the Position parameter and scale so that the monitor fills the screen:

Monitor full screen
Now we are going to animate all of our element pieces. The following are the steps to do that:
- Go to the point in the timeline where the monitor fills the screen and select all your elements to your monitor.
- Parent them to your monitor.
- For each of these elements, position the anchor points at the end of the line.
This will ensure our elements are animating from the correct spot:

Anchor point element
Now that your anchor points and your elements are parented correctly to the monitor, we can start animating them. Here's how we can do that:
- Select the first element and make a key frame for scale
- Jump down the timeline 10 key frames (to the right) and set key frames for scale
- Jump back to the previous scale key frame and scale that element down to 0
Great! Let's preview what we have so far! You should see your animated text on the screen. The next thing you should see is the monitor. Next, you should see your fake camera push in and one of your elements scaling up from the background. (All your elements should be in the background.)
The next step is to create a secondary scale movement. Go to the last key frame position, go 10 key frames to the right, then create a blank key frame.
This is how you create a blank key frame. This is helpful for holding a key frame. Also, you can use these triangles to jump between key frames:
- Jump backward to the keyframe (to the left).
- Scale that key frame up to 120:

Adding a blank key frame
Next, you need to Easy Ease these scale key frames:

Easy Ease elements
Excellent! Let's look at what we've accomplished. On previewing your work, you should have your monitor element animating on with secondary movement, with motion blur turned on. If turning motion blur on makes your computer run too slowly, you can turn motion blur off temporarily. You will need to remember to turn it back on before you render your project. Repeat the steps to animate the rest of your elements on for your monitor.
At this point, you have all the powerful tools for animating a text with text presets. You also know how to use a camera null. You are grooving along! The next thing we are going to do is animate more type using the same tools we used for the online learning introduction. Be certain that you have time to see the monitor animate on fully with all its pieces and the camera push in. Timing is everything. If you start your text animation too soon, it won't be a pretty sight. Let it rest for a bit, then start animating on the next message. Take a while to animate the text (today's schools are under pressure to do more with less). Be sure to pause in between the lines of text—this will give the viewer time to read it. We are going to add an adjustment layer in between the text and the monitor elements:
- Go to the Layer tab.
- Then go to Adjustment Layer.
- This will add an adjustment layer to your timeline:

Adjustment layer
Adjustment layers are similar to null objects. They are like a blank layer that you can add effects to and will affect everything underneath them. I'm dropping some important knowledge here; be sure to pick it up and remember it! Effects on an adjustment layer affect everything underneath it in the stacking order. We don't want it to affect the new animated type, so put the adjustment layer under the new type.
Now that we've added our adjustment layer, we can add an effect to it. Here's how we can do that:
Go to the point in the timeline where your monitor and all the elements are completely animated on
- Go to your effects and add a Fast Box Blur
- While the box radius is at
0, hit the stopwatch in the effects panel - Move down the timeline 10 key frames
- Increase the box radius to
60 - Turn on Repeat Edge Pixels
After turning on these settings, your screen should look similar to this:

Fast box blur
Great! Let's take a look at what we are working with here. As the fake camera moves in and out on the monitor, all the elements animated on the screen blur as the next message is animating on. I just taught you another transition effect. This is a rack focus transition. You have a lot of tools under your belt so far. Take a breather to be proud of what you have accomplished so far. Next, we are moving on to character animation—my favorite subject.
Creating a new layer in Illustrator
As you can see in this screenshot, there are other elements that make up this image. If you were to import this into After Effects, everything would be on one layer. You would not be able to animate these elements individually, though. Let's take a look at part of the interface of the Illustrator Layers panel. Look at the lower-right corner of the Illustrator window. There's a button called Create New Layer:

Illustrator new layer
Click on the Create New Layer button. This is how you create a new layer in Illustrator.
Once you've created a layer in Illustrator, you need to drag the element you want into that layer. If you double-click on that layer, you can rename it:

Dragging to a new layer
Now that you know how to create separate layers for your illustrations. Take a few moments to drag each element to its own layer. We are going to animate these elements in After Effects later:

Separate layers
You can edit your Illustrator file extensively. This is great for animation purposes.
The Eyedropper tool
One of my go-to editing tools for changing the color of an element is the Eyedropper tool, which can be used as follows:
- You use this tool by selecting the element you want to change.
- Go to the far-left of the Illustrator panel.
- Choose the Eyedropper Tool (I) or the fill icon:

Eyedropper
- Once you have selected either one of these, you can change the color of the element:

Changing the color of an element
Changing the color of text is done just as it is in After Effects. You can use the Eyedropper tool to choose a color onscreen to change your element to.
- To save your file, go up to the upper-left corner of the screen and, under the File tab, choose Save As...:

Save
This is where you can save your file in a variety of different formats. For our purposes, we want our illustrations saved as Illustrator files. Choose the Adobe Illustrator *AI file format.
Now jump back to After Effects. Once you import your Illustrator file into After Effects, you can jump back into Illustrator, modify the existing layers, save them, and they will automatically update in After Effects. However, any new layers created in the Illustrator file will not import into After Effects. If you need to add a new layer to an Illustrator file, I recommend you save a new Illustrator file. Import the new Illustrator file and incorporate that new layer into the After Effects project. Now we are ready to import our Illustrator files into After Effect and start animating them! I love this process because Illustrator files are so beautiful and easy to work with. So, the way we import our Illustrator files correctly is by choosing the following options:
- Import As: Composition - Retain Layer Sizes
- Import
Click on Create a composition.
Now that you have imported your Illustrator files, you should see a composition automatically appear in the project panel. Move it into your precomp folder:

Importing an Illustrator file
This will also import a folder with the individual layers. Move this folder into the IMAGES folder. I love this—it's so organized if you set it up correctly in Illustrator! Take a look at the size of these IMAGES in the folder. This is important because bigger layers increase the render time. Smaller-sized layers are easier to animate. Since these are Illustrator files, they can be scaled up and not lose their quality:
- Navigate to the Illustrator precomp.
- Duplicate this so that you have a backup copy in After Effects.
- Double-click on one of these PRECOMPS. You will see your laptop's individual elements set up exactly how we created them in Illustrator.
- When you import Illustrator files, be sure to turn on continuously rasterize:

Continuously rasterize
Continuously rasterize is a way to make your layers render in full resolution. Since these are Illustrator files, they will look crisp no matter how much they are scaled up. Now we are going to parent all of our elements to our monitor:

Parent elements
Copy all of these elements and paste them into the composition with your type composition, then do the following:
- Name this composition
ONLINE LEARNING - Select the monitor layer you parented everything to
- Scale this layer down to fit in the scene
When you move this layer, all your elements will move with it, because you parented them to it:

Monitor resize
Let's take a look at what we have created so far and be proud of ourselves! We now have our first logo element set up and ready to be animated. Great job!
Animation principles
At this point, I am going to slow things down and talk about animation principles. We are about to animate our logo and I want you to have a greater understanding of how to move your elements in convincing dynamic ways. Walt Disney—one of the great pioneers of animation—created 12 animation principles that we still use today:
- Timing
- Ease in and out (or slow in and slow out)
- Arcs
- Anticipation
- Exaggeration
- Squash and stretch
- Secondary action
- Follow through and overlapping action
- Straight ahead action and pose-to-pose action
- Staging
- Appeal
- Personality
The ones I want to pay special attention to are timing, ease in and out, secondary action, and personality. Timing is everything in animation. I will repeat this many times in this book. A rule I almost always use is the rule of 10 key frames. It takes the eye about 10 key frames to visually register anything. Make sure you have at least 10 frames between each action. You may need more frames if you have a lot of information on the screen, but this is a good starting point. Take special care in deciding how long something should be onscreen. You do not want the viewer to be bored, so do not let your animations lag. This is something you will get the hang of the more you animate.
The next thing to pay attention to is ease in and out. This is one of the most important things in animating a convincing, elegant action. In the real world, objects need time to accelerate and slow down, like the human body does; most objects move in this way. There's always a gradual easing at the start and end of a movement. To accomplish this in After Effects, we use the Easy Ease key frame assistant. Adding this immediately makes your animation look better.
Secondary actions also add some personality and realism to your animation. Secondary actions are when your objects move into their positions and have a secondary movement after they land there. It isn't necessary to always use secondary movements, but it can add weight and believability to your movements. It also makes your animations imperfect, which generates interest and creates personality. We will go over these principles a lot more in this book.
Animating a monitor
Now let's get to animating our computer monitor:
- Move 10–20 key frames down the timeline after our text appears on the screen
- Move the anchor point of the monitor to the bottom edge of your monitor
To move your anchor point, choose the pan behind tool (Y) and move the anchor point. Now this object will animate around the anchor point. It's important to set this up before animating your object:

Monitor anchor point
At this point, we need to lock our parameters where they are. We do that by creating blank key frames:
- Set scale and rotate key frames at this point
- Move back in the timeline (to the left) 10 key frames
- Scale down the monitor to 0
- Turn on motion blur for everything
Now we are going to create a fake camera move. This will be used as a transition element for our infographic video. We create camera nulls by parenting everything but the background of the null object:
- Go to the point in the timeline after the monitor has been animated.
- Create a null object. Select everything except the background.
- Parent everything selected to the null object.
- Easy ease all of these key frames.
- Turn on motion blur for everything except the background. Remember, motion blur must be turned on in two locations:

Motion blur to icons
Easy Ease will soften your movements and will make them look more organic. Select the key frames for the monitor and the null. Go to Animation | Keyframe Assistance | Easy Ease:

Easy Ease
Now let's animate our fake camera push on our monitor. Here are the steps:
- Stay at the point where the monitor has been animated.
- Create a key frame for the scale and position of the null object.
- Jump down (to the right) 10 key frames.
- Adjust the Position parameter and scale so that the monitor fills the screen:

Monitor full screen
Now we are going to animate all of our element pieces. The following are the steps to do that:
- Go to the point in the timeline where the monitor fills the screen and select all your elements to your monitor.
- Parent them to your monitor.
- For each of these elements, position the anchor points at the end of the line.
This will ensure our elements are animating from the correct spot:

Anchor point element
Now that your anchor points and your elements are parented correctly to the monitor, we can start animating them. Here's how we can do that:
- Select the first element and make a key frame for scale
- Jump down the timeline 10 key frames (to the right) and set key frames for scale
- Jump back to the previous scale key frame and scale that element down to 0
Great! Let's preview what we have so far! You should see your animated text on the screen. The next thing you should see is the monitor. Next, you should see your fake camera push in and one of your elements scaling up from the background. (All your elements should be in the background.)
The next step is to create a secondary scale movement. Go to the last key frame position, go 10 key frames to the right, then create a blank key frame.
This is how you create a blank key frame. This is helpful for holding a key frame. Also, you can use these triangles to jump between key frames:
- Jump backward to the keyframe (to the left).
- Scale that key frame up to 120:

Adding a blank key frame
Next, you need to Easy Ease these scale key frames:

Easy Ease elements
Excellent! Let's look at what we've accomplished. On previewing your work, you should have your monitor element animating on with secondary movement, with motion blur turned on. If turning motion blur on makes your computer run too slowly, you can turn motion blur off temporarily. You will need to remember to turn it back on before you render your project. Repeat the steps to animate the rest of your elements on for your monitor.
At this point, you have all the powerful tools for animating a text with text presets. You also know how to use a camera null. You are grooving along! The next thing we are going to do is animate more type using the same tools we used for the online learning introduction. Be certain that you have time to see the monitor animate on fully with all its pieces and the camera push in. Timing is everything. If you start your text animation too soon, it won't be a pretty sight. Let it rest for a bit, then start animating on the next message. Take a while to animate the text (today's schools are under pressure to do more with less). Be sure to pause in between the lines of text—this will give the viewer time to read it. We are going to add an adjustment layer in between the text and the monitor elements:
- Go to the Layer tab.
- Then go to Adjustment Layer.
- This will add an adjustment layer to your timeline:

Adjustment layer
Adjustment layers are similar to null objects. They are like a blank layer that you can add effects to and will affect everything underneath them. I'm dropping some important knowledge here; be sure to pick it up and remember it! Effects on an adjustment layer affect everything underneath it in the stacking order. We don't want it to affect the new animated type, so put the adjustment layer under the new type.
Now that we've added our adjustment layer, we can add an effect to it. Here's how we can do that:
Go to the point in the timeline where your monitor and all the elements are completely animated on
- Go to your effects and add a Fast Box Blur
- While the box radius is at
0, hit the stopwatch in the effects panel - Move down the timeline 10 key frames
- Increase the box radius to
60 - Turn on Repeat Edge Pixels
After turning on these settings, your screen should look similar to this:

Fast box blur
Great! Let's take a look at what we are working with here. As the fake camera moves in and out on the monitor, all the elements animated on the screen blur as the next message is animating on. I just taught you another transition effect. This is a rack focus transition. You have a lot of tools under your belt so far. Take a breather to be proud of what you have accomplished so far. Next, we are moving on to character animation—my favorite subject.
The Eyedropper tool
One of my go-to editing tools for changing the color of an element is the Eyedropper tool, which can be used as follows:
- You use this tool by selecting the element you want to change.
- Go to the far-left of the Illustrator panel.
- Choose the Eyedropper Tool (I) or the fill icon:

Eyedropper
- Once you have selected either one of these, you can change the color of the element:

Changing the color of an element
Changing the color of text is done just as it is in After Effects. You can use the Eyedropper tool to choose a color onscreen to change your element to.
- To save your file, go up to the upper-left corner of the screen and, under the File tab, choose Save As...:

Save
This is where you can save your file in a variety of different formats. For our purposes, we want our illustrations saved as Illustrator files. Choose the Adobe Illustrator *AI file format.
Now jump back to After Effects. Once you import your Illustrator file into After Effects, you can jump back into Illustrator, modify the existing layers, save them, and they will automatically update in After Effects. However, any new layers created in the Illustrator file will not import into After Effects. If you need to add a new layer to an Illustrator file, I recommend you save a new Illustrator file. Import the new Illustrator file and incorporate that new layer into the After Effects project. Now we are ready to import our Illustrator files into After Effect and start animating them! I love this process because Illustrator files are so beautiful and easy to work with. So, the way we import our Illustrator files correctly is by choosing the following options:
- Import As: Composition - Retain Layer Sizes
- Import
Click on Create a composition.
Now that you have imported your Illustrator files, you should see a composition automatically appear in the project panel. Move it into your precomp folder:

Importing an Illustrator file
This will also import a folder with the individual layers. Move this folder into the IMAGES folder. I love this—it's so organized if you set it up correctly in Illustrator! Take a look at the size of these IMAGES in the folder. This is important because bigger layers increase the render time. Smaller-sized layers are easier to animate. Since these are Illustrator files, they can be scaled up and not lose their quality:
- Navigate to the Illustrator precomp.
- Duplicate this so that you have a backup copy in After Effects.
- Double-click on one of these PRECOMPS. You will see your laptop's individual elements set up exactly how we created them in Illustrator.
- When you import Illustrator files, be sure to turn on continuously rasterize:

Continuously rasterize
Continuously rasterize is a way to make your layers render in full resolution. Since these are Illustrator files, they will look crisp no matter how much they are scaled up. Now we are going to parent all of our elements to our monitor:

Parent elements
Copy all of these elements and paste them into the composition with your type composition, then do the following:
- Name this composition
ONLINE LEARNING - Select the monitor layer you parented everything to
- Scale this layer down to fit in the scene
When you move this layer, all your elements will move with it, because you parented them to it:

Monitor resize
Let's take a look at what we have created so far and be proud of ourselves! We now have our first logo element set up and ready to be animated. Great job!
Animation principles
At this point, I am going to slow things down and talk about animation principles. We are about to animate our logo and I want you to have a greater understanding of how to move your elements in convincing dynamic ways. Walt Disney—one of the great pioneers of animation—created 12 animation principles that we still use today:
- Timing
- Ease in and out (or slow in and slow out)
- Arcs
- Anticipation
- Exaggeration
- Squash and stretch
- Secondary action
- Follow through and overlapping action
- Straight ahead action and pose-to-pose action
- Staging
- Appeal
- Personality
The ones I want to pay special attention to are timing, ease in and out, secondary action, and personality. Timing is everything in animation. I will repeat this many times in this book. A rule I almost always use is the rule of 10 key frames. It takes the eye about 10 key frames to visually register anything. Make sure you have at least 10 frames between each action. You may need more frames if you have a lot of information on the screen, but this is a good starting point. Take special care in deciding how long something should be onscreen. You do not want the viewer to be bored, so do not let your animations lag. This is something you will get the hang of the more you animate.
The next thing to pay attention to is ease in and out. This is one of the most important things in animating a convincing, elegant action. In the real world, objects need time to accelerate and slow down, like the human body does; most objects move in this way. There's always a gradual easing at the start and end of a movement. To accomplish this in After Effects, we use the Easy Ease key frame assistant. Adding this immediately makes your animation look better.
Secondary actions also add some personality and realism to your animation. Secondary actions are when your objects move into their positions and have a secondary movement after they land there. It isn't necessary to always use secondary movements, but it can add weight and believability to your movements. It also makes your animations imperfect, which generates interest and creates personality. We will go over these principles a lot more in this book.
Animating a monitor
Now let's get to animating our computer monitor:
- Move 10–20 key frames down the timeline after our text appears on the screen
- Move the anchor point of the monitor to the bottom edge of your monitor
To move your anchor point, choose the pan behind tool (Y) and move the anchor point. Now this object will animate around the anchor point. It's important to set this up before animating your object:

Monitor anchor point
At this point, we need to lock our parameters where they are. We do that by creating blank key frames:
- Set scale and rotate key frames at this point
- Move back in the timeline (to the left) 10 key frames
- Scale down the monitor to 0
- Turn on motion blur for everything
Now we are going to create a fake camera move. This will be used as a transition element for our infographic video. We create camera nulls by parenting everything but the background of the null object:
- Go to the point in the timeline after the monitor has been animated.
- Create a null object. Select everything except the background.
- Parent everything selected to the null object.
- Easy ease all of these key frames.
- Turn on motion blur for everything except the background. Remember, motion blur must be turned on in two locations:

Motion blur to icons
Easy Ease will soften your movements and will make them look more organic. Select the key frames for the monitor and the null. Go to Animation | Keyframe Assistance | Easy Ease:

Easy Ease
Now let's animate our fake camera push on our monitor. Here are the steps:
- Stay at the point where the monitor has been animated.
- Create a key frame for the scale and position of the null object.
- Jump down (to the right) 10 key frames.
- Adjust the Position parameter and scale so that the monitor fills the screen:

Monitor full screen
Now we are going to animate all of our element pieces. The following are the steps to do that:
- Go to the point in the timeline where the monitor fills the screen and select all your elements to your monitor.
- Parent them to your monitor.
- For each of these elements, position the anchor points at the end of the line.
This will ensure our elements are animating from the correct spot:

Anchor point element
Now that your anchor points and your elements are parented correctly to the monitor, we can start animating them. Here's how we can do that:
- Select the first element and make a key frame for scale
- Jump down the timeline 10 key frames (to the right) and set key frames for scale
- Jump back to the previous scale key frame and scale that element down to 0
Great! Let's preview what we have so far! You should see your animated text on the screen. The next thing you should see is the monitor. Next, you should see your fake camera push in and one of your elements scaling up from the background. (All your elements should be in the background.)
The next step is to create a secondary scale movement. Go to the last key frame position, go 10 key frames to the right, then create a blank key frame.
This is how you create a blank key frame. This is helpful for holding a key frame. Also, you can use these triangles to jump between key frames:
- Jump backward to the keyframe (to the left).
- Scale that key frame up to 120:

Adding a blank key frame
Next, you need to Easy Ease these scale key frames:

Easy Ease elements
Excellent! Let's look at what we've accomplished. On previewing your work, you should have your monitor element animating on with secondary movement, with motion blur turned on. If turning motion blur on makes your computer run too slowly, you can turn motion blur off temporarily. You will need to remember to turn it back on before you render your project. Repeat the steps to animate the rest of your elements on for your monitor.
At this point, you have all the powerful tools for animating a text with text presets. You also know how to use a camera null. You are grooving along! The next thing we are going to do is animate more type using the same tools we used for the online learning introduction. Be certain that you have time to see the monitor animate on fully with all its pieces and the camera push in. Timing is everything. If you start your text animation too soon, it won't be a pretty sight. Let it rest for a bit, then start animating on the next message. Take a while to animate the text (today's schools are under pressure to do more with less). Be sure to pause in between the lines of text—this will give the viewer time to read it. We are going to add an adjustment layer in between the text and the monitor elements:
- Go to the Layer tab.
- Then go to Adjustment Layer.
- This will add an adjustment layer to your timeline:

Adjustment layer
Adjustment layers are similar to null objects. They are like a blank layer that you can add effects to and will affect everything underneath them. I'm dropping some important knowledge here; be sure to pick it up and remember it! Effects on an adjustment layer affect everything underneath it in the stacking order. We don't want it to affect the new animated type, so put the adjustment layer under the new type.
Now that we've added our adjustment layer, we can add an effect to it. Here's how we can do that:
Go to the point in the timeline where your monitor and all the elements are completely animated on
- Go to your effects and add a Fast Box Blur
- While the box radius is at
0, hit the stopwatch in the effects panel - Move down the timeline 10 key frames
- Increase the box radius to
60 - Turn on Repeat Edge Pixels
After turning on these settings, your screen should look similar to this:

Fast box blur
Great! Let's take a look at what we are working with here. As the fake camera moves in and out on the monitor, all the elements animated on the screen blur as the next message is animating on. I just taught you another transition effect. This is a rack focus transition. You have a lot of tools under your belt so far. Take a breather to be proud of what you have accomplished so far. Next, we are moving on to character animation—my favorite subject.
Animation principles
At this point, I am going to slow things down and talk about animation principles. We are about to animate our logo and I want you to have a greater understanding of how to move your elements in convincing dynamic ways. Walt Disney—one of the great pioneers of animation—created 12 animation principles that we still use today:
- Timing
- Ease in and out (or slow in and slow out)
- Arcs
- Anticipation
- Exaggeration
- Squash and stretch
- Secondary action
- Follow through and overlapping action
- Straight ahead action and pose-to-pose action
- Staging
- Appeal
- Personality
The ones I want to pay special attention to are timing, ease in and out, secondary action, and personality. Timing is everything in animation. I will repeat this many times in this book. A rule I almost always use is the rule of 10 key frames. It takes the eye about 10 key frames to visually register anything. Make sure you have at least 10 frames between each action. You may need more frames if you have a lot of information on the screen, but this is a good starting point. Take special care in deciding how long something should be onscreen. You do not want the viewer to be bored, so do not let your animations lag. This is something you will get the hang of the more you animate.
The next thing to pay attention to is ease in and out. This is one of the most important things in animating a convincing, elegant action. In the real world, objects need time to accelerate and slow down, like the human body does; most objects move in this way. There's always a gradual easing at the start and end of a movement. To accomplish this in After Effects, we use the Easy Ease key frame assistant. Adding this immediately makes your animation look better.
Secondary actions also add some personality and realism to your animation. Secondary actions are when your objects move into their positions and have a secondary movement after they land there. It isn't necessary to always use secondary movements, but it can add weight and believability to your movements. It also makes your animations imperfect, which generates interest and creates personality. We will go over these principles a lot more in this book.
Animating a monitor
Now let's get to animating our computer monitor:
- Move 10–20 key frames down the timeline after our text appears on the screen
- Move the anchor point of the monitor to the bottom edge of your monitor
To move your anchor point, choose the pan behind tool (Y) and move the anchor point. Now this object will animate around the anchor point. It's important to set this up before animating your object:

Monitor anchor point
At this point, we need to lock our parameters where they are. We do that by creating blank key frames:
- Set scale and rotate key frames at this point
- Move back in the timeline (to the left) 10 key frames
- Scale down the monitor to 0
- Turn on motion blur for everything
Now we are going to create a fake camera move. This will be used as a transition element for our infographic video. We create camera nulls by parenting everything but the background of the null object:
- Go to the point in the timeline after the monitor has been animated.
- Create a null object. Select everything except the background.
- Parent everything selected to the null object.
- Easy ease all of these key frames.
- Turn on motion blur for everything except the background. Remember, motion blur must be turned on in two locations:

Motion blur to icons
Easy Ease will soften your movements and will make them look more organic. Select the key frames for the monitor and the null. Go to Animation | Keyframe Assistance | Easy Ease:

Easy Ease
Now let's animate our fake camera push on our monitor. Here are the steps:
- Stay at the point where the monitor has been animated.
- Create a key frame for the scale and position of the null object.
- Jump down (to the right) 10 key frames.
- Adjust the Position parameter and scale so that the monitor fills the screen:

Monitor full screen
Now we are going to animate all of our element pieces. The following are the steps to do that:
- Go to the point in the timeline where the monitor fills the screen and select all your elements to your monitor.
- Parent them to your monitor.
- For each of these elements, position the anchor points at the end of the line.
This will ensure our elements are animating from the correct spot:

Anchor point element
Now that your anchor points and your elements are parented correctly to the monitor, we can start animating them. Here's how we can do that:
- Select the first element and make a key frame for scale
- Jump down the timeline 10 key frames (to the right) and set key frames for scale
- Jump back to the previous scale key frame and scale that element down to 0
Great! Let's preview what we have so far! You should see your animated text on the screen. The next thing you should see is the monitor. Next, you should see your fake camera push in and one of your elements scaling up from the background. (All your elements should be in the background.)
The next step is to create a secondary scale movement. Go to the last key frame position, go 10 key frames to the right, then create a blank key frame.
This is how you create a blank key frame. This is helpful for holding a key frame. Also, you can use these triangles to jump between key frames:
- Jump backward to the keyframe (to the left).
- Scale that key frame up to 120:

Adding a blank key frame
Next, you need to Easy Ease these scale key frames:

Easy Ease elements
Excellent! Let's look at what we've accomplished. On previewing your work, you should have your monitor element animating on with secondary movement, with motion blur turned on. If turning motion blur on makes your computer run too slowly, you can turn motion blur off temporarily. You will need to remember to turn it back on before you render your project. Repeat the steps to animate the rest of your elements on for your monitor.
At this point, you have all the powerful tools for animating a text with text presets. You also know how to use a camera null. You are grooving along! The next thing we are going to do is animate more type using the same tools we used for the online learning introduction. Be certain that you have time to see the monitor animate on fully with all its pieces and the camera push in. Timing is everything. If you start your text animation too soon, it won't be a pretty sight. Let it rest for a bit, then start animating on the next message. Take a while to animate the text (today's schools are under pressure to do more with less). Be sure to pause in between the lines of text—this will give the viewer time to read it. We are going to add an adjustment layer in between the text and the monitor elements:
- Go to the Layer tab.
- Then go to Adjustment Layer.
- This will add an adjustment layer to your timeline:

Adjustment layer
Adjustment layers are similar to null objects. They are like a blank layer that you can add effects to and will affect everything underneath them. I'm dropping some important knowledge here; be sure to pick it up and remember it! Effects on an adjustment layer affect everything underneath it in the stacking order. We don't want it to affect the new animated type, so put the adjustment layer under the new type.
Now that we've added our adjustment layer, we can add an effect to it. Here's how we can do that:
Go to the point in the timeline where your monitor and all the elements are completely animated on
- Go to your effects and add a Fast Box Blur
- While the box radius is at
0, hit the stopwatch in the effects panel - Move down the timeline 10 key frames
- Increase the box radius to
60 - Turn on Repeat Edge Pixels
After turning on these settings, your screen should look similar to this:

Fast box blur
Great! Let's take a look at what we are working with here. As the fake camera moves in and out on the monitor, all the elements animated on the screen blur as the next message is animating on. I just taught you another transition effect. This is a rack focus transition. You have a lot of tools under your belt so far. Take a breather to be proud of what you have accomplished so far. Next, we are moving on to character animation—my favorite subject.
Animating a monitor
Now let's get to animating our computer monitor:
- Move 10–20 key frames down the timeline after our text appears on the screen
- Move the anchor point of the monitor to the bottom edge of your monitor
To move your anchor point, choose the pan behind tool (Y) and move the anchor point. Now this object will animate around the anchor point. It's important to set this up before animating your object:

Monitor anchor point
At this point, we need to lock our parameters where they are. We do that by creating blank key frames:
- Set scale and rotate key frames at this point
- Move back in the timeline (to the left) 10 key frames
- Scale down the monitor to 0
- Turn on motion blur for everything
Now we are going to create a fake camera move. This will be used as a transition element for our infographic video. We create camera nulls by parenting everything but the background of the null object:
- Go to the point in the timeline after the monitor has been animated.
- Create a null object. Select everything except the background.
- Parent everything selected to the null object.
- Easy ease all of these key frames.
- Turn on motion blur for everything except the background. Remember, motion blur must be turned on in two locations:

Motion blur to icons
Easy Ease will soften your movements and will make them look more organic. Select the key frames for the monitor and the null. Go to Animation | Keyframe Assistance | Easy Ease:

Easy Ease
Now let's animate our fake camera push on our monitor. Here are the steps:
- Stay at the point where the monitor has been animated.
- Create a key frame for the scale and position of the null object.
- Jump down (to the right) 10 key frames.
- Adjust the Position parameter and scale so that the monitor fills the screen:

Monitor full screen
Now we are going to animate all of our element pieces. The following are the steps to do that:
- Go to the point in the timeline where the monitor fills the screen and select all your elements to your monitor.
- Parent them to your monitor.
- For each of these elements, position the anchor points at the end of the line.
This will ensure our elements are animating from the correct spot:

Anchor point element
Now that your anchor points and your elements are parented correctly to the monitor, we can start animating them. Here's how we can do that:
- Select the first element and make a key frame for scale
- Jump down the timeline 10 key frames (to the right) and set key frames for scale
- Jump back to the previous scale key frame and scale that element down to 0
Great! Let's preview what we have so far! You should see your animated text on the screen. The next thing you should see is the monitor. Next, you should see your fake camera push in and one of your elements scaling up from the background. (All your elements should be in the background.)
The next step is to create a secondary scale movement. Go to the last key frame position, go 10 key frames to the right, then create a blank key frame.
This is how you create a blank key frame. This is helpful for holding a key frame. Also, you can use these triangles to jump between key frames:
- Jump backward to the keyframe (to the left).
- Scale that key frame up to 120:

Adding a blank key frame
Next, you need to Easy Ease these scale key frames:

Easy Ease elements
Excellent! Let's look at what we've accomplished. On previewing your work, you should have your monitor element animating on with secondary movement, with motion blur turned on. If turning motion blur on makes your computer run too slowly, you can turn motion blur off temporarily. You will need to remember to turn it back on before you render your project. Repeat the steps to animate the rest of your elements on for your monitor.
At this point, you have all the powerful tools for animating a text with text presets. You also know how to use a camera null. You are grooving along! The next thing we are going to do is animate more type using the same tools we used for the online learning introduction. Be certain that you have time to see the monitor animate on fully with all its pieces and the camera push in. Timing is everything. If you start your text animation too soon, it won't be a pretty sight. Let it rest for a bit, then start animating on the next message. Take a while to animate the text (today's schools are under pressure to do more with less). Be sure to pause in between the lines of text—this will give the viewer time to read it. We are going to add an adjustment layer in between the text and the monitor elements:
- Go to the Layer tab.
- Then go to Adjustment Layer.
- This will add an adjustment layer to your timeline:

Adjustment layer
Adjustment layers are similar to null objects. They are like a blank layer that you can add effects to and will affect everything underneath them. I'm dropping some important knowledge here; be sure to pick it up and remember it! Effects on an adjustment layer affect everything underneath it in the stacking order. We don't want it to affect the new animated type, so put the adjustment layer under the new type.
Now that we've added our adjustment layer, we can add an effect to it. Here's how we can do that:
Go to the point in the timeline where your monitor and all the elements are completely animated on
- Go to your effects and add a Fast Box Blur
- While the box radius is at
0, hit the stopwatch in the effects panel - Move down the timeline 10 key frames
- Increase the box radius to
60 - Turn on Repeat Edge Pixels
After turning on these settings, your screen should look similar to this:

Fast box blur
Great! Let's take a look at what we are working with here. As the fake camera moves in and out on the monitor, all the elements animated on the screen blur as the next message is animating on. I just taught you another transition effect. This is a rack focus transition. You have a lot of tools under your belt so far. Take a breather to be proud of what you have accomplished so far. Next, we are moving on to character animation—my favorite subject.
Character animation types
Character animation is a deep rabbit hole where you can spend years and years learning. Thankfully, you can learn a few simple tricks to get you up and running fast! These tricks will change your life, because character animation will empower you to use characters to express yourself!
Puppet Warp animation
Puppet Warp is one of the most basic character animation tools. You can start using this right now and get immediate results:
- Import the male puppet
- Be sure to import the Illustrator file with Retain layer sizes and Create a comp checked
- Duplicate this composition and put both in the
PRECOMPSfolder - Move the folders with the Illustrator images into the
IMAGESfolder - Open one of the male puppet precompositions
- Turn on Continuous rasterize
- Select everything except the torso and parent all the pieces to the torso
- Copy all the pieces and paste them into the online learning composition
- Add three pins to the arm, as shown in the following screenshot
Puppet Warp is located up in the tool panel, on the far-right end:

Puppet Warp
In order to animate this, twirl down the Effects tab of the arm you added the pins to. Now you can see that key frames have already been added to the layer. Go 30 frames to the right and move the arm to the position, as shown here:
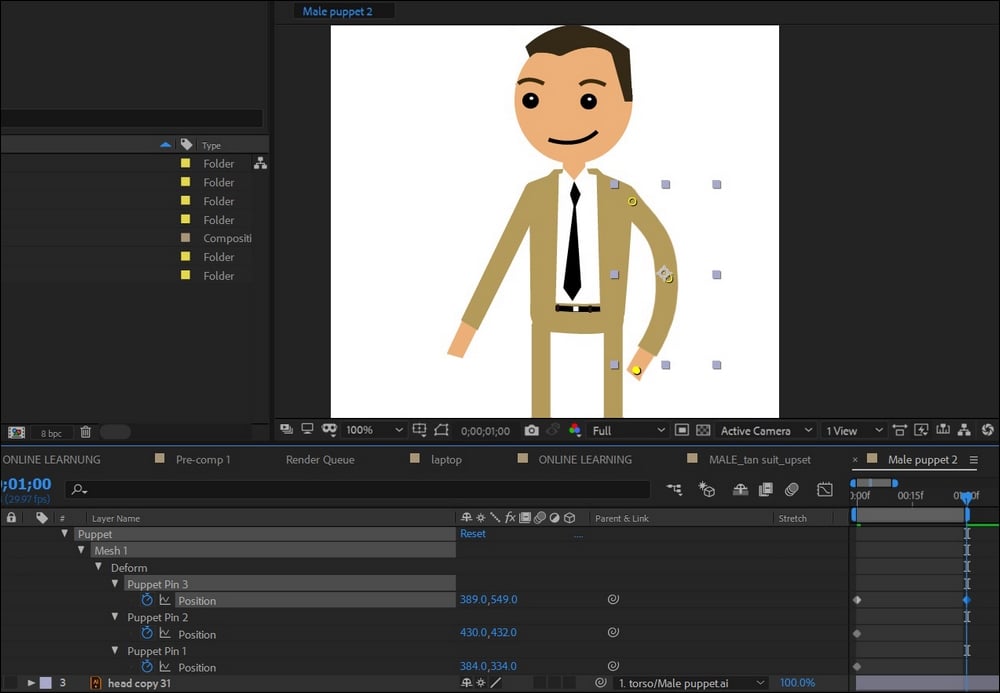
Puppet Warp key frames
As you can see, as you move the pin it creates key frames in the timeline. Preview this to see what we are working with here. Voila! You've got some warpy character animation. If it looks strange, don't worry—you can always tweak it more to your liking. Subtlety is the key to this effect. This effect works best with subtle minor movements.
Jointed animation
This next animation style is called jointed animation. It's very versatile and can work well for more realistic movements. You have greater control with jointed animation. With this technique, you need to rig your character just right. Let's duplicate our male puppet composition again and set it up as we did before by turning on continuous rasterized for all layers.
Now that you have created a Puppet Warp animation, we can create a jointed animation. Here's how we can do that:
- Parent your arms, legs, and head to the torso.
- Move the arm anchor points to the joints nearest to the torso.
- Do this for the legs and the head:

Puppet anchor points
Did you notice how all the anchor points touch the torso? These limbs are rotating around that point.
Follow these instructions to animate your jointed character:
- Choose an arm and select the Rotation parameter
- Hit a rotation key frame and move down the timeline to the right by 10 key frames
- Rotate your character arm so it's pointing out to the left
- Ease those key frames
This is very basic, but imagine all the possibilities! If you had a character with biceps, triceps, thighs, calves, hands, and feet layers, you could parent them correctly and have a fully rigged character that animates! The possibilities are endless.
Adobe Character Animator
Character Animator is by far the most amazing character animation program in After Effects. Install Photoshop and Adobe Character Animator on your machine this very second. With this software, you can create characters that lip synch to your voice. You must have a webcam to create and stream live motion-captured animation online.
First things first, you need to install Adobe Character Animator. When you open Character Animator, you're presented with the Start menu. This has free puppets you can start using without editing them. You also have access to interactive tutorials. If you click the right arrow, you can see more free characters to use:
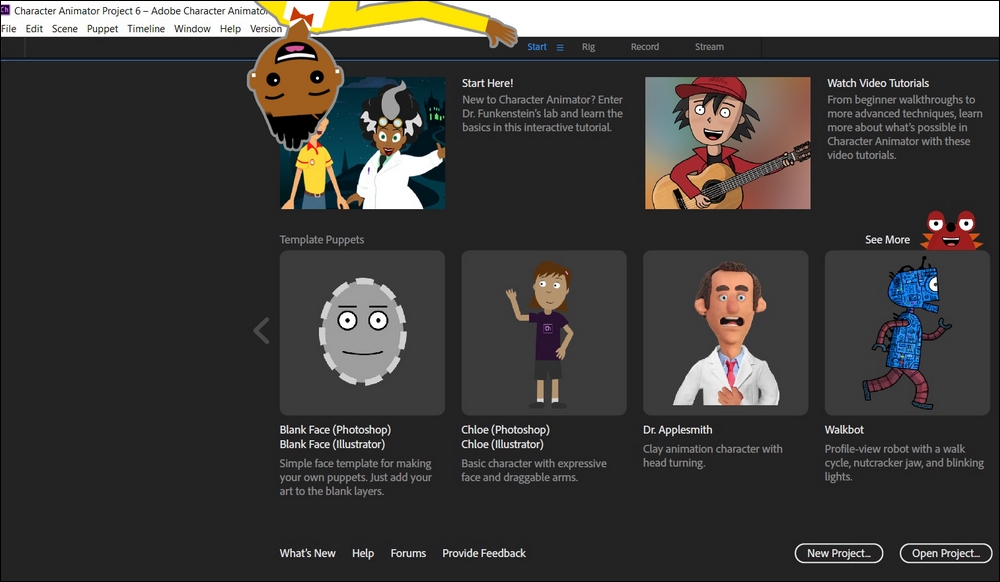
Start menu
Let's click on the Chloe character. Choose the Illustator version. You could also use the Photoshop version, but for this lesson we will use the illustrator file. This opens the Chloe character in Illustrator. You can choose to edit the character here, but do not rename anything. Just for fun, let's change the color of her shirt to yellow. Look on the far-left of your Illustrator tool panel and choose the direct selection tool.
Altering Illustrator files
Now that you know how to open your characters, we can start altering our illustrator files. Here's how we do that:
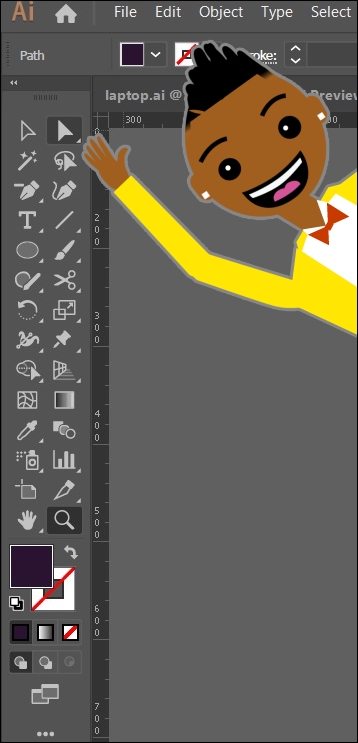
Direct selection tool
Hover the direct selection tool over the different parts of the t-shirt. Click on each piece while holding the Shift key:

Select the shirt
Now that the t-shirt is selected, navigate to the left of the tool panel and choose Fill (X) to change the color to yellow:
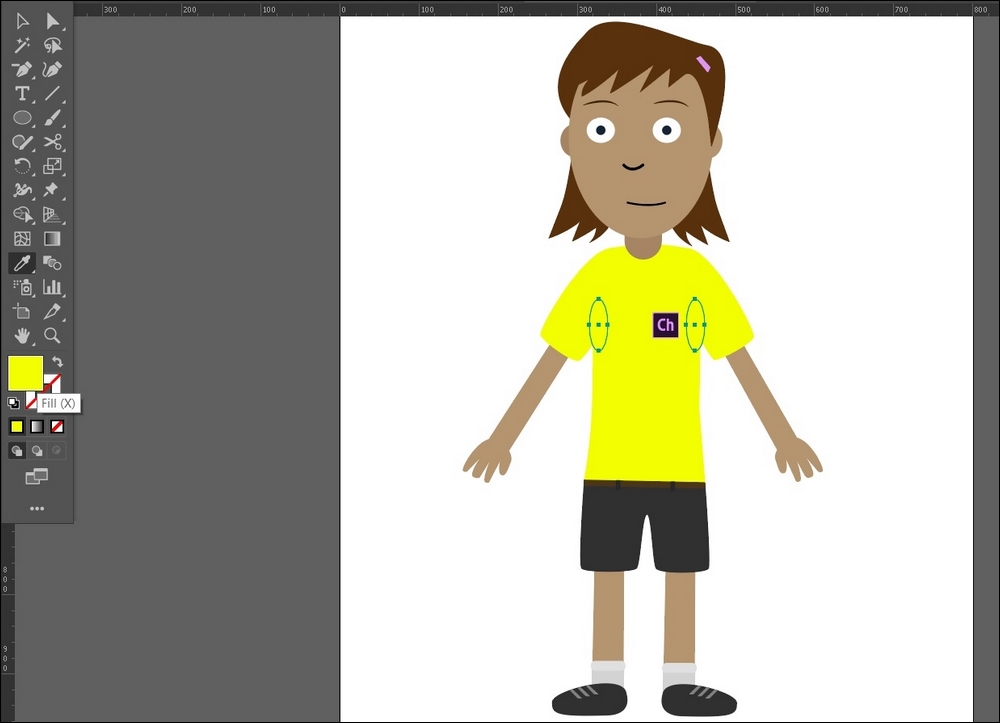
Change color
I am also going to select the t-shirt logo and turn it off. You need to save your Illustrator file, then jump back into Character Animator.
Now you should see the Record interface. This is where you animate your character. Let's save this project:

Record interface
Go up to the File tab and Save Project As.... Give your project a unique name:

Save as
Character Animator has an autosave feature built into it. I find it useful to save different versions of my projects as I progress. That way, if a project gets corrupted, you will have a backup.
Character Animator interface
The interface is similar to After Effects, except it doesn't have as many tools and panels. To the far left, you will see a Project panel window. This is where you can create new scenes and new folders, and organize your project. This is where you import items into the program:

Image folders and new scenes
To the left, at the top of the interface, there are four tabs: Start/Rig/Record/Stream. We already looked at the Start tab. Let's look at the Rig tab. This is where the puppet is rigged. This allows us to take a behind-the-scenes look at our character. As you get more advanced, you will need to edit the rig of your character here:

Rig
The Record tab is the animation panel; this is where all the animation and performance takes place.
The Stream tab is used for streaming your performance live around the world:
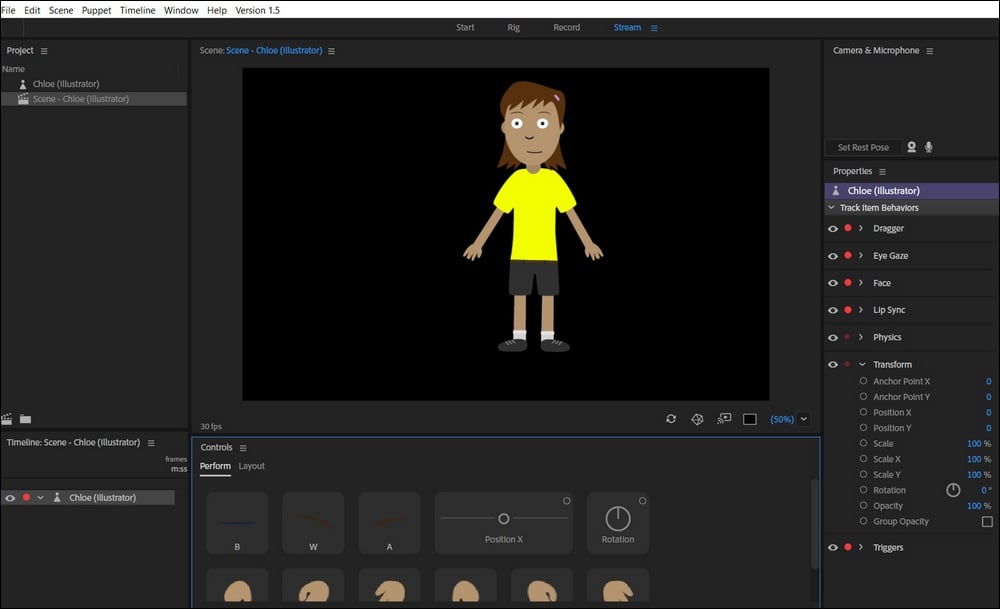
Stream
Next, let's look at the scene Properties.
Make sure your scene is selected, then look to the far-right—you will see a variety of project settings you can adjust, such as Frame Rate:

Scene settings
The Scene window is where your character is. This is where all the action takes place. Take a look at the play buttons under the character. This allows you to go backward or forward in the timeline. The red button is how you record your animations. To the right of the Record button is the speed. You can control how quickly or slowly your recording happens:
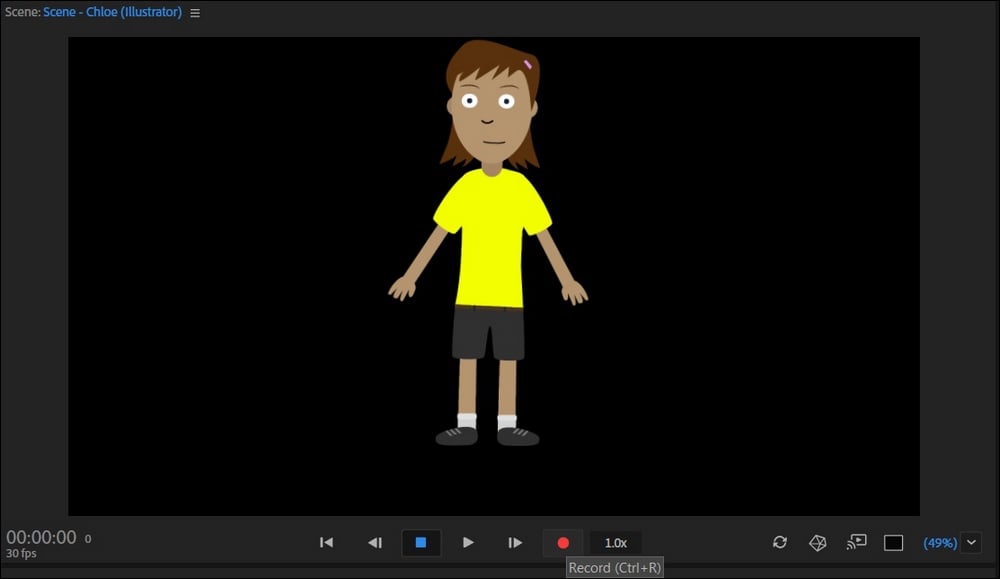
Record button and speed
Next, let's look at the camera and mic panel.
This is where you handle your webcam setup and your voice recording. Let's turn on our webcam. Click this camera input tab at the top-left corner of the interface. If you have a working webcam, you should see the box in the panel show your image in it. This will enable facial tracking. The red dots are track points on your face:
Image webcam
Let's make sure our face is properly synced. Make sure you have a strong light source. Also, wearing glasses can interfere with syncing your face to the web camera. Next, select the webcam button. Click the (Set Rest Pose). This will sync your face to the character's face. It's similar to what happened in Avatar when Sully gets synced to his avatar. Now you are synced to your character:

Set Rest Pose
Now you can spend some time playing with your character—when you speak, it speaks. It only syncs to your head; as its head will move with yours, its eyes will also follow yours. It will also speak when you speak. I'll show you how to move its limbs later.
Animation timeline
Let's look at the animation timeline. This is where you can see your layers and is similar to After Effects. You can edit your performances here:

Timeline
Next, we will look at the character properties. Select your Chloe character layer in the timeline. To the far right, you have properties for her eyes, face, lips, and so on:

Puppet properties
Recording your performance
These are all the properties you can adjust for your character.
Now that we know where everything is located, let's begin our animation and our performance:
- Click on the red record button. You will hear a few beeps before the recording button is active:

Record button
- Select Chloe's hand and drag it.
- Let go of her hand.
- Press the record button again to stop recording.
Adjusting character properties
It may take your computer a couple of seconds to render the recording. When it's done, you will have a recording layer. This is called a take in Character Animator. You can adjust your Dragger setting like this:
- Select the character in the timeline and to the right in the Properties.
- Twirl down the Dragger properties:

Dragger properties
Across from the After Move property, you can choose to hold your limbs in place or return to rest. Let's choose Return to rest. This will enable our limbs to return to their original resting pose after moving them:

Return to rest
You can also adjust Eye Gaze to control the strength or the extent to which the eyes will move:

Eye Gaze
Let's look at our Face controls. These are located on the far-right of your screen. We won't go over all these parameters here, but you can change your Eyebrow Strength to 40. This will give you control of eyebrow movements. If you need to adjust anything on the face, this is where you find it:

Face controls
We are almost ready to start the animation. Look in the far-right corner of the screen—there is a small camera-control icon. Click on this icon to begin to activate your camera. Hit the record button to activate live recording:

Camera control
If you move your head around, you should see your puppet moving. Let's adjust the gravity for her hair:

Gravity Strength
You will need to zoom into the timeline to look at the bottom corner of the panel, just under the timeline. You will see an icon similar to that in After Effects. Click on this to zoom into the timeline:

Zoom into the timeline
Blending takes
After you're done with your performance, press the record button again. You will see the recordings on your timeline. You can edit these by sliding them, or you may want to blend or ease your performances. This is similar to easing a movement in After Effects. These layers are called takes and are similar to an acting performance in a movie. An actor has a series of takes in a movie scene:
- Select the end of your take layer.
- You will see a double-arrow icon.
- Drag this icon to the left. You will see a sloped curve icon. This means you can blend or smooth the end of your take layer:

Blend take
Starting recording
Next, let's make Chloe talk! Look at the icon next to the camera. This is the audio recording button:
- Click on the audio button.
- Click the record button.
- Begin speaking.
- Click the record button again to stop recording:

Turn on the audio button
This will add additional Audio layers in the timeline. Take a look at the new layers or takes in the timeline here:

Camera and audio input layers
Now that we've created a cool animation, let's play it to preview our work. Press the play button:
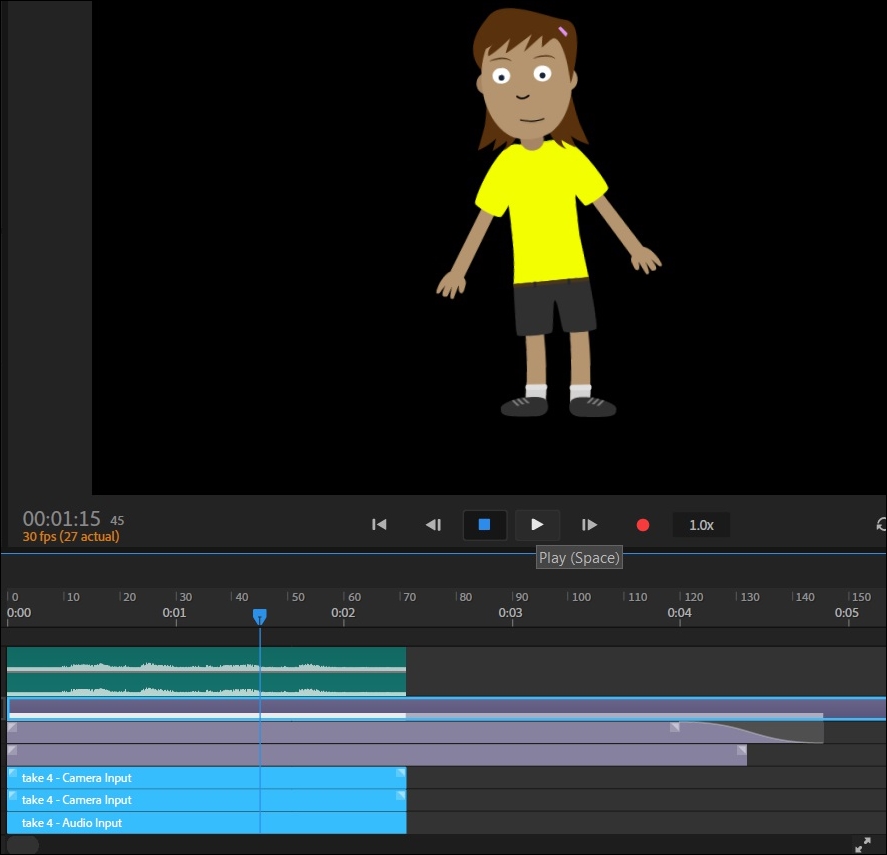
Play button
Project settings
Now that you know how to animate your character and record audio, let's adjust our project settings. The following steps will show you how to do that:
- Select the Scene.
- Look at the far-right and you will see the Scene info.
- Adjust the scene Duration so that it's only the length of your project:

Adjust scene duration
Next, we are going to adjust our Frame Rate so that it matches our frame rate in After Effects. Change this to 29.97 fps:

Adjust scene duration frame rate
Exporting your animation
Now let's export our project. Your project will export with a transparent background unless you put an image in the background.
The following are the steps to export your project:
- Click on File.
- Click on Export.
- Select PNG Sequence and WAV...:

Export PNG sequence
Importing PNG sequences
We are ready to import our PNG sequences. Here are the steps to do that:
- Jump back over to After Effects. Import the
.pngfile. - Select the first
.pngfile with00at the end. - After Effects will import all the remaining files in a
.pngsequence. - Ensure that you check the sequence:

Import PNG
You can also import any audio recorded in your character animation. When you render out your PNG sequence, it will save a WAV file with it. If you need to import your audio file, here are the steps:
- Go to the folder with the PNG sequence.
- Navigate to the bottom of the PNG sequence.
- Import the WAV file to After Effects:

Import WAV
Adding the character to an infographic project
Now we are going to bring Chloe into the main composition and we are going to create a camera move to the right. We will animate our null object to do this. We need to be on the correct part of the timeline and we need the correct things parented to the null.
To be sure we are at the correct point on the timeline, follow these steps:
- Move to the point on the timeline after the last bit of text that has been animated on.
- Move the Chloe layer on to the timeline so that the layer starts at that point.
- Turn on motion blur for Chloe. See the placement of everything here:

Camera pan start point
We need to parent the Chloe layer to the null layer at this point. Also parent the text to the null layer:

Parent character to null
To create a hold key frame for the position parameter of our null object, follow these steps:
- Navigate to the far-right of the timeline.
- Locate the diamond icon in the position of the null object.
- Click on the diamond:

Blank key frame
Let's animate our move to the right. Select the position parameter and scrub it so that the camera is moving to the right:

Pan to Chloe
Completing your infographic
You now have all the tools to create a dynamic infographic video. Spend some time adding more text to help communicate your concept.
Puppet Warp animation
Puppet Warp is one of the most basic character animation tools. You can start using this right now and get immediate results:
- Import the male puppet
- Be sure to import the Illustrator file with Retain layer sizes and Create a comp checked
- Duplicate this composition and put both in the
PRECOMPSfolder - Move the folders with the Illustrator images into the
IMAGESfolder - Open one of the male puppet precompositions
- Turn on Continuous rasterize
- Select everything except the torso and parent all the pieces to the torso
- Copy all the pieces and paste them into the online learning composition
- Add three pins to the arm, as shown in the following screenshot
Puppet Warp is located up in the tool panel, on the far-right end:

Puppet Warp
In order to animate this, twirl down the Effects tab of the arm you added the pins to. Now you can see that key frames have already been added to the layer. Go 30 frames to the right and move the arm to the position, as shown here:

Puppet Warp key frames
As you can see, as you move the pin it creates key frames in the timeline. Preview this to see what we are working with here. Voila! You've got some warpy character animation. If it looks strange, don't worry—you can always tweak it more to your liking. Subtlety is the key to this effect. This effect works best with subtle minor movements.
Jointed animation
This next animation style is called jointed animation. It's very versatile and can work well for more realistic movements. You have greater control with jointed animation. With this technique, you need to rig your character just right. Let's duplicate our male puppet composition again and set it up as we did before by turning on continuous rasterized for all layers.
Now that you have created a Puppet Warp animation, we can create a jointed animation. Here's how we can do that:
- Parent your arms, legs, and head to the torso.
- Move the arm anchor points to the joints nearest to the torso.
- Do this for the legs and the head:

Puppet anchor points
Did you notice how all the anchor points touch the torso? These limbs are rotating around that point.
Follow these instructions to animate your jointed character:
- Choose an arm and select the Rotation parameter
- Hit a rotation key frame and move down the timeline to the right by 10 key frames
- Rotate your character arm so it's pointing out to the left
- Ease those key frames
This is very basic, but imagine all the possibilities! If you had a character with biceps, triceps, thighs, calves, hands, and feet layers, you could parent them correctly and have a fully rigged character that animates! The possibilities are endless.
Adobe Character Animator
Character Animator is by far the most amazing character animation program in After Effects. Install Photoshop and Adobe Character Animator on your machine this very second. With this software, you can create characters that lip synch to your voice. You must have a webcam to create and stream live motion-captured animation online.
First things first, you need to install Adobe Character Animator. When you open Character Animator, you're presented with the Start menu. This has free puppets you can start using without editing them. You also have access to interactive tutorials. If you click the right arrow, you can see more free characters to use:

Start menu
Let's click on the Chloe character. Choose the Illustator version. You could also use the Photoshop version, but for this lesson we will use the illustrator file. This opens the Chloe character in Illustrator. You can choose to edit the character here, but do not rename anything. Just for fun, let's change the color of her shirt to yellow. Look on the far-left of your Illustrator tool panel and choose the direct selection tool.
Altering Illustrator files
Now that you know how to open your characters, we can start altering our illustrator files. Here's how we do that:

Direct selection tool
Hover the direct selection tool over the different parts of the t-shirt. Click on each piece while holding the Shift key:

Select the shirt
Now that the t-shirt is selected, navigate to the left of the tool panel and choose Fill (X) to change the color to yellow:

Change color
I am also going to select the t-shirt logo and turn it off. You need to save your Illustrator file, then jump back into Character Animator.
Now you should see the Record interface. This is where you animate your character. Let's save this project:

Record interface
Go up to the File tab and Save Project As.... Give your project a unique name:

Save as
Character Animator has an autosave feature built into it. I find it useful to save different versions of my projects as I progress. That way, if a project gets corrupted, you will have a backup.
Character Animator interface
The interface is similar to After Effects, except it doesn't have as many tools and panels. To the far left, you will see a Project panel window. This is where you can create new scenes and new folders, and organize your project. This is where you import items into the program:

Image folders and new scenes
To the left, at the top of the interface, there are four tabs: Start/Rig/Record/Stream. We already looked at the Start tab. Let's look at the Rig tab. This is where the puppet is rigged. This allows us to take a behind-the-scenes look at our character. As you get more advanced, you will need to edit the rig of your character here:

Rig
The Record tab is the animation panel; this is where all the animation and performance takes place.
The Stream tab is used for streaming your performance live around the world:

Stream
Next, let's look at the scene Properties.
Make sure your scene is selected, then look to the far-right—you will see a variety of project settings you can adjust, such as Frame Rate:

Scene settings
The Scene window is where your character is. This is where all the action takes place. Take a look at the play buttons under the character. This allows you to go backward or forward in the timeline. The red button is how you record your animations. To the right of the Record button is the speed. You can control how quickly or slowly your recording happens:

Record button and speed
Next, let's look at the camera and mic panel.
This is where you handle your webcam setup and your voice recording. Let's turn on our webcam. Click this camera input tab at the top-left corner of the interface. If you have a working webcam, you should see the box in the panel show your image in it. This will enable facial tracking. The red dots are track points on your face:

Image webcam
Let's make sure our face is properly synced. Make sure you have a strong light source. Also, wearing glasses can interfere with syncing your face to the web camera. Next, select the webcam button. Click the (Set Rest Pose). This will sync your face to the character's face. It's similar to what happened in Avatar when Sully gets synced to his avatar. Now you are synced to your character:

Set Rest Pose
Now you can spend some time playing with your character—when you speak, it speaks. It only syncs to your head; as its head will move with yours, its eyes will also follow yours. It will also speak when you speak. I'll show you how to move its limbs later.
Animation timeline
Let's look at the animation timeline. This is where you can see your layers and is similar to After Effects. You can edit your performances here:

Timeline
Next, we will look at the character properties. Select your Chloe character layer in the timeline. To the far right, you have properties for her eyes, face, lips, and so on:

Puppet properties
Recording your performance
These are all the properties you can adjust for your character.
Now that we know where everything is located, let's begin our animation and our performance:
- Click on the red record button. You will hear a few beeps before the recording button is active:

Record button
- Select Chloe's hand and drag it.
- Let go of her hand.
- Press the record button again to stop recording.
Adjusting character properties
It may take your computer a couple of seconds to render the recording. When it's done, you will have a recording layer. This is called a take in Character Animator. You can adjust your Dragger setting like this:
- Select the character in the timeline and to the right in the Properties.
- Twirl down the Dragger properties:

Dragger properties
Across from the After Move property, you can choose to hold your limbs in place or return to rest. Let's choose Return to rest. This will enable our limbs to return to their original resting pose after moving them:

Return to rest
You can also adjust Eye Gaze to control the strength or the extent to which the eyes will move:

Eye Gaze
Let's look at our Face controls. These are located on the far-right of your screen. We won't go over all these parameters here, but you can change your Eyebrow Strength to 40. This will give you control of eyebrow movements. If you need to adjust anything on the face, this is where you find it:

Face controls
We are almost ready to start the animation. Look in the far-right corner of the screen—there is a small camera-control icon. Click on this icon to begin to activate your camera. Hit the record button to activate live recording:

Camera control
If you move your head around, you should see your puppet moving. Let's adjust the gravity for her hair:

Gravity Strength
You will need to zoom into the timeline to look at the bottom corner of the panel, just under the timeline. You will see an icon similar to that in After Effects. Click on this to zoom into the timeline:

Zoom into the timeline
Blending takes
After you're done with your performance, press the record button again. You will see the recordings on your timeline. You can edit these by sliding them, or you may want to blend or ease your performances. This is similar to easing a movement in After Effects. These layers are called takes and are similar to an acting performance in a movie. An actor has a series of takes in a movie scene:
- Select the end of your take layer.
- You will see a double-arrow icon.
- Drag this icon to the left. You will see a sloped curve icon. This means you can blend or smooth the end of your take layer:

Blend take
Starting recording
Next, let's make Chloe talk! Look at the icon next to the camera. This is the audio recording button:
- Click on the audio button.
- Click the record button.
- Begin speaking.
- Click the record button again to stop recording:

Turn on the audio button
This will add additional Audio layers in the timeline. Take a look at the new layers or takes in the timeline here:

Camera and audio input layers
Now that we've created a cool animation, let's play it to preview our work. Press the play button:

Play button
Project settings
Now that you know how to animate your character and record audio, let's adjust our project settings. The following steps will show you how to do that:
- Select the Scene.
- Look at the far-right and you will see the Scene info.
- Adjust the scene Duration so that it's only the length of your project:

Adjust scene duration
Next, we are going to adjust our Frame Rate so that it matches our frame rate in After Effects. Change this to 29.97 fps:

Adjust scene duration frame rate
Exporting your animation
Now let's export our project. Your project will export with a transparent background unless you put an image in the background.
The following are the steps to export your project:
- Click on File.
- Click on Export.
- Select PNG Sequence and WAV...:

Export PNG sequence
Importing PNG sequences
We are ready to import our PNG sequences. Here are the steps to do that:
- Jump back over to After Effects. Import the
.pngfile. - Select the first
.pngfile with00at the end. - After Effects will import all the remaining files in a
.pngsequence. - Ensure that you check the sequence:

Import PNG
You can also import any audio recorded in your character animation. When you render out your PNG sequence, it will save a WAV file with it. If you need to import your audio file, here are the steps:
- Go to the folder with the PNG sequence.
- Navigate to the bottom of the PNG sequence.
- Import the WAV file to After Effects:

Import WAV
Adding the character to an infographic project
Now we are going to bring Chloe into the main composition and we are going to create a camera move to the right. We will animate our null object to do this. We need to be on the correct part of the timeline and we need the correct things parented to the null.
To be sure we are at the correct point on the timeline, follow these steps:
- Move to the point on the timeline after the last bit of text that has been animated on.
- Move the Chloe layer on to the timeline so that the layer starts at that point.
- Turn on motion blur for Chloe. See the placement of everything here:

Camera pan start point
We need to parent the Chloe layer to the null layer at this point. Also parent the text to the null layer:

Parent character to null
To create a hold key frame for the position parameter of our null object, follow these steps:
- Navigate to the far-right of the timeline.
- Locate the diamond icon in the position of the null object.
- Click on the diamond:

Blank key frame
Let's animate our move to the right. Select the position parameter and scrub it so that the camera is moving to the right:

Pan to Chloe
Completing your infographic
You now have all the tools to create a dynamic infographic video. Spend some time adding more text to help communicate your concept.
Jointed animation
This next animation style is called jointed animation. It's very versatile and can work well for more realistic movements. You have greater control with jointed animation. With this technique, you need to rig your character just right. Let's duplicate our male puppet composition again and set it up as we did before by turning on continuous rasterized for all layers.
Now that you have created a Puppet Warp animation, we can create a jointed animation. Here's how we can do that:
- Parent your arms, legs, and head to the torso.
- Move the arm anchor points to the joints nearest to the torso.
- Do this for the legs and the head:

Puppet anchor points
Did you notice how all the anchor points touch the torso? These limbs are rotating around that point.
Follow these instructions to animate your jointed character:
- Choose an arm and select the Rotation parameter
- Hit a rotation key frame and move down the timeline to the right by 10 key frames
- Rotate your character arm so it's pointing out to the left
- Ease those key frames
This is very basic, but imagine all the possibilities! If you had a character with biceps, triceps, thighs, calves, hands, and feet layers, you could parent them correctly and have a fully rigged character that animates! The possibilities are endless.
Adobe Character Animator
Character Animator is by far the most amazing character animation program in After Effects. Install Photoshop and Adobe Character Animator on your machine this very second. With this software, you can create characters that lip synch to your voice. You must have a webcam to create and stream live motion-captured animation online.
First things first, you need to install Adobe Character Animator. When you open Character Animator, you're presented with the Start menu. This has free puppets you can start using without editing them. You also have access to interactive tutorials. If you click the right arrow, you can see more free characters to use:

Start menu
Let's click on the Chloe character. Choose the Illustator version. You could also use the Photoshop version, but for this lesson we will use the illustrator file. This opens the Chloe character in Illustrator. You can choose to edit the character here, but do not rename anything. Just for fun, let's change the color of her shirt to yellow. Look on the far-left of your Illustrator tool panel and choose the direct selection tool.
Altering Illustrator files
Now that you know how to open your characters, we can start altering our illustrator files. Here's how we do that:

Direct selection tool
Hover the direct selection tool over the different parts of the t-shirt. Click on each piece while holding the Shift key:

Select the shirt
Now that the t-shirt is selected, navigate to the left of the tool panel and choose Fill (X) to change the color to yellow:

Change color
I am also going to select the t-shirt logo and turn it off. You need to save your Illustrator file, then jump back into Character Animator.
Now you should see the Record interface. This is where you animate your character. Let's save this project:

Record interface
Go up to the File tab and Save Project As.... Give your project a unique name:

Save as
Character Animator has an autosave feature built into it. I find it useful to save different versions of my projects as I progress. That way, if a project gets corrupted, you will have a backup.
Character Animator interface
The interface is similar to After Effects, except it doesn't have as many tools and panels. To the far left, you will see a Project panel window. This is where you can create new scenes and new folders, and organize your project. This is where you import items into the program:

Image folders and new scenes
To the left, at the top of the interface, there are four tabs: Start/Rig/Record/Stream. We already looked at the Start tab. Let's look at the Rig tab. This is where the puppet is rigged. This allows us to take a behind-the-scenes look at our character. As you get more advanced, you will need to edit the rig of your character here:

Rig
The Record tab is the animation panel; this is where all the animation and performance takes place.
The Stream tab is used for streaming your performance live around the world:

Stream
Next, let's look at the scene Properties.
Make sure your scene is selected, then look to the far-right—you will see a variety of project settings you can adjust, such as Frame Rate:

Scene settings
The Scene window is where your character is. This is where all the action takes place. Take a look at the play buttons under the character. This allows you to go backward or forward in the timeline. The red button is how you record your animations. To the right of the Record button is the speed. You can control how quickly or slowly your recording happens:

Record button and speed
Next, let's look at the camera and mic panel.
This is where you handle your webcam setup and your voice recording. Let's turn on our webcam. Click this camera input tab at the top-left corner of the interface. If you have a working webcam, you should see the box in the panel show your image in it. This will enable facial tracking. The red dots are track points on your face:

Image webcam
Let's make sure our face is properly synced. Make sure you have a strong light source. Also, wearing glasses can interfere with syncing your face to the web camera. Next, select the webcam button. Click the (Set Rest Pose). This will sync your face to the character's face. It's similar to what happened in Avatar when Sully gets synced to his avatar. Now you are synced to your character:

Set Rest Pose
Now you can spend some time playing with your character—when you speak, it speaks. It only syncs to your head; as its head will move with yours, its eyes will also follow yours. It will also speak when you speak. I'll show you how to move its limbs later.
Animation timeline
Let's look at the animation timeline. This is where you can see your layers and is similar to After Effects. You can edit your performances here:

Timeline
Next, we will look at the character properties. Select your Chloe character layer in the timeline. To the far right, you have properties for her eyes, face, lips, and so on:

Puppet properties
Recording your performance
These are all the properties you can adjust for your character.
Now that we know where everything is located, let's begin our animation and our performance:
- Click on the red record button. You will hear a few beeps before the recording button is active:

Record button
- Select Chloe's hand and drag it.
- Let go of her hand.
- Press the record button again to stop recording.
Adjusting character properties
It may take your computer a couple of seconds to render the recording. When it's done, you will have a recording layer. This is called a take in Character Animator. You can adjust your Dragger setting like this:
- Select the character in the timeline and to the right in the Properties.
- Twirl down the Dragger properties:

Dragger properties
Across from the After Move property, you can choose to hold your limbs in place or return to rest. Let's choose Return to rest. This will enable our limbs to return to their original resting pose after moving them:

Return to rest
You can also adjust Eye Gaze to control the strength or the extent to which the eyes will move:

Eye Gaze
Let's look at our Face controls. These are located on the far-right of your screen. We won't go over all these parameters here, but you can change your Eyebrow Strength to 40. This will give you control of eyebrow movements. If you need to adjust anything on the face, this is where you find it:

Face controls
We are almost ready to start the animation. Look in the far-right corner of the screen—there is a small camera-control icon. Click on this icon to begin to activate your camera. Hit the record button to activate live recording:

Camera control
If you move your head around, you should see your puppet moving. Let's adjust the gravity for her hair:

Gravity Strength
You will need to zoom into the timeline to look at the bottom corner of the panel, just under the timeline. You will see an icon similar to that in After Effects. Click on this to zoom into the timeline:

Zoom into the timeline
Blending takes
After you're done with your performance, press the record button again. You will see the recordings on your timeline. You can edit these by sliding them, or you may want to blend or ease your performances. This is similar to easing a movement in After Effects. These layers are called takes and are similar to an acting performance in a movie. An actor has a series of takes in a movie scene:
- Select the end of your take layer.
- You will see a double-arrow icon.
- Drag this icon to the left. You will see a sloped curve icon. This means you can blend or smooth the end of your take layer:

Blend take
Starting recording
Next, let's make Chloe talk! Look at the icon next to the camera. This is the audio recording button:
- Click on the audio button.
- Click the record button.
- Begin speaking.
- Click the record button again to stop recording:

Turn on the audio button
This will add additional Audio layers in the timeline. Take a look at the new layers or takes in the timeline here:

Camera and audio input layers
Now that we've created a cool animation, let's play it to preview our work. Press the play button:

Play button
Project settings
Now that you know how to animate your character and record audio, let's adjust our project settings. The following steps will show you how to do that:
- Select the Scene.
- Look at the far-right and you will see the Scene info.
- Adjust the scene Duration so that it's only the length of your project:

Adjust scene duration
Next, we are going to adjust our Frame Rate so that it matches our frame rate in After Effects. Change this to 29.97 fps:

Adjust scene duration frame rate
Exporting your animation
Now let's export our project. Your project will export with a transparent background unless you put an image in the background.
The following are the steps to export your project:
- Click on File.
- Click on Export.
- Select PNG Sequence and WAV...:

Export PNG sequence
Importing PNG sequences
We are ready to import our PNG sequences. Here are the steps to do that:
- Jump back over to After Effects. Import the
.pngfile. - Select the first
.pngfile with00at the end. - After Effects will import all the remaining files in a
.pngsequence. - Ensure that you check the sequence:

Import PNG
You can also import any audio recorded in your character animation. When you render out your PNG sequence, it will save a WAV file with it. If you need to import your audio file, here are the steps:
- Go to the folder with the PNG sequence.
- Navigate to the bottom of the PNG sequence.
- Import the WAV file to After Effects:

Import WAV
Adding the character to an infographic project
Now we are going to bring Chloe into the main composition and we are going to create a camera move to the right. We will animate our null object to do this. We need to be on the correct part of the timeline and we need the correct things parented to the null.
To be sure we are at the correct point on the timeline, follow these steps:
- Move to the point on the timeline after the last bit of text that has been animated on.
- Move the Chloe layer on to the timeline so that the layer starts at that point.
- Turn on motion blur for Chloe. See the placement of everything here:

Camera pan start point
We need to parent the Chloe layer to the null layer at this point. Also parent the text to the null layer:

Parent character to null
To create a hold key frame for the position parameter of our null object, follow these steps:
- Navigate to the far-right of the timeline.
- Locate the diamond icon in the position of the null object.
- Click on the diamond:

Blank key frame
Let's animate our move to the right. Select the position parameter and scrub it so that the camera is moving to the right:

Pan to Chloe
Completing your infographic
You now have all the tools to create a dynamic infographic video. Spend some time adding more text to help communicate your concept.
Adobe Character Animator
Character Animator is by far the most amazing character animation program in After Effects. Install Photoshop and Adobe Character Animator on your machine this very second. With this software, you can create characters that lip synch to your voice. You must have a webcam to create and stream live motion-captured animation online.
First things first, you need to install Adobe Character Animator. When you open Character Animator, you're presented with the Start menu. This has free puppets you can start using without editing them. You also have access to interactive tutorials. If you click the right arrow, you can see more free characters to use:

Start menu
Let's click on the Chloe character. Choose the Illustator version. You could also use the Photoshop version, but for this lesson we will use the illustrator file. This opens the Chloe character in Illustrator. You can choose to edit the character here, but do not rename anything. Just for fun, let's change the color of her shirt to yellow. Look on the far-left of your Illustrator tool panel and choose the direct selection tool.
Altering Illustrator files
Now that you know how to open your characters, we can start altering our illustrator files. Here's how we do that:

Direct selection tool
Hover the direct selection tool over the different parts of the t-shirt. Click on each piece while holding the Shift key:

Select the shirt
Now that the t-shirt is selected, navigate to the left of the tool panel and choose Fill (X) to change the color to yellow:

Change color
I am also going to select the t-shirt logo and turn it off. You need to save your Illustrator file, then jump back into Character Animator.
Now you should see the Record interface. This is where you animate your character. Let's save this project:

Record interface
Go up to the File tab and Save Project As.... Give your project a unique name:

Save as
Character Animator has an autosave feature built into it. I find it useful to save different versions of my projects as I progress. That way, if a project gets corrupted, you will have a backup.
Character Animator interface
The interface is similar to After Effects, except it doesn't have as many tools and panels. To the far left, you will see a Project panel window. This is where you can create new scenes and new folders, and organize your project. This is where you import items into the program:

Image folders and new scenes
To the left, at the top of the interface, there are four tabs: Start/Rig/Record/Stream. We already looked at the Start tab. Let's look at the Rig tab. This is where the puppet is rigged. This allows us to take a behind-the-scenes look at our character. As you get more advanced, you will need to edit the rig of your character here:

Rig
The Record tab is the animation panel; this is where all the animation and performance takes place.
The Stream tab is used for streaming your performance live around the world:

Stream
Next, let's look at the scene Properties.
Make sure your scene is selected, then look to the far-right—you will see a variety of project settings you can adjust, such as Frame Rate:

Scene settings
The Scene window is where your character is. This is where all the action takes place. Take a look at the play buttons under the character. This allows you to go backward or forward in the timeline. The red button is how you record your animations. To the right of the Record button is the speed. You can control how quickly or slowly your recording happens:

Record button and speed
Next, let's look at the camera and mic panel.
This is where you handle your webcam setup and your voice recording. Let's turn on our webcam. Click this camera input tab at the top-left corner of the interface. If you have a working webcam, you should see the box in the panel show your image in it. This will enable facial tracking. The red dots are track points on your face:

Image webcam
Let's make sure our face is properly synced. Make sure you have a strong light source. Also, wearing glasses can interfere with syncing your face to the web camera. Next, select the webcam button. Click the (Set Rest Pose). This will sync your face to the character's face. It's similar to what happened in Avatar when Sully gets synced to his avatar. Now you are synced to your character:

Set Rest Pose
Now you can spend some time playing with your character—when you speak, it speaks. It only syncs to your head; as its head will move with yours, its eyes will also follow yours. It will also speak when you speak. I'll show you how to move its limbs later.
Animation timeline
Let's look at the animation timeline. This is where you can see your layers and is similar to After Effects. You can edit your performances here:

Timeline
Next, we will look at the character properties. Select your Chloe character layer in the timeline. To the far right, you have properties for her eyes, face, lips, and so on:

Puppet properties
Recording your performance
These are all the properties you can adjust for your character.
Now that we know where everything is located, let's begin our animation and our performance:
- Click on the red record button. You will hear a few beeps before the recording button is active:

Record button
- Select Chloe's hand and drag it.
- Let go of her hand.
- Press the record button again to stop recording.
Adjusting character properties
It may take your computer a couple of seconds to render the recording. When it's done, you will have a recording layer. This is called a take in Character Animator. You can adjust your Dragger setting like this:
- Select the character in the timeline and to the right in the Properties.
- Twirl down the Dragger properties:

Dragger properties
Across from the After Move property, you can choose to hold your limbs in place or return to rest. Let's choose Return to rest. This will enable our limbs to return to their original resting pose after moving them:

Return to rest
You can also adjust Eye Gaze to control the strength or the extent to which the eyes will move:

Eye Gaze
Let's look at our Face controls. These are located on the far-right of your screen. We won't go over all these parameters here, but you can change your Eyebrow Strength to 40. This will give you control of eyebrow movements. If you need to adjust anything on the face, this is where you find it:

Face controls
We are almost ready to start the animation. Look in the far-right corner of the screen—there is a small camera-control icon. Click on this icon to begin to activate your camera. Hit the record button to activate live recording:

Camera control
If you move your head around, you should see your puppet moving. Let's adjust the gravity for her hair:

Gravity Strength
You will need to zoom into the timeline to look at the bottom corner of the panel, just under the timeline. You will see an icon similar to that in After Effects. Click on this to zoom into the timeline:

Zoom into the timeline
Blending takes
After you're done with your performance, press the record button again. You will see the recordings on your timeline. You can edit these by sliding them, or you may want to blend or ease your performances. This is similar to easing a movement in After Effects. These layers are called takes and are similar to an acting performance in a movie. An actor has a series of takes in a movie scene:
- Select the end of your take layer.
- You will see a double-arrow icon.
- Drag this icon to the left. You will see a sloped curve icon. This means you can blend or smooth the end of your take layer:

Blend take
Starting recording
Next, let's make Chloe talk! Look at the icon next to the camera. This is the audio recording button:
- Click on the audio button.
- Click the record button.
- Begin speaking.
- Click the record button again to stop recording:

Turn on the audio button
This will add additional Audio layers in the timeline. Take a look at the new layers or takes in the timeline here:

Camera and audio input layers
Now that we've created a cool animation, let's play it to preview our work. Press the play button:

Play button
Project settings
Now that you know how to animate your character and record audio, let's adjust our project settings. The following steps will show you how to do that:
- Select the Scene.
- Look at the far-right and you will see the Scene info.
- Adjust the scene Duration so that it's only the length of your project:

Adjust scene duration
Next, we are going to adjust our Frame Rate so that it matches our frame rate in After Effects. Change this to 29.97 fps:

Adjust scene duration frame rate
Exporting your animation
Now let's export our project. Your project will export with a transparent background unless you put an image in the background.
The following are the steps to export your project:
- Click on File.
- Click on Export.
- Select PNG Sequence and WAV...:

Export PNG sequence
Importing PNG sequences
We are ready to import our PNG sequences. Here are the steps to do that:
- Jump back over to After Effects. Import the
.pngfile. - Select the first
.pngfile with00at the end. - After Effects will import all the remaining files in a
.pngsequence. - Ensure that you check the sequence:

Import PNG
You can also import any audio recorded in your character animation. When you render out your PNG sequence, it will save a WAV file with it. If you need to import your audio file, here are the steps:
- Go to the folder with the PNG sequence.
- Navigate to the bottom of the PNG sequence.
- Import the WAV file to After Effects:

Import WAV
Adding the character to an infographic project
Now we are going to bring Chloe into the main composition and we are going to create a camera move to the right. We will animate our null object to do this. We need to be on the correct part of the timeline and we need the correct things parented to the null.
To be sure we are at the correct point on the timeline, follow these steps:
- Move to the point on the timeline after the last bit of text that has been animated on.
- Move the Chloe layer on to the timeline so that the layer starts at that point.
- Turn on motion blur for Chloe. See the placement of everything here:

Camera pan start point
We need to parent the Chloe layer to the null layer at this point. Also parent the text to the null layer:

Parent character to null
To create a hold key frame for the position parameter of our null object, follow these steps:
- Navigate to the far-right of the timeline.
- Locate the diamond icon in the position of the null object.
- Click on the diamond:

Blank key frame
Let's animate our move to the right. Select the position parameter and scrub it so that the camera is moving to the right:

Pan to Chloe
Completing your infographic
You now have all the tools to create a dynamic infographic video. Spend some time adding more text to help communicate your concept.
Altering Illustrator files
Now that you know how to open your characters, we can start altering our illustrator files. Here's how we do that:

Direct selection tool
Hover the direct selection tool over the different parts of the t-shirt. Click on each piece while holding the Shift key:

Select the shirt
Now that the t-shirt is selected, navigate to the left of the tool panel and choose Fill (X) to change the color to yellow:

Change color
I am also going to select the t-shirt logo and turn it off. You need to save your Illustrator file, then jump back into Character Animator.
Now you should see the Record interface. This is where you animate your character. Let's save this project:

Record interface
Go up to the File tab and Save Project As.... Give your project a unique name:

Save as
Character Animator has an autosave feature built into it. I find it useful to save different versions of my projects as I progress. That way, if a project gets corrupted, you will have a backup.
Character Animator interface
The interface is similar to After Effects, except it doesn't have as many tools and panels. To the far left, you will see a Project panel window. This is where you can create new scenes and new folders, and organize your project. This is where you import items into the program:

Image folders and new scenes
To the left, at the top of the interface, there are four tabs: Start/Rig/Record/Stream. We already looked at the Start tab. Let's look at the Rig tab. This is where the puppet is rigged. This allows us to take a behind-the-scenes look at our character. As you get more advanced, you will need to edit the rig of your character here:

Rig
The Record tab is the animation panel; this is where all the animation and performance takes place.
The Stream tab is used for streaming your performance live around the world:

Stream
Next, let's look at the scene Properties.
Make sure your scene is selected, then look to the far-right—you will see a variety of project settings you can adjust, such as Frame Rate:

Scene settings
The Scene window is where your character is. This is where all the action takes place. Take a look at the play buttons under the character. This allows you to go backward or forward in the timeline. The red button is how you record your animations. To the right of the Record button is the speed. You can control how quickly or slowly your recording happens:

Record button and speed
Next, let's look at the camera and mic panel.
This is where you handle your webcam setup and your voice recording. Let's turn on our webcam. Click this camera input tab at the top-left corner of the interface. If you have a working webcam, you should see the box in the panel show your image in it. This will enable facial tracking. The red dots are track points on your face:

Image webcam
Let's make sure our face is properly synced. Make sure you have a strong light source. Also, wearing glasses can interfere with syncing your face to the web camera. Next, select the webcam button. Click the (Set Rest Pose). This will sync your face to the character's face. It's similar to what happened in Avatar when Sully gets synced to his avatar. Now you are synced to your character:

Set Rest Pose
Now you can spend some time playing with your character—when you speak, it speaks. It only syncs to your head; as its head will move with yours, its eyes will also follow yours. It will also speak when you speak. I'll show you how to move its limbs later.
Animation timeline
Let's look at the animation timeline. This is where you can see your layers and is similar to After Effects. You can edit your performances here:

Timeline
Next, we will look at the character properties. Select your Chloe character layer in the timeline. To the far right, you have properties for her eyes, face, lips, and so on:

Puppet properties
Recording your performance
These are all the properties you can adjust for your character.
Now that we know where everything is located, let's begin our animation and our performance:
- Click on the red record button. You will hear a few beeps before the recording button is active:

Record button
- Select Chloe's hand and drag it.
- Let go of her hand.
- Press the record button again to stop recording.
Adjusting character properties
It may take your computer a couple of seconds to render the recording. When it's done, you will have a recording layer. This is called a take in Character Animator. You can adjust your Dragger setting like this:
- Select the character in the timeline and to the right in the Properties.
- Twirl down the Dragger properties:

Dragger properties
Across from the After Move property, you can choose to hold your limbs in place or return to rest. Let's choose Return to rest. This will enable our limbs to return to their original resting pose after moving them:

Return to rest
You can also adjust Eye Gaze to control the strength or the extent to which the eyes will move:

Eye Gaze
Let's look at our Face controls. These are located on the far-right of your screen. We won't go over all these parameters here, but you can change your Eyebrow Strength to 40. This will give you control of eyebrow movements. If you need to adjust anything on the face, this is where you find it:

Face controls
We are almost ready to start the animation. Look in the far-right corner of the screen—there is a small camera-control icon. Click on this icon to begin to activate your camera. Hit the record button to activate live recording:

Camera control
If you move your head around, you should see your puppet moving. Let's adjust the gravity for her hair:

Gravity Strength
You will need to zoom into the timeline to look at the bottom corner of the panel, just under the timeline. You will see an icon similar to that in After Effects. Click on this to zoom into the timeline:

Zoom into the timeline
Blending takes
After you're done with your performance, press the record button again. You will see the recordings on your timeline. You can edit these by sliding them, or you may want to blend or ease your performances. This is similar to easing a movement in After Effects. These layers are called takes and are similar to an acting performance in a movie. An actor has a series of takes in a movie scene:
- Select the end of your take layer.
- You will see a double-arrow icon.
- Drag this icon to the left. You will see a sloped curve icon. This means you can blend or smooth the end of your take layer:

Blend take
Starting recording
Next, let's make Chloe talk! Look at the icon next to the camera. This is the audio recording button:
- Click on the audio button.
- Click the record button.
- Begin speaking.
- Click the record button again to stop recording:

Turn on the audio button
This will add additional Audio layers in the timeline. Take a look at the new layers or takes in the timeline here:

Camera and audio input layers
Now that we've created a cool animation, let's play it to preview our work. Press the play button:

Play button
Project settings
Now that you know how to animate your character and record audio, let's adjust our project settings. The following steps will show you how to do that:
- Select the Scene.
- Look at the far-right and you will see the Scene info.
- Adjust the scene Duration so that it's only the length of your project:

Adjust scene duration
Next, we are going to adjust our Frame Rate so that it matches our frame rate in After Effects. Change this to 29.97 fps:

Adjust scene duration frame rate
Exporting your animation
Now let's export our project. Your project will export with a transparent background unless you put an image in the background.
The following are the steps to export your project:
- Click on File.
- Click on Export.
- Select PNG Sequence and WAV...:

Export PNG sequence
Importing PNG sequences
We are ready to import our PNG sequences. Here are the steps to do that:
- Jump back over to After Effects. Import the
.pngfile. - Select the first
.pngfile with00at the end. - After Effects will import all the remaining files in a
.pngsequence. - Ensure that you check the sequence:

Import PNG
You can also import any audio recorded in your character animation. When you render out your PNG sequence, it will save a WAV file with it. If you need to import your audio file, here are the steps:
- Go to the folder with the PNG sequence.
- Navigate to the bottom of the PNG sequence.
- Import the WAV file to After Effects:

Import WAV
Adding the character to an infographic project
Now we are going to bring Chloe into the main composition and we are going to create a camera move to the right. We will animate our null object to do this. We need to be on the correct part of the timeline and we need the correct things parented to the null.
To be sure we are at the correct point on the timeline, follow these steps:
- Move to the point on the timeline after the last bit of text that has been animated on.
- Move the Chloe layer on to the timeline so that the layer starts at that point.
- Turn on motion blur for Chloe. See the placement of everything here:

Camera pan start point
We need to parent the Chloe layer to the null layer at this point. Also parent the text to the null layer:

Parent character to null
To create a hold key frame for the position parameter of our null object, follow these steps:
- Navigate to the far-right of the timeline.
- Locate the diamond icon in the position of the null object.
- Click on the diamond:

Blank key frame
Let's animate our move to the right. Select the position parameter and scrub it so that the camera is moving to the right:

Pan to Chloe
Completing your infographic
You now have all the tools to create a dynamic infographic video. Spend some time adding more text to help communicate your concept.
Character Animator interface
The interface is similar to After Effects, except it doesn't have as many tools and panels. To the far left, you will see a Project panel window. This is where you can create new scenes and new folders, and organize your project. This is where you import items into the program:

Image folders and new scenes
To the left, at the top of the interface, there are four tabs: Start/Rig/Record/Stream. We already looked at the Start tab. Let's look at the Rig tab. This is where the puppet is rigged. This allows us to take a behind-the-scenes look at our character. As you get more advanced, you will need to edit the rig of your character here:

Rig
The Record tab is the animation panel; this is where all the animation and performance takes place.
The Stream tab is used for streaming your performance live around the world:

Stream
Next, let's look at the scene Properties.
Make sure your scene is selected, then look to the far-right—you will see a variety of project settings you can adjust, such as Frame Rate:

Scene settings
The Scene window is where your character is. This is where all the action takes place. Take a look at the play buttons under the character. This allows you to go backward or forward in the timeline. The red button is how you record your animations. To the right of the Record button is the speed. You can control how quickly or slowly your recording happens:

Record button and speed
Next, let's look at the camera and mic panel.
This is where you handle your webcam setup and your voice recording. Let's turn on our webcam. Click this camera input tab at the top-left corner of the interface. If you have a working webcam, you should see the box in the panel show your image in it. This will enable facial tracking. The red dots are track points on your face:

Image webcam
Let's make sure our face is properly synced. Make sure you have a strong light source. Also, wearing glasses can interfere with syncing your face to the web camera. Next, select the webcam button. Click the (Set Rest Pose). This will sync your face to the character's face. It's similar to what happened in Avatar when Sully gets synced to his avatar. Now you are synced to your character:

Set Rest Pose
Now you can spend some time playing with your character—when you speak, it speaks. It only syncs to your head; as its head will move with yours, its eyes will also follow yours. It will also speak when you speak. I'll show you how to move its limbs later.
Animation timeline
Let's look at the animation timeline. This is where you can see your layers and is similar to After Effects. You can edit your performances here:

Timeline
Next, we will look at the character properties. Select your Chloe character layer in the timeline. To the far right, you have properties for her eyes, face, lips, and so on:

Puppet properties
Recording your performance
These are all the properties you can adjust for your character.
Now that we know where everything is located, let's begin our animation and our performance:
- Click on the red record button. You will hear a few beeps before the recording button is active:

Record button
- Select Chloe's hand and drag it.
- Let go of her hand.
- Press the record button again to stop recording.
Adjusting character properties
It may take your computer a couple of seconds to render the recording. When it's done, you will have a recording layer. This is called a take in Character Animator. You can adjust your Dragger setting like this:
- Select the character in the timeline and to the right in the Properties.
- Twirl down the Dragger properties:

Dragger properties
Across from the After Move property, you can choose to hold your limbs in place or return to rest. Let's choose Return to rest. This will enable our limbs to return to their original resting pose after moving them:

Return to rest
You can also adjust Eye Gaze to control the strength or the extent to which the eyes will move:

Eye Gaze
Let's look at our Face controls. These are located on the far-right of your screen. We won't go over all these parameters here, but you can change your Eyebrow Strength to 40. This will give you control of eyebrow movements. If you need to adjust anything on the face, this is where you find it:

Face controls
We are almost ready to start the animation. Look in the far-right corner of the screen—there is a small camera-control icon. Click on this icon to begin to activate your camera. Hit the record button to activate live recording:

Camera control
If you move your head around, you should see your puppet moving. Let's adjust the gravity for her hair:

Gravity Strength
You will need to zoom into the timeline to look at the bottom corner of the panel, just under the timeline. You will see an icon similar to that in After Effects. Click on this to zoom into the timeline:

Zoom into the timeline
Blending takes
After you're done with your performance, press the record button again. You will see the recordings on your timeline. You can edit these by sliding them, or you may want to blend or ease your performances. This is similar to easing a movement in After Effects. These layers are called takes and are similar to an acting performance in a movie. An actor has a series of takes in a movie scene:
- Select the end of your take layer.
- You will see a double-arrow icon.
- Drag this icon to the left. You will see a sloped curve icon. This means you can blend or smooth the end of your take layer:

Blend take
Starting recording
Next, let's make Chloe talk! Look at the icon next to the camera. This is the audio recording button:
- Click on the audio button.
- Click the record button.
- Begin speaking.
- Click the record button again to stop recording:

Turn on the audio button
This will add additional Audio layers in the timeline. Take a look at the new layers or takes in the timeline here:

Camera and audio input layers
Now that we've created a cool animation, let's play it to preview our work. Press the play button:

Play button
Project settings
Now that you know how to animate your character and record audio, let's adjust our project settings. The following steps will show you how to do that:
- Select the Scene.
- Look at the far-right and you will see the Scene info.
- Adjust the scene Duration so that it's only the length of your project:

Adjust scene duration
Next, we are going to adjust our Frame Rate so that it matches our frame rate in After Effects. Change this to 29.97 fps:

Adjust scene duration frame rate
Exporting your animation
Now let's export our project. Your project will export with a transparent background unless you put an image in the background.
The following are the steps to export your project:
- Click on File.
- Click on Export.
- Select PNG Sequence and WAV...:

Export PNG sequence
Importing PNG sequences
We are ready to import our PNG sequences. Here are the steps to do that:
- Jump back over to After Effects. Import the
.pngfile. - Select the first
.pngfile with00at the end. - After Effects will import all the remaining files in a
.pngsequence. - Ensure that you check the sequence:

Import PNG
You can also import any audio recorded in your character animation. When you render out your PNG sequence, it will save a WAV file with it. If you need to import your audio file, here are the steps:
- Go to the folder with the PNG sequence.
- Navigate to the bottom of the PNG sequence.
- Import the WAV file to After Effects:

Import WAV
Adding the character to an infographic project
Now we are going to bring Chloe into the main composition and we are going to create a camera move to the right. We will animate our null object to do this. We need to be on the correct part of the timeline and we need the correct things parented to the null.
To be sure we are at the correct point on the timeline, follow these steps:
- Move to the point on the timeline after the last bit of text that has been animated on.
- Move the Chloe layer on to the timeline so that the layer starts at that point.
- Turn on motion blur for Chloe. See the placement of everything here:

Camera pan start point
We need to parent the Chloe layer to the null layer at this point. Also parent the text to the null layer:

Parent character to null
To create a hold key frame for the position parameter of our null object, follow these steps:
- Navigate to the far-right of the timeline.
- Locate the diamond icon in the position of the null object.
- Click on the diamond:

Blank key frame
Let's animate our move to the right. Select the position parameter and scrub it so that the camera is moving to the right:

Pan to Chloe
Completing your infographic
You now have all the tools to create a dynamic infographic video. Spend some time adding more text to help communicate your concept.
Animation timeline
Let's look at the animation timeline. This is where you can see your layers and is similar to After Effects. You can edit your performances here:

Timeline
Next, we will look at the character properties. Select your Chloe character layer in the timeline. To the far right, you have properties for her eyes, face, lips, and so on:

Puppet properties
Recording your performance
These are all the properties you can adjust for your character.
Now that we know where everything is located, let's begin our animation and our performance:
- Click on the red record button. You will hear a few beeps before the recording button is active:

Record button
- Select Chloe's hand and drag it.
- Let go of her hand.
- Press the record button again to stop recording.
Adjusting character properties
It may take your computer a couple of seconds to render the recording. When it's done, you will have a recording layer. This is called a take in Character Animator. You can adjust your Dragger setting like this:
- Select the character in the timeline and to the right in the Properties.
- Twirl down the Dragger properties:

Dragger properties
Across from the After Move property, you can choose to hold your limbs in place or return to rest. Let's choose Return to rest. This will enable our limbs to return to their original resting pose after moving them:

Return to rest
You can also adjust Eye Gaze to control the strength or the extent to which the eyes will move:

Eye Gaze
Let's look at our Face controls. These are located on the far-right of your screen. We won't go over all these parameters here, but you can change your Eyebrow Strength to 40. This will give you control of eyebrow movements. If you need to adjust anything on the face, this is where you find it:

Face controls
We are almost ready to start the animation. Look in the far-right corner of the screen—there is a small camera-control icon. Click on this icon to begin to activate your camera. Hit the record button to activate live recording:

Camera control
If you move your head around, you should see your puppet moving. Let's adjust the gravity for her hair:

Gravity Strength
You will need to zoom into the timeline to look at the bottom corner of the panel, just under the timeline. You will see an icon similar to that in After Effects. Click on this to zoom into the timeline:

Zoom into the timeline
Blending takes
After you're done with your performance, press the record button again. You will see the recordings on your timeline. You can edit these by sliding them, or you may want to blend or ease your performances. This is similar to easing a movement in After Effects. These layers are called takes and are similar to an acting performance in a movie. An actor has a series of takes in a movie scene:
- Select the end of your take layer.
- You will see a double-arrow icon.
- Drag this icon to the left. You will see a sloped curve icon. This means you can blend or smooth the end of your take layer:

Blend take
Starting recording
Next, let's make Chloe talk! Look at the icon next to the camera. This is the audio recording button:
- Click on the audio button.
- Click the record button.
- Begin speaking.
- Click the record button again to stop recording:

Turn on the audio button
This will add additional Audio layers in the timeline. Take a look at the new layers or takes in the timeline here:

Camera and audio input layers
Now that we've created a cool animation, let's play it to preview our work. Press the play button:

Play button
Project settings
Now that you know how to animate your character and record audio, let's adjust our project settings. The following steps will show you how to do that:
- Select the Scene.
- Look at the far-right and you will see the Scene info.
- Adjust the scene Duration so that it's only the length of your project:

Adjust scene duration
Next, we are going to adjust our Frame Rate so that it matches our frame rate in After Effects. Change this to 29.97 fps:

Adjust scene duration frame rate
Exporting your animation
Now let's export our project. Your project will export with a transparent background unless you put an image in the background.
The following are the steps to export your project:
- Click on File.
- Click on Export.
- Select PNG Sequence and WAV...:

Export PNG sequence
Importing PNG sequences
We are ready to import our PNG sequences. Here are the steps to do that:
- Jump back over to After Effects. Import the
.pngfile. - Select the first
.pngfile with00at the end. - After Effects will import all the remaining files in a
.pngsequence. - Ensure that you check the sequence:

Import PNG
You can also import any audio recorded in your character animation. When you render out your PNG sequence, it will save a WAV file with it. If you need to import your audio file, here are the steps:
- Go to the folder with the PNG sequence.
- Navigate to the bottom of the PNG sequence.
- Import the WAV file to After Effects:

Import WAV
Adding the character to an infographic project
Now we are going to bring Chloe into the main composition and we are going to create a camera move to the right. We will animate our null object to do this. We need to be on the correct part of the timeline and we need the correct things parented to the null.
To be sure we are at the correct point on the timeline, follow these steps:
- Move to the point on the timeline after the last bit of text that has been animated on.
- Move the Chloe layer on to the timeline so that the layer starts at that point.
- Turn on motion blur for Chloe. See the placement of everything here:

Camera pan start point
We need to parent the Chloe layer to the null layer at this point. Also parent the text to the null layer:

Parent character to null
To create a hold key frame for the position parameter of our null object, follow these steps:
- Navigate to the far-right of the timeline.
- Locate the diamond icon in the position of the null object.
- Click on the diamond:

Blank key frame
Let's animate our move to the right. Select the position parameter and scrub it so that the camera is moving to the right:

Pan to Chloe
Completing your infographic
You now have all the tools to create a dynamic infographic video. Spend some time adding more text to help communicate your concept.
Recording your performance
These are all the properties you can adjust for your character.
Now that we know where everything is located, let's begin our animation and our performance:
- Click on the red record button. You will hear a few beeps before the recording button is active:

Record button
- Select Chloe's hand and drag it.
- Let go of her hand.
- Press the record button again to stop recording.
Adjusting character properties
It may take your computer a couple of seconds to render the recording. When it's done, you will have a recording layer. This is called a take in Character Animator. You can adjust your Dragger setting like this:
- Select the character in the timeline and to the right in the Properties.
- Twirl down the Dragger properties:

Dragger properties
Across from the After Move property, you can choose to hold your limbs in place or return to rest. Let's choose Return to rest. This will enable our limbs to return to their original resting pose after moving them:

Return to rest
You can also adjust Eye Gaze to control the strength or the extent to which the eyes will move:

Eye Gaze
Let's look at our Face controls. These are located on the far-right of your screen. We won't go over all these parameters here, but you can change your Eyebrow Strength to 40. This will give you control of eyebrow movements. If you need to adjust anything on the face, this is where you find it:

Face controls
We are almost ready to start the animation. Look in the far-right corner of the screen—there is a small camera-control icon. Click on this icon to begin to activate your camera. Hit the record button to activate live recording:

Camera control
If you move your head around, you should see your puppet moving. Let's adjust the gravity for her hair:

Gravity Strength
You will need to zoom into the timeline to look at the bottom corner of the panel, just under the timeline. You will see an icon similar to that in After Effects. Click on this to zoom into the timeline:

Zoom into the timeline
Blending takes
After you're done with your performance, press the record button again. You will see the recordings on your timeline. You can edit these by sliding them, or you may want to blend or ease your performances. This is similar to easing a movement in After Effects. These layers are called takes and are similar to an acting performance in a movie. An actor has a series of takes in a movie scene:
- Select the end of your take layer.
- You will see a double-arrow icon.
- Drag this icon to the left. You will see a sloped curve icon. This means you can blend or smooth the end of your take layer:

Blend take
Starting recording
Next, let's make Chloe talk! Look at the icon next to the camera. This is the audio recording button:
- Click on the audio button.
- Click the record button.
- Begin speaking.
- Click the record button again to stop recording:

Turn on the audio button
This will add additional Audio layers in the timeline. Take a look at the new layers or takes in the timeline here:

Camera and audio input layers
Now that we've created a cool animation, let's play it to preview our work. Press the play button:

Play button
Project settings
Now that you know how to animate your character and record audio, let's adjust our project settings. The following steps will show you how to do that:
- Select the Scene.
- Look at the far-right and you will see the Scene info.
- Adjust the scene Duration so that it's only the length of your project:

Adjust scene duration
Next, we are going to adjust our Frame Rate so that it matches our frame rate in After Effects. Change this to 29.97 fps:

Adjust scene duration frame rate
Exporting your animation
Now let's export our project. Your project will export with a transparent background unless you put an image in the background.
The following are the steps to export your project:
- Click on File.
- Click on Export.
- Select PNG Sequence and WAV...:

Export PNG sequence
Importing PNG sequences
We are ready to import our PNG sequences. Here are the steps to do that:
- Jump back over to After Effects. Import the
.pngfile. - Select the first
.pngfile with00at the end. - After Effects will import all the remaining files in a
.pngsequence. - Ensure that you check the sequence:

Import PNG
You can also import any audio recorded in your character animation. When you render out your PNG sequence, it will save a WAV file with it. If you need to import your audio file, here are the steps:
- Go to the folder with the PNG sequence.
- Navigate to the bottom of the PNG sequence.
- Import the WAV file to After Effects:

Import WAV
Adding the character to an infographic project
Now we are going to bring Chloe into the main composition and we are going to create a camera move to the right. We will animate our null object to do this. We need to be on the correct part of the timeline and we need the correct things parented to the null.
To be sure we are at the correct point on the timeline, follow these steps:
- Move to the point on the timeline after the last bit of text that has been animated on.
- Move the Chloe layer on to the timeline so that the layer starts at that point.
- Turn on motion blur for Chloe. See the placement of everything here:

Camera pan start point
We need to parent the Chloe layer to the null layer at this point. Also parent the text to the null layer:

Parent character to null
To create a hold key frame for the position parameter of our null object, follow these steps:
- Navigate to the far-right of the timeline.
- Locate the diamond icon in the position of the null object.
- Click on the diamond:

Blank key frame
Let's animate our move to the right. Select the position parameter and scrub it so that the camera is moving to the right:

Pan to Chloe
Completing your infographic
You now have all the tools to create a dynamic infographic video. Spend some time adding more text to help communicate your concept.
Adjusting character properties
It may take your computer a couple of seconds to render the recording. When it's done, you will have a recording layer. This is called a take in Character Animator. You can adjust your Dragger setting like this:
- Select the character in the timeline and to the right in the Properties.
- Twirl down the Dragger properties:

Dragger properties
Across from the After Move property, you can choose to hold your limbs in place or return to rest. Let's choose Return to rest. This will enable our limbs to return to their original resting pose after moving them:

Return to rest
You can also adjust Eye Gaze to control the strength or the extent to which the eyes will move:

Eye Gaze
Let's look at our Face controls. These are located on the far-right of your screen. We won't go over all these parameters here, but you can change your Eyebrow Strength to 40. This will give you control of eyebrow movements. If you need to adjust anything on the face, this is where you find it:

Face controls
We are almost ready to start the animation. Look in the far-right corner of the screen—there is a small camera-control icon. Click on this icon to begin to activate your camera. Hit the record button to activate live recording:

Camera control
If you move your head around, you should see your puppet moving. Let's adjust the gravity for her hair:

Gravity Strength
You will need to zoom into the timeline to look at the bottom corner of the panel, just under the timeline. You will see an icon similar to that in After Effects. Click on this to zoom into the timeline:

Zoom into the timeline
Blending takes
After you're done with your performance, press the record button again. You will see the recordings on your timeline. You can edit these by sliding them, or you may want to blend or ease your performances. This is similar to easing a movement in After Effects. These layers are called takes and are similar to an acting performance in a movie. An actor has a series of takes in a movie scene:
- Select the end of your take layer.
- You will see a double-arrow icon.
- Drag this icon to the left. You will see a sloped curve icon. This means you can blend or smooth the end of your take layer:

Blend take
Starting recording
Next, let's make Chloe talk! Look at the icon next to the camera. This is the audio recording button:
- Click on the audio button.
- Click the record button.
- Begin speaking.
- Click the record button again to stop recording:

Turn on the audio button
This will add additional Audio layers in the timeline. Take a look at the new layers or takes in the timeline here:

Camera and audio input layers
Now that we've created a cool animation, let's play it to preview our work. Press the play button:

Play button
Project settings
Now that you know how to animate your character and record audio, let's adjust our project settings. The following steps will show you how to do that:
- Select the Scene.
- Look at the far-right and you will see the Scene info.
- Adjust the scene Duration so that it's only the length of your project:

Adjust scene duration
Next, we are going to adjust our Frame Rate so that it matches our frame rate in After Effects. Change this to 29.97 fps:

Adjust scene duration frame rate
Exporting your animation
Now let's export our project. Your project will export with a transparent background unless you put an image in the background.
The following are the steps to export your project:
- Click on File.
- Click on Export.
- Select PNG Sequence and WAV...:

Export PNG sequence
Importing PNG sequences
We are ready to import our PNG sequences. Here are the steps to do that:
- Jump back over to After Effects. Import the
.pngfile. - Select the first
.pngfile with00at the end. - After Effects will import all the remaining files in a
.pngsequence. - Ensure that you check the sequence:

Import PNG
You can also import any audio recorded in your character animation. When you render out your PNG sequence, it will save a WAV file with it. If you need to import your audio file, here are the steps:
- Go to the folder with the PNG sequence.
- Navigate to the bottom of the PNG sequence.
- Import the WAV file to After Effects:

Import WAV
Adding the character to an infographic project
Now we are going to bring Chloe into the main composition and we are going to create a camera move to the right. We will animate our null object to do this. We need to be on the correct part of the timeline and we need the correct things parented to the null.
To be sure we are at the correct point on the timeline, follow these steps:
- Move to the point on the timeline after the last bit of text that has been animated on.
- Move the Chloe layer on to the timeline so that the layer starts at that point.
- Turn on motion blur for Chloe. See the placement of everything here:

Camera pan start point
We need to parent the Chloe layer to the null layer at this point. Also parent the text to the null layer:

Parent character to null
To create a hold key frame for the position parameter of our null object, follow these steps:
- Navigate to the far-right of the timeline.
- Locate the diamond icon in the position of the null object.
- Click on the diamond:

Blank key frame
Let's animate our move to the right. Select the position parameter and scrub it so that the camera is moving to the right:

Pan to Chloe
Completing your infographic
You now have all the tools to create a dynamic infographic video. Spend some time adding more text to help communicate your concept.
Blending takes
After you're done with your performance, press the record button again. You will see the recordings on your timeline. You can edit these by sliding them, or you may want to blend or ease your performances. This is similar to easing a movement in After Effects. These layers are called takes and are similar to an acting performance in a movie. An actor has a series of takes in a movie scene:
- Select the end of your take layer.
- You will see a double-arrow icon.
- Drag this icon to the left. You will see a sloped curve icon. This means you can blend or smooth the end of your take layer:

Blend take
Starting recording
Next, let's make Chloe talk! Look at the icon next to the camera. This is the audio recording button:
- Click on the audio button.
- Click the record button.
- Begin speaking.
- Click the record button again to stop recording:

Turn on the audio button
This will add additional Audio layers in the timeline. Take a look at the new layers or takes in the timeline here:

Camera and audio input layers
Now that we've created a cool animation, let's play it to preview our work. Press the play button:

Play button
Project settings
Now that you know how to animate your character and record audio, let's adjust our project settings. The following steps will show you how to do that:
- Select the Scene.
- Look at the far-right and you will see the Scene info.
- Adjust the scene Duration so that it's only the length of your project:

Adjust scene duration
Next, we are going to adjust our Frame Rate so that it matches our frame rate in After Effects. Change this to 29.97 fps:

Adjust scene duration frame rate
Exporting your animation
Now let's export our project. Your project will export with a transparent background unless you put an image in the background.
The following are the steps to export your project:
- Click on File.
- Click on Export.
- Select PNG Sequence and WAV...:

Export PNG sequence
Importing PNG sequences
We are ready to import our PNG sequences. Here are the steps to do that:
- Jump back over to After Effects. Import the
.pngfile. - Select the first
.pngfile with00at the end. - After Effects will import all the remaining files in a
.pngsequence. - Ensure that you check the sequence:

Import PNG
You can also import any audio recorded in your character animation. When you render out your PNG sequence, it will save a WAV file with it. If you need to import your audio file, here are the steps:
- Go to the folder with the PNG sequence.
- Navigate to the bottom of the PNG sequence.
- Import the WAV file to After Effects:

Import WAV
Adding the character to an infographic project
Now we are going to bring Chloe into the main composition and we are going to create a camera move to the right. We will animate our null object to do this. We need to be on the correct part of the timeline and we need the correct things parented to the null.
To be sure we are at the correct point on the timeline, follow these steps:
- Move to the point on the timeline after the last bit of text that has been animated on.
- Move the Chloe layer on to the timeline so that the layer starts at that point.
- Turn on motion blur for Chloe. See the placement of everything here:

Camera pan start point
We need to parent the Chloe layer to the null layer at this point. Also parent the text to the null layer:

Parent character to null
To create a hold key frame for the position parameter of our null object, follow these steps:
- Navigate to the far-right of the timeline.
- Locate the diamond icon in the position of the null object.
- Click on the diamond:

Blank key frame
Let's animate our move to the right. Select the position parameter and scrub it so that the camera is moving to the right:

Pan to Chloe
Completing your infographic
You now have all the tools to create a dynamic infographic video. Spend some time adding more text to help communicate your concept.
Starting recording
Next, let's make Chloe talk! Look at the icon next to the camera. This is the audio recording button:
- Click on the audio button.
- Click the record button.
- Begin speaking.
- Click the record button again to stop recording:

Turn on the audio button
This will add additional Audio layers in the timeline. Take a look at the new layers or takes in the timeline here:

Camera and audio input layers
Now that we've created a cool animation, let's play it to preview our work. Press the play button:

Play button
Project settings
Now that you know how to animate your character and record audio, let's adjust our project settings. The following steps will show you how to do that:
- Select the Scene.
- Look at the far-right and you will see the Scene info.
- Adjust the scene Duration so that it's only the length of your project:

Adjust scene duration
Next, we are going to adjust our Frame Rate so that it matches our frame rate in After Effects. Change this to 29.97 fps:

Adjust scene duration frame rate
Exporting your animation
Now let's export our project. Your project will export with a transparent background unless you put an image in the background.
The following are the steps to export your project:
- Click on File.
- Click on Export.
- Select PNG Sequence and WAV...:

Export PNG sequence
Importing PNG sequences
We are ready to import our PNG sequences. Here are the steps to do that:
- Jump back over to After Effects. Import the
.pngfile. - Select the first
.pngfile with00at the end. - After Effects will import all the remaining files in a
.pngsequence. - Ensure that you check the sequence:

Import PNG
You can also import any audio recorded in your character animation. When you render out your PNG sequence, it will save a WAV file with it. If you need to import your audio file, here are the steps:
- Go to the folder with the PNG sequence.
- Navigate to the bottom of the PNG sequence.
- Import the WAV file to After Effects:

Import WAV
Adding the character to an infographic project
Now we are going to bring Chloe into the main composition and we are going to create a camera move to the right. We will animate our null object to do this. We need to be on the correct part of the timeline and we need the correct things parented to the null.
To be sure we are at the correct point on the timeline, follow these steps:
- Move to the point on the timeline after the last bit of text that has been animated on.
- Move the Chloe layer on to the timeline so that the layer starts at that point.
- Turn on motion blur for Chloe. See the placement of everything here:

Camera pan start point
We need to parent the Chloe layer to the null layer at this point. Also parent the text to the null layer:

Parent character to null
To create a hold key frame for the position parameter of our null object, follow these steps:
- Navigate to the far-right of the timeline.
- Locate the diamond icon in the position of the null object.
- Click on the diamond:

Blank key frame
Let's animate our move to the right. Select the position parameter and scrub it so that the camera is moving to the right:

Pan to Chloe
Completing your infographic
You now have all the tools to create a dynamic infographic video. Spend some time adding more text to help communicate your concept.
Project settings
Now that you know how to animate your character and record audio, let's adjust our project settings. The following steps will show you how to do that:
- Select the Scene.
- Look at the far-right and you will see the Scene info.
- Adjust the scene Duration so that it's only the length of your project:

Adjust scene duration
Next, we are going to adjust our Frame Rate so that it matches our frame rate in After Effects. Change this to 29.97 fps:

Adjust scene duration frame rate
Exporting your animation
Now let's export our project. Your project will export with a transparent background unless you put an image in the background.
The following are the steps to export your project:
- Click on File.
- Click on Export.
- Select PNG Sequence and WAV...:

Export PNG sequence
Importing PNG sequences
We are ready to import our PNG sequences. Here are the steps to do that:
- Jump back over to After Effects. Import the
.pngfile. - Select the first
.pngfile with00at the end. - After Effects will import all the remaining files in a
.pngsequence. - Ensure that you check the sequence:

Import PNG
You can also import any audio recorded in your character animation. When you render out your PNG sequence, it will save a WAV file with it. If you need to import your audio file, here are the steps:
- Go to the folder with the PNG sequence.
- Navigate to the bottom of the PNG sequence.
- Import the WAV file to After Effects:

Import WAV
Adding the character to an infographic project
Now we are going to bring Chloe into the main composition and we are going to create a camera move to the right. We will animate our null object to do this. We need to be on the correct part of the timeline and we need the correct things parented to the null.
To be sure we are at the correct point on the timeline, follow these steps:
- Move to the point on the timeline after the last bit of text that has been animated on.
- Move the Chloe layer on to the timeline so that the layer starts at that point.
- Turn on motion blur for Chloe. See the placement of everything here:

Camera pan start point
We need to parent the Chloe layer to the null layer at this point. Also parent the text to the null layer:

Parent character to null
To create a hold key frame for the position parameter of our null object, follow these steps:
- Navigate to the far-right of the timeline.
- Locate the diamond icon in the position of the null object.
- Click on the diamond:

Blank key frame
Let's animate our move to the right. Select the position parameter and scrub it so that the camera is moving to the right:

Pan to Chloe
Completing your infographic
You now have all the tools to create a dynamic infographic video. Spend some time adding more text to help communicate your concept.
Exporting your animation
Now let's export our project. Your project will export with a transparent background unless you put an image in the background.
The following are the steps to export your project:
- Click on File.
- Click on Export.
- Select PNG Sequence and WAV...:

Export PNG sequence
Importing PNG sequences
We are ready to import our PNG sequences. Here are the steps to do that:
- Jump back over to After Effects. Import the
.pngfile. - Select the first
.pngfile with00at the end. - After Effects will import all the remaining files in a
.pngsequence. - Ensure that you check the sequence:

Import PNG
You can also import any audio recorded in your character animation. When you render out your PNG sequence, it will save a WAV file with it. If you need to import your audio file, here are the steps:
- Go to the folder with the PNG sequence.
- Navigate to the bottom of the PNG sequence.
- Import the WAV file to After Effects:

Import WAV
Adding the character to an infographic project
Now we are going to bring Chloe into the main composition and we are going to create a camera move to the right. We will animate our null object to do this. We need to be on the correct part of the timeline and we need the correct things parented to the null.
To be sure we are at the correct point on the timeline, follow these steps:
- Move to the point on the timeline after the last bit of text that has been animated on.
- Move the Chloe layer on to the timeline so that the layer starts at that point.
- Turn on motion blur for Chloe. See the placement of everything here:

Camera pan start point
We need to parent the Chloe layer to the null layer at this point. Also parent the text to the null layer:

Parent character to null
To create a hold key frame for the position parameter of our null object, follow these steps:
- Navigate to the far-right of the timeline.
- Locate the diamond icon in the position of the null object.
- Click on the diamond:

Blank key frame
Let's animate our move to the right. Select the position parameter and scrub it so that the camera is moving to the right:

Pan to Chloe
Completing your infographic
You now have all the tools to create a dynamic infographic video. Spend some time adding more text to help communicate your concept.
Importing PNG sequences
We are ready to import our PNG sequences. Here are the steps to do that:
- Jump back over to After Effects. Import the
.pngfile. - Select the first
.pngfile with00at the end. - After Effects will import all the remaining files in a
.pngsequence. - Ensure that you check the sequence:

Import PNG
You can also import any audio recorded in your character animation. When you render out your PNG sequence, it will save a WAV file with it. If you need to import your audio file, here are the steps:
- Go to the folder with the PNG sequence.
- Navigate to the bottom of the PNG sequence.
- Import the WAV file to After Effects:

Import WAV
Adding the character to an infographic project
Now we are going to bring Chloe into the main composition and we are going to create a camera move to the right. We will animate our null object to do this. We need to be on the correct part of the timeline and we need the correct things parented to the null.
To be sure we are at the correct point on the timeline, follow these steps:
- Move to the point on the timeline after the last bit of text that has been animated on.
- Move the Chloe layer on to the timeline so that the layer starts at that point.
- Turn on motion blur for Chloe. See the placement of everything here:

Camera pan start point
We need to parent the Chloe layer to the null layer at this point. Also parent the text to the null layer:

Parent character to null
To create a hold key frame for the position parameter of our null object, follow these steps:
- Navigate to the far-right of the timeline.
- Locate the diamond icon in the position of the null object.
- Click on the diamond:

Blank key frame
Let's animate our move to the right. Select the position parameter and scrub it so that the camera is moving to the right:

Pan to Chloe
Completing your infographic
You now have all the tools to create a dynamic infographic video. Spend some time adding more text to help communicate your concept.
Adding the character to an infographic project
Now we are going to bring Chloe into the main composition and we are going to create a camera move to the right. We will animate our null object to do this. We need to be on the correct part of the timeline and we need the correct things parented to the null.
To be sure we are at the correct point on the timeline, follow these steps:
- Move to the point on the timeline after the last bit of text that has been animated on.
- Move the Chloe layer on to the timeline so that the layer starts at that point.
- Turn on motion blur for Chloe. See the placement of everything here:

Camera pan start point
We need to parent the Chloe layer to the null layer at this point. Also parent the text to the null layer:

Parent character to null
To create a hold key frame for the position parameter of our null object, follow these steps:
- Navigate to the far-right of the timeline.
- Locate the diamond icon in the position of the null object.
- Click on the diamond:

Blank key frame
Let's animate our move to the right. Select the position parameter and scrub it so that the camera is moving to the right:

Pan to Chloe
Completing your infographic
You now have all the tools to create a dynamic infographic video. Spend some time adding more text to help communicate your concept.
Completing your infographic
You now have all the tools to create a dynamic infographic video. Spend some time adding more text to help communicate your concept.
Summary
In this chapter, we have learned how to create infographics. These types of videos can be used to communicate information, explain products, or as a way to express stories. You have learned many skills and tools. You can create kinetic typography and edit it. You can also animate icons in dynamic, realistic ways, as demonstrated with this project. The biggest thing you learned was how to animate characters. You learned three different ways to bring characters to life. Experiment with these character animation tools.
I have provided additional links for further reading. Character animation is a valuable skill to have in your toolbox. It allows you to add humor and emotion to your projects, and is a unique way to engage your viewers! We also covered different camera moves such as a camera push in and a left-to-right pan. These camera moves are a great way to transition in and out of scenes. We also covered using adjustment layers to simulate a rack focus. You now have a variety of character animation tools at your disposal. I strongly recommend you experiment with all of these character animation tools. Use these characters to help tell your story!
In the next chapter, we will create a film title. This will build on your knowledge of text animation and effects.
Questions
- What is tracking used for?
- What should Illustrator files should be imported as?
- Why is it important to turn on continuously rasterize for Illustrator layers?
- Why is it important to turn on Easy Ease for your key frames?
- In Adobe Character Animator, how do you turn on facial tracking and lip-synch recording?
- How do you export your Adobe Character Animator project?
- How many locations does motion blur need to be turned on at?
Further reading
Adobe Character Animator is a deep program. Take some time to read more about animation principles and this amazing program, and what you can do with it:


