In this section of the chapter, you'll learn how to build OpenCV using its source codes. As you'll see later on, and as opposed to the title of this section, we're not really installing OpenCV in a way similar to what we experienced with Qt installation. That's because OpenCV usually doesn't provide pre-built binaries for all compilers and platforms, and in fact it provides no pre-built binaries for macOS and Linux at all. In the most recent Win pack of the OpenCV, only pre-built binaries for MSVC 2015 64-bit are included, which are not compatible with the 32-bit version that we'll be using, so it's a very good idea to learn how to build OpenCV yourself. It also has the advantage of building an OpenCV framework library that is suitable for what you need. You may want to exclude some options to make your OpenCV installation lighter, or you may want to build for another compiler such as MSVC 2013. So, there are quite a lot of reasons to build OpenCV from sources by yourself.
Installing OpenCV
Preparing for an OpenCV build
Most of the open source frameworks and libraries on the internet, or at least the ones that want to remain IDE neutral (this means, a project that can be configured and built using any IDE and a project that does not depend on a specific IDE to be able to work), use CMake or similar so-called make systems. I guess this also answers questions such as Why do I need CMake at all?, Why can't they just give the libraries and be done with it? or any other questions like these. So, we need CMake to be able to configure and build OpenCV using sources. CMake is an open source and cross-platform application that allows for configuring and building open source projects (or apps, libraries, or so on), and you can download and use it on all operating systems that were mentioned in the previous sections. At the moment of writing this book, CMake version 3.9.1 can be downloaded from the CMake website download page (https://cmake.org/download/).
Make sure you download and install it on your computer before proceeding forward. There's nothing special about the CMake installation that needs to be taken note of, except for the fact that you should make sure you install the GUI version since that's what we'll be using in the next section and it's the default option in the link provided earlier.
Where to get OpenCV?
OpenCV maintains its official and stable releases under the Releases page at their website (http://opencv.org/releases.html):
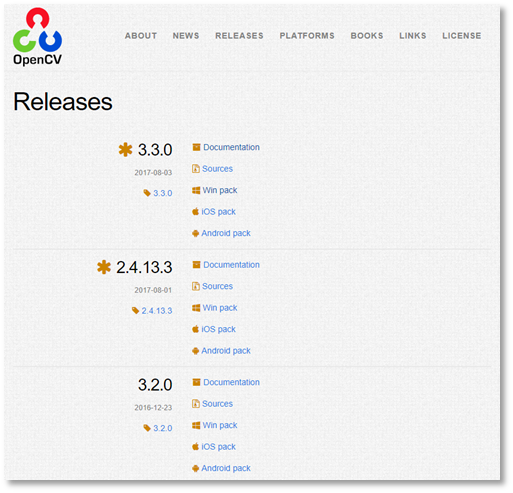
This is where you can always find the most recent release of OpenCV sources, documentation, and pre-built binaries for Windows, Android, and iOS. As new versions are released, they are added at the top of the page. At the moment of writing this book, version 3.3.0 is the most recent release of OpenCV and that's the version we'll use. So, without further ado, you should go ahead and download the Sources by clicking on the Sources link for version 3.3.0. Download the source zip file to a folder of your choice, extract it, and make a note of the extracted path since we'll use it in a few moments.
How to build?
Now that we have all required tools and files to build OpenCV, we can start the process by running the CMake GUI application. If you've installed CMake correctly, then you should be able to run it from your desktop, start menu, or dock, depending on your operating system.
sudp apt-get install libgtk2.0-dev and pkg-config
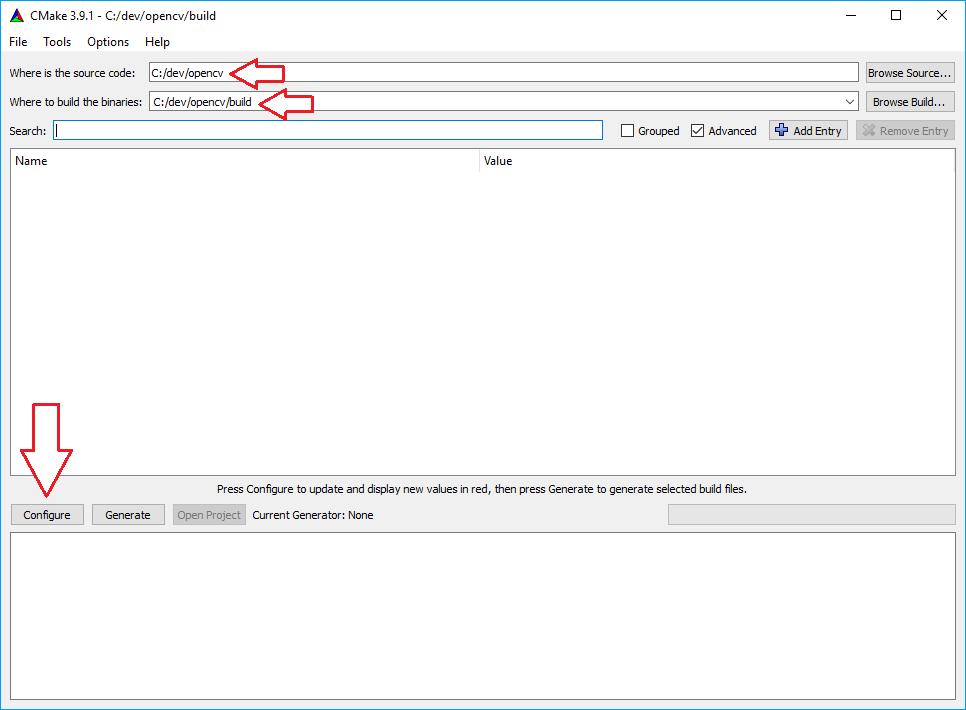
After you run the CMake GUI application, you need to set the following two folders:
- The Where is the source code folder should be set to where you downloaded and extracted OpenCV source code
- The Where to build the binaries folder can be set to any folder, but it's common to create a subfolder named build under the source codes folder and select that as the binaries folder
After these two folders are set, you can proceed forward by clicking on the Configure button, as shown in the following screenshot:
Clicking on the Configure button will start the configuration process. You may be asked to create the build folder if it does not already exist, to which you need to answer by clicking on the Yes button. Don't worry if you still feel like you're just repeating what's in the book. This will all sink in as you move forward with the book and the instructions. For now, let's just focus on getting OpenCV built and installed on your computer. Consider this an installation process that is not as easy as just clicking on a few Next buttons, and as soon as you start using OpenCV, it will all make sense. So, in the window that will appear next, select the correct generator and click Finish. See the following instructions for the correct generator type on each operating system:
macOS and Linux users: You need to select Unix Makefiles.
You'll see a short process in CMake, and when it's finished, you'll be able to set various parameters to configure your OpenCV build. There are many parameters to configure, so we'll just bother with the ones that directly affect us.
Make sure you check the checkbox next to the BUILD_opencv_world option. This will allow building all OpenCV modules into a single library. So, if you're on Windows, you'll have only a single DLL file that includes all OpenCV functions. As you'll see later on, this has the advantage of bothering with only a single DLL file when you want to deploy your computer vision applications. Of course, the obvious downside to this is that your application installer size will be a little bit larger. But again, ease of deployment, will prove to be much more useful later on.
You need to click on the Configure button again after changing the build parameters. Wait for the reconfiguration to finish and finally click on the Generate button. This will make your OpenCV build ready to compile. For the next part, you'll need to execute somewhat different commands if you're using Windows, macOS, or Linux operating systems. So, here they are:
Windows users: Go to the OpenCV build folder that you set earlier in CMake (in our case it was c:\dev\opencv\build). There should be a Visual Studio 2015 Solution (that is, the type of MSVC projects) that you can easily execute and build OpenCV with. You can also immediately click on the Open Project button, which is right next to the Generate button on CMake. You can also just run Visual Studio 2015 and open the Solution file you just created for OpenCV.
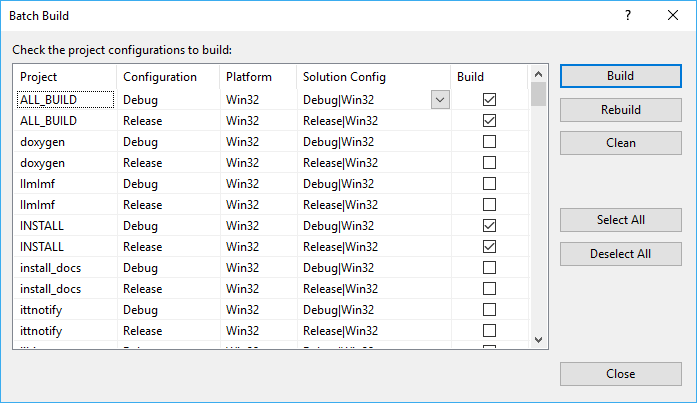
After Visual Studio is opened, you need to select Batch Build from the Visual Studio main menu. It's right under Build:
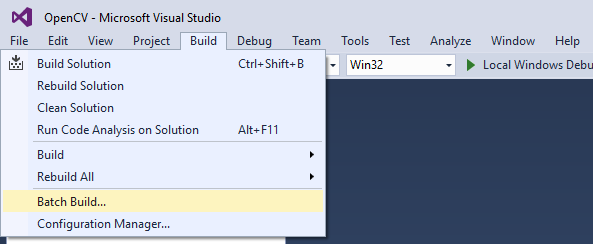
Make sure checkboxes in the Build column are enabled for ALL_BUILD and INSTALL, as shown in the following screenshot:
For macOS and Linux users: Run a terminal instance and execute the following commands after you switch to the Binaries folder you chose in CMake. To switch to a specific folder, you need to use the cd command. After you are in the OpenCV build folder (it should be the folder in your home that you chose when you opened CMake), you need to execute the following command. You'll be asked to provide the administrative password, just provide your password and press Enter to proceed forward with building OpenCV:
sudo make
This will trigger the build process, and depending on your computer speed this can take quite some time. Wait until building all libraries are finished and you see the progress bar reach 100%.
After the long wait, there's only one more command left to execute for macOS and Linux users. If you are on Windows, you can close Visual Studio IDE and proceed to the next step.
sudo make install
This last command for non-Windows users will make sure OpenCV is installed on your computer and is completely ready to use. You're fine to proceed forward if you didn't miss any commands in this section. You have an OpenCV framework ready to build computer vision applications with.
Configuring OpenCV installation
Remember we mentioned that OpenCV is a framework and you will learn how to use it with Qt? Well, Qt offers a very easy-to-use method to include any third-party library, such as OpenCV, in your Qt projects. To be able to use OpenCV in Qt, you need to use a special kind of file which is called a PRI file. PRI files are files that are used to add third-party modules and include them in your Qt projects. Note that you only need to do this once, and for the rest of the book you will use this file in all your projects, so it's a very crucial (yet very easy) part of the Qt configuration.
Start by creating a text file in a folder of your choice. I recommend using the same folder you used for OpenCV build because that can help make sure you have all your OpenCV related files in a single folder. However, technically speaking, this file can be located anywhere on your computer. Rename the file to opencv.pri and open it using any text editor and write the following inside this PRI file:
INCLUDEPATH += c:/dev/opencv/build/install/include
Debug: {
LIBS += -lc:/dev/opencv/build/install/x86/vc14/lib/opencv_world330d
}
Release: {
LIBS += -lc:/dev/opencv/build/install/x86/vc14/lib/opencv_world330
}
macOS and Linux users: Simply put the following inside your opencv.pri file:
 INCLUDEPATH += /usr/local/include
 LIBS += -L/usr/local/lib \
    -lopencv_world
There's one more thing left for Windows users, and that is adding OpenCV DLLs folder to the PATH environment variable. Simply open the System properties window and add a new entry in your PATH. They are usually separated by ; so just add a new one after that. Note that this path is related to the Windows operating system only, and where it can find your DLL files for OpenCV for an easier build process; users of Linux and macOS don't need to do anything regarding this.
Testing OpenCV installation
The worst is past us, and we are now ready to dig into the world of Computer Vision and start building exciting applications using Qt and OpenCV. Although this one last step is called Testing OpenCV, it's actually the first Qt+OpenCV application that you'll write, as simple as it may seem at first. Our aim in this section is not to bother with any details of how things are working and what goes on behind the scenes, but just to make sure we have configured everything correctly and avoid wasting time with configuration-related issues later in the book. If you have followed everything as it was described and executed all instructions in the correct order, then by now, you shouldn't be worrying about anything, but it's always best to verify, and that is what we'll do now.
So, we'll verify our OpenCV installation with a very simple application that reads an image file from the hard disk and just displays it. Again, don't bother with any code related details since we'll cover it all in the upcoming chapters and just focus on the task at hand, that is testing our OpenCV installation. Start by running Qt Creator and creating a new Console Application. You have already done a very similar task before when you were testing your Qt installation. You need to follow exactly the same instructions, except instead of Qt Widgets, you have to make sure you select Qt Console Application. Repeat all of the similar steps like before, until you end up in Qt Creator edit mode. If you are asked about build system just select qmake, which should be selected by default, so you just need to move forward. Make sure to give a name such as QtCvTest to your project. This time, instead of clicking on the Run button, double-click on your project's PRO file, which you can find in the explorer at the left side of the Qt Creator screen, and add the following line at the end of your project's PRO file:
include(c:/dev/opencv/opencv.pri)
Note that this, in fact, is a type of hard-coding that should always be avoided, and as we'll see in the later chapters, we will write more sophisticated PRO files that work on all operating systems without changing a single line; however, since we're just testing our OpenCV installation, it is OK for now to go ahead with a little bit of hard-coding to simplify things a little bit and not overwhelm you with more configuration details.
So, back to what we were doing, the moment you save your PRO file by pressing Ctrl + S, you will notice a quick process and update in the project explorer and the opencv.pri file will appear in the explorer. You can always change the contents of opencv.pri from here, but you will probably never need to do it. Ignore the Comment-Like lines and make sure your PRO file is similar to what I have here:
 QT += core
 QT -= gui
 CONFIG += c++11
 TARGET = QtCvTest
 CONFIG += console
 CONFIG -= app_bundle
 TEMPLATE = app
 SOURCES += main.cpp
 DEFINES += QT_DEPRECATED_WARNINGS
 include(c:/dev/opencv/opencv.pri)
This simple line of code in our project's PRO file is basically the result of all of our efforts in this chapter. Now, we are able to add OpenCV to our Qt projects by simply including this simple piece of code in every Computer Vision project that we want to build using Qt and OpenCV.
In the upcoming chapters, we'll learn about PRO files in Qt and everything about the preceding code; however, for now let's just move on knowing that this file is responsible for our project's configurations. So, the last line, which is pretty much self-explanatory, simply means we want to add OpenCV include headers and libraries to our Qt project.
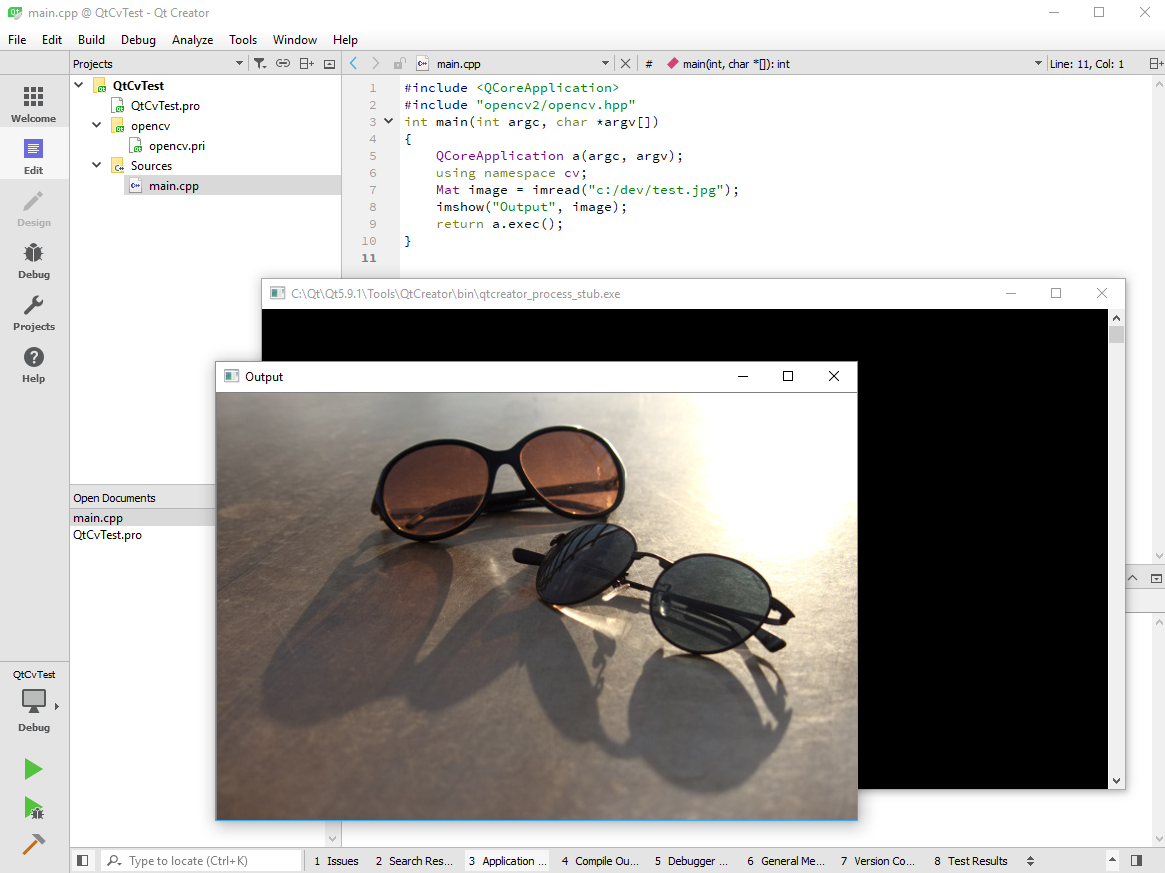
Now, you can actually write some OpenCV code. Open up your main.cpp file and change the contents of it to make it similar to this:
 #include <QCoreApplication>
 #include "opencv2/opencv.hpp"
 int main(int argc, char *argv[])
 {
    QCoreApplication a(argc, argv);
    using namespace cv;
    Mat image = imread("c:/dev/test.jpg");
    imshow("Output", image);
    return a.exec();
 }
By default, your main.cpp file should already have most of what is in the preceding code, but you'll notice the include line at the top and the three lines responsible for reading and displaying a test image from my computer. You can replace the path to any other image (just make sure you stick to JPG or PNG files for now), and it's very important to make sure the image file exists and it's accessible, otherwise, our test might fail, even though our installation is still correct. The whole code is almost self-explanatory but once again, you shouldn't bother with the codes for now since we're just testing our OpenCV build, so just press the Run button to have your image file displayed. You should see something similar to the following screenshot on your computer:
