Creating new projects and using templates
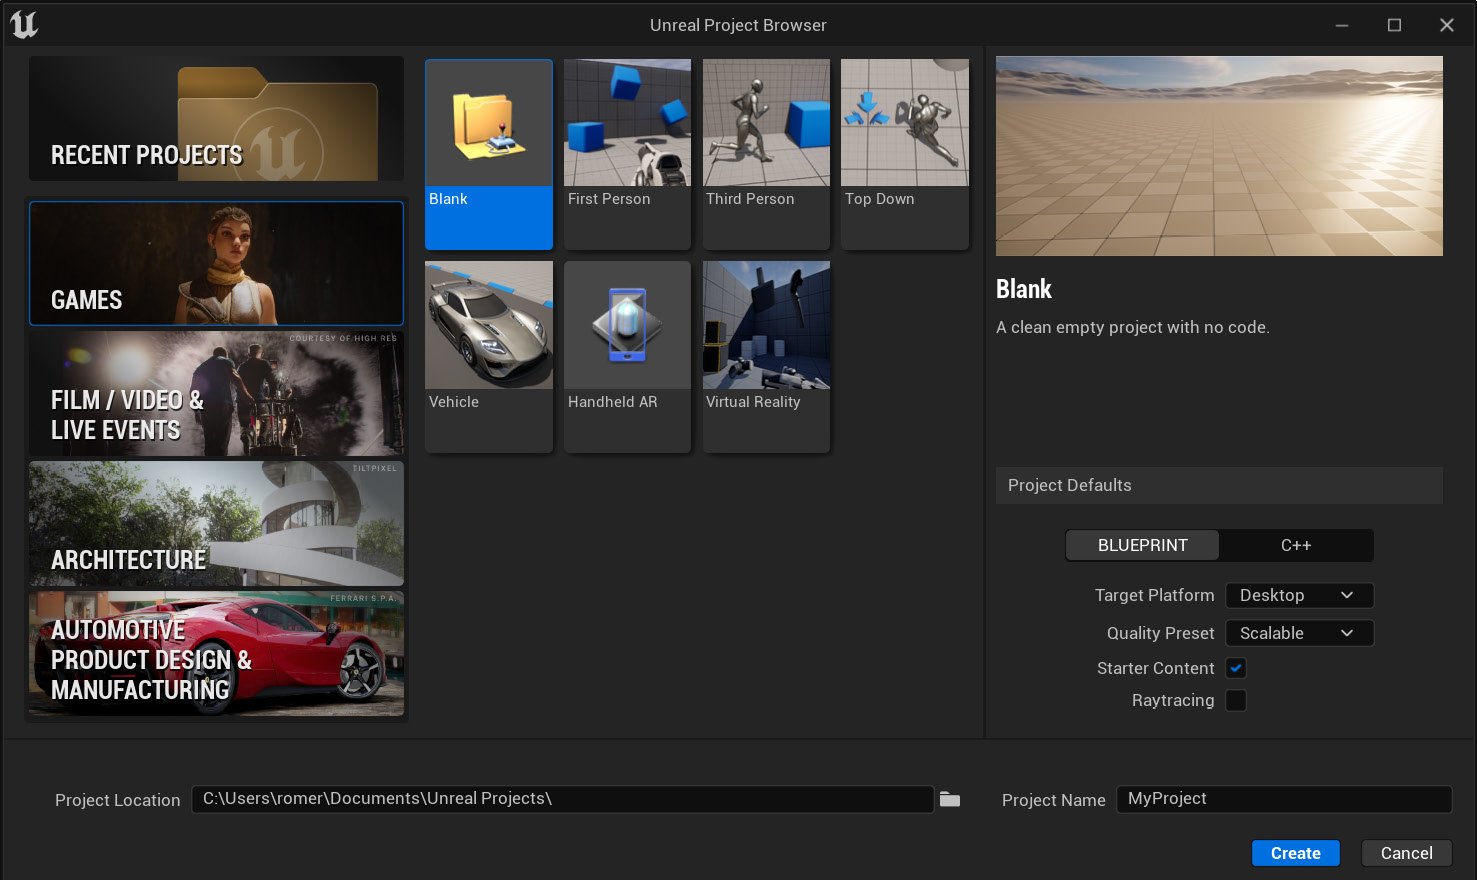
After starting up Unreal Engine Editor, the Unreal Project Browser will appear. The Recent Projects box on the top left is used to open existing projects and the other boxes on the left are categories of templates used to create a new project. The following screenshot shows the templates of the Games category.

Figure 1.2 – Templates under the Games category
Templates are basic containers with some key files and a level that provide a basic starting point for different types of projects. They are useful for rapid prototyping or to learn the basic mechanics of a specific type of project. The use of templates is optional. All templates can be simply recreated in the blank template. The following are descriptions of each template in the Games category:
- First Person: For games with a first-person perspective. This template features a player character represented by a pair of arms equipped with a gun that fires a simple sphere projectile. The character can be moved around the level using a keyboard, controller, or virtual joystick on a touch device.
- Handheld AR: For augmented reality applications for Android and iOS devices. This template features runtime logic for toggling AR mode on and off, along with some example code for hit detection and light estimation handling.
- Third Person: Contains a playable character with a camera that follows it. The camera is positioned behind and slightly above the character. The character has walking, running, and jumping animations and can be moved around the level using a keyboard, controller, or virtual joystick on a touch device.
- Top Down: Contains a character controlled by a mouse with a camera at a great distance above it. The player's character is controlled using a mouse or touchscreen to click on the required destination and uses the navigation system to avoid obstacles when moving to destinations. This top-down view is often used in action role-playing games.
- Virtual Reality: Contains the essential features for virtual reality games. This template features teleport locomotion, grabbable objects, interactive objects, and a VR spectator camera. The template has a level where the player can move around and contains objects that can be grabbed and interacted with.
- Vehicle: Contains a regular vehicle and a complex vehicle with suspension. The level of this template contains a simple track and obstacles.
At the bottom right of the Unreal Project Browser, there are the Project Defaults with project configuration options available for the selected template. In the examples of this book, we will use the values selected on the screenshot. These options can be modified later in the project, and they are as follows:
- Blueprint/C++: There are templates made with Blueprint or the C++ programming language. In this book, we will only use Blueprint templates. A project in Unreal Engine 5 can be developed using Blueprint, C++, or a combination of both. You can add C++ code to Blueprint projects and Blueprint to C++ projects.
- Target Platform: Desktop or Mobile. Use Desktop if you are developing your project for use on computers or game consoles. Choose Mobile if your project will be viewed on a mobile device. In this book, we will use the Desktop option.
- Quality Preset: Scalable or Maximum. These options affect the project's performance. The Scalable option disables some complex features, and the Maximum option enables all the features available in the target platform. In this book, we will use the Scalable option.
- Starter Content: If this checkbox is marked, the project will include Starter Content. Starter Content is a content pack with simple meshes, materials, and particle effects. The examples in this book assume that Starter Content is being used.
- Raytracing: If this checkbox is marked, the project will use real-time raytracing, which is a performance-intensive feature. The examples in this book will not use raytracing.
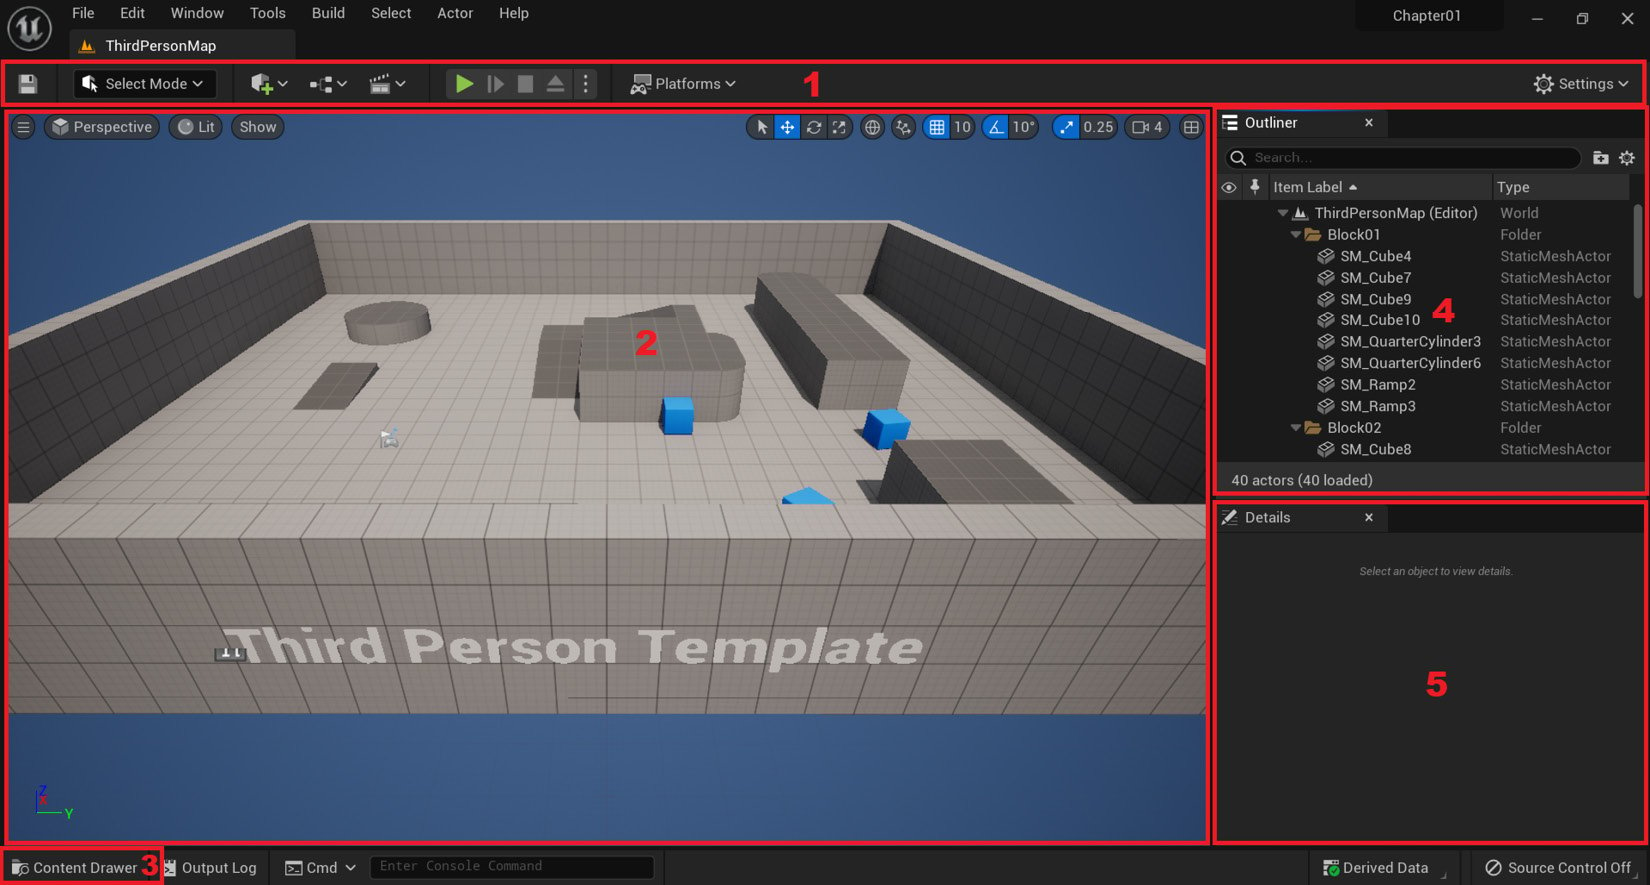
Select the Third Person template, choose a location folder, and fill in the Name field for the project. Select the Project Defaults mentioned in the previous list and then click the Create button. After the project loads, the Unreal Engine Level Editor will be displayed, as shown in the following screenshot:

Figure 1.3 – The Unreal Engine Level Editor
These are the key panels of the Level Editor:
- Toolbar: Located at the top of the Level Editor. It contains buttons with commonly used operations. The toolbar buttons are separated into four groups. The first group from the left provides quick access to features such as saving your work and adding various objects and code to the project. The second group of buttons are used to change the editing mode of the Level Editor. The third group lets you play the current level and provides various platform-specific options. The final Settings button all the way on the right provides easy access to project settings.
- Viewport: Located at the center of the Level Editor. It shows the Level that is being created. You can use the Viewport panel to move around the Level and add objects on the Level. When holding down the right mouse button, move the mouse to rotate the camera and use the WASD keys to move around.
- Content Browser: This can be accessed by clicking on the Content Drawer button located at the bottom-left corner of the Level Editor. It is used to manage the assets of the project. An asset is a piece of content in an Unreal Engine project. For example, Materials, Static Meshes, and Blueprints are all assets. If you drag an asset from the Content Browser and drop it into the Level, the Editor creates a copy of the asset to place in the Level.
- Outliner: Located to the right of the Level Editor. It lists the objects that are in the Level.
- Details: Located to the right of the Level Editor, below Outliner. It shows the editable properties of an object that is selected in the Viewport.
Now that we have an overview of the Unreal Engine Level Editor, let's focus on the Blueprints Visual Scripting.


