Lets open a new Jupyter Notebook and create a new Python 3 Notebook, then name the Notebook as FirstPractice. As mentioned earlier, the Notebook is made out of cells, and you have two types of cells: the default cell type, which is called the code cell, and the other type of cells are text cells. We have a code cell every time we open a Notebook where you can execute any Python statement.
Using the Jupyter Notebook
Running code in a code cell
We will run a few simple code statements and learn how to run those statements, and also learn how to change a cell type from code to text and vice versa. Let's execute the first code by typing 1 + 1 in the first code cell, and if you run the code of the cell with the run cell button, you will see the following output in the line below the code cell:

Next, let's create a variable, a, assign its value as 10, and run the code. Now this variable has been created, but since we didn’t create any code to compute the variable, we won’t see any output. But the statement was run, and now, if you use this variable, add 1 to it, and run the code, you will see the following result:

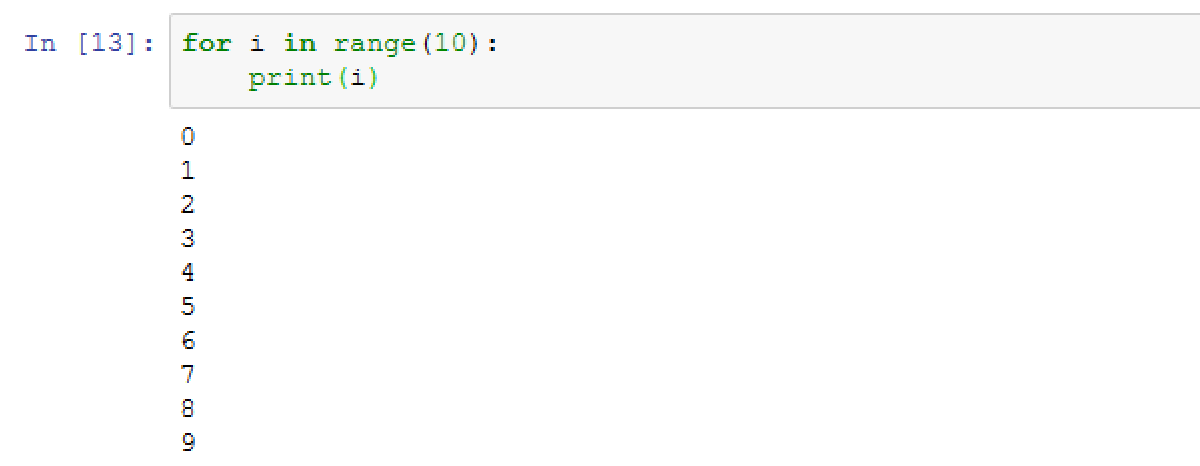
Now, let's see an example of the for syntax using a variable, i:

The code will tell the Notebook to print the value of i if and when the value is within the range of 10, which gives the preceding result.
Running markdown syntax in a text cell
As mentioned, the default type of each cell is a code cell, where we write Python expressions. The other type of cell that we have is a text cell, and a text cell is used to actually write text. In the cell below the output, let's type This is regular text. To tell the Notebook that this is not Python code and this is actually some text, you go to Cell | Cell Type | Markdown. Let’s run this now and you will find that what you get as output is just the text, the same text we entered:

Jupyter also allows us to format the text in many ways by using markdown syntax. If you are not familiar with markdown, you can go to Help|Markdown, where you will be taken to one of the GitHub help pages.
The markdown that you can use in Jupyter is the same markdown you use in GitHub.
There are many ways you can style and format your text; you can find all the information at: https://help.github.com/articles/basic-writing-and-formatting-syntax/. For this chapter, we will just look at the headings that are very important.
To create a heading, we add one to six # symbols before the heading text. The number of # symbols determines the size of the heading, starting from one to six # symbols, the largest to smallest heading, as follows:
# The largest heading
## The second largest heading
###### The smallest heading
The following screenshot shows the output for the preceding syntax:

If you run them in a code cell, you will get a bunch of Python commands, but we know that we want to see these as formatted text, so we need to tell the Notebook that these are actually texts by marking the cell type as markdown, and when you run the cell you get the preceding result.
Styles and formats
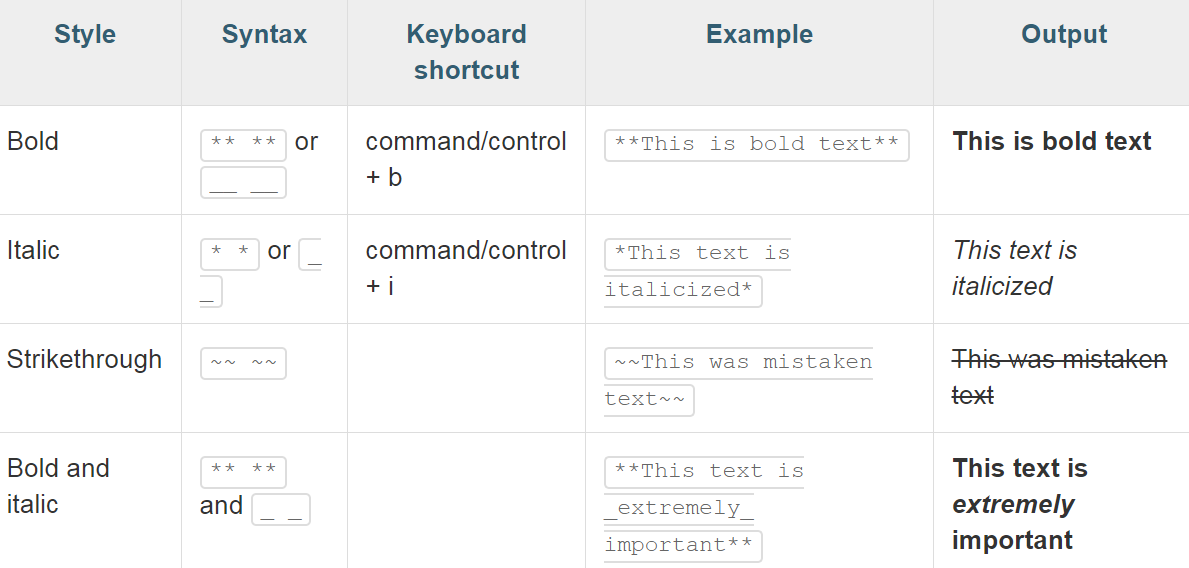
You can introduce other formats, such as bold, italic, strikethrough, and bold and italic. The following table shows the different styles and their corresponding syntax with an example of each:

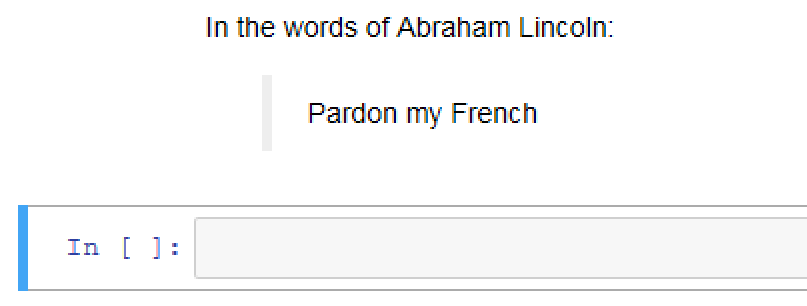
You can also introduce quotes, for which the syntax is denoted by, the > symbol. Run a markdown cell with the following syntax:
In the words of Abraham Lincoln:
> Pardon my French
This will give the following result:

We find the style and format of the texts remains the same, similar to the line of text preceding the >, but the quoted text is a little indented from the normal indentation.
Lists
You can use – or * before one or more lines to create a bulleted list. You can also use 1, 2, 3, and so on, to create a numbered or ordered list:
- George Washington
- John Adams
- Thomas Jefferson

1. James Madison
2. James Monroe
3. John Quincy Adams
On running the markdown syntax, we get the following result:

You will get a lot more styling and formatting syntax from a website that you can use in the Notebook.
Useful keyboard shortcuts
It is very annoying to use the mouse every time you want to run the cell or to transform a code cell into a markdown cell. To ease these tasks, we have a lot of keyboard shortcuts that you can use in Jupyter. Let's look at some of the most important ones.
To run a cell, for example, if you want to run the computation of 1 + 2, you can hit Alt + Enter. This shortcut will run the code in the cell and create a new cell below the output line. But if you just want to run the computation, you will press Ctrl + Enter; this will get the Notebook to run the code in that cell and show you the output, but no new cell will be created. If you want to insert a new cell below the current cell, you can press B, and then pressing A will create new cells above the current cell. This is very useful when you're working interactively within the Notebook and you want to create many cells to have more room to work.
Another very useful thing is how to transform cells from code cells to markdown cells. If you want to transform a code cell into a text cell, press the M key; this will get you from Edit mode to Command mode. Also, if you are in Command mode and you want to transform the cell into a code cell or Edit mode, press the Esc key.


