Writing our first Java code
So, we now know the code that will output to Logcat or the user's screen. But where do we write the code? To answer this question, we need to understand that the onCreate method in MainActivity.java executes as the app is preparing to be shown to the user. So, if we put our code at the end of this method, it will execute just as the user sees the app. Sounds good.
Note
We know that to execute the code in a method, we need to call it. We have wired our buttons up to call a couple of methods: topClick and bottomClick. Soon we will write these methods. But who or what is calling onCreate!? The answer to this mystery is that the Android operating system itself calls onCreate. It does so when the user clicks the app icon to run the app. In Chapter 6, The Android Lifecycle, we will look deeper at this phenomenon, and it will be clear exactly what code executes and when. You don't need to completely comprehend this now. I just wanted to give you an overview of what was going on.
Let's quickly try this out. Switch to the MainActivity.java tab in Android Studio.
We know that the onCreate method is called just before the app starts. Let's copy and paste some code into the onCreate method of our app and see what happens when we run it.
Adding message code to the onCreate method
Find the closing curly brace } of the onCreate method and add the highlighted code shown next. In the code, I haven't shown the complete contents of the onCreate method but have used … to indicate some lines of code not being shown. The important thing is to place the new code (shown in full) right at the end but before that closing curly brace, }:
@Override
protected void onCreate(Bundle savedInstanceState) {
…
…
…
// Your code goes here
     Toast.makeText(this, "Can you see me?",
                    Toast.LENGTH_SHORT).show();

     Log.i("info", "Done creating the app");
}
Notice that the two instances of the word Toast and the word Log are highlighted in red in Android Studio. They are errors. We know that Toast and Log are classes and that classes are containers for code.
The problem is that Android Studio doesn't know about them until we tell it about them. We must add an import for each class. Fortunately, this is semi-automatic.
Left-click on the red Toast code in the onCreate method. Now hold the Alt key and then tap Enter. When prompted, choose Import class. Now repeat this process for Log. Android Studio adds the import directives at the top of the code with our other imports and the errors are gone.
Note
Alt + Enter is just one of many useful keyboard shortcuts. The following link is to a keyboard shortcut reference for Android Studio. More specifically, it is for the IntelliJ Idea IDE, upon which Android Studio is based. Look at and bookmark this web page; it will be invaluable over the course of this book: http://www.jetbrains.com/idea/docs/IntelliJIDEA_ReferenceCard.pdf.
Scroll to the top of MainActivity.java and look at the added import directives. Here they are for your convenience:
import android.util.Log;
import android.widget.Toast;
Run the app in the usual way and look at the output in the Logcat window.
Examining the output
The next figure shows a screenshot of the output in the Logcat window:

Figure 2.21 – Output in the Logcat window
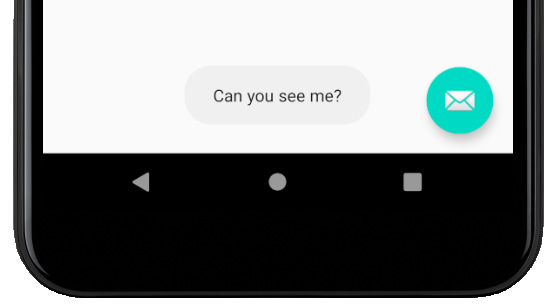
Look at the Logcat window, you can see our message Done creating the app was output, although it is mixed up among other system messages that we are currently not interested in. If you watch the emulator when the app first starts, you will also see the neat pop-up message that the user will see:

Figure 2.22 – Pop-up message
It is possible that you might be wondering why the messages were output at the time they were. The answer is that the onCreate method is called just before the app starts to respond to the user. It is for this reason, it's common practice among Android developers to put code in this method to get their apps set up and ready for the user.
Now we will go a step further and write our own methods that will be called by our two buttons in the UI. We will place similar Log and Toast messages inside these new methods.
Writing our own Java methods
Let's get straight on with writing our first Java methods with some more Log and Toast messages inside them.
Note
Now would be a good time, if you haven't already, to get the download bundle that contains all the code files. You can view the completed code for each chapter. For example, the completed code for this chapter can be found in the Chapter 2 folder. I have further subdivided the Chapter 2 folder into java and res folders (for Java and resource files). In chapters with more than one project, I will divide the folders further to include the project name. You should view these files in a text editor. My favorite is Notepad++, a free download from https://notepad-plus-plus.org/download/. The code viewed in a text editor is easier to read than from the book directly, especially the paperback version, and even more so where the lines of code are long. The text editor is also a great way to select sections of the code to copy and paste into Android Studio. You could open the code in Android Studio, but then you'd risk mixing up my code with the auto-generated code of Android Studio.
Identify the closing curly brace, }, of the MainActivity class.
Note
You are looking for the end of the entire class, not the end of the onCreate method as in the previous section. Take your time to identify the new code and where it goes among the existing code.
Inside that curly brace, enter the following code that is highlighted.
@Override
protected void onCreate(Bundle savedInstanceState) {
…
…
…
…
}
…
…
…
public void topClick(View v){
             Toast.makeText(this, "Top button clicked",
                            Toast.LENGTH_SHORT).show();
             Log.i("info","The user clicked the top
                   button");
}
public void bottomClick(View v){
             Toast.makeText(this, "Bottom button clicked",
                            Toast.LENGTH_SHORT).show();
             Log.i("info","The user clicked the bottom
                   button");
}
} // This is the end of the class
Notice that the two instances of the word View might be red, indicating an error. Simply use the Alt + Enter keyboard combination to import the View class and remove the errors.
Note
The reason I said there "might" be an error is because it depends on how you entered the code. If you copied and pasted the code, then Android Studio may automatically add the View class import code. If you typed the new code, then the error will appear, and you will need to use the Alt + Enter key solution. This is just a quirk of Android Studio.
Deploy the app to a real device or emulator in the usual way and start tapping the buttons so we can observe the output.
Examining the output
At last, our app does something we told it to do when we told it to do it. We can see that the method names we defined in the button onClick attribute are indeed called when the buttons are clicked, and the appropriate messages are added to the Logcat window and the appropriate Toast messages are shown to the user.
Admittedly, we still don't understand why or how the Toast and Log classes really work, neither do we fully comprehend the public void and (View v) parts of our method's syntax (or much of the rest of the auto-generated code). This will become clearer as we progress. As said previously, in Chapter 10, Object-Oriented Programming, we will take a deep dive into the world of classes, and in Chapter 9, Learning Java Methods, we will master the rest of the syntax associated with methods.
Check the Logcat window output. You can see that a log entry was made from the onCreate method just as before, as well as from the two methods that we wrote ourselves, each time you clicked one of the buttons. In the following figure, you can see I clicked each button three times:

Figure 2.23 – Logcat window output
As you are now familiar with where to find the Logcat window, in future I will present Logcat output as trimmed text as follows, as it is easier to read:
The user clicked the top button
The user clicked the top button
The user clicked the top button
The user clicked the bottom button
The user clicked the bottom button
The user clicked the bottom button
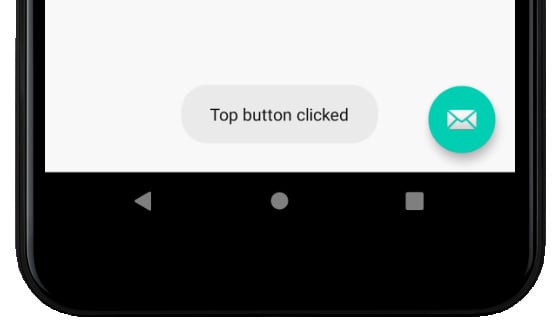
And in the next figure, you can see that the top button has been clicked and the topClick method was called, triggering the pop-up Toast message highlighted here:

Figure 2.24 – Pop-up Toast message
Throughout this book, we will regularly output to the Logcat window, so we can see what is going on behind the UI of our apps. Toast messages are more for notifying the user that something has occurred. This might be a download that has completed, a new email that has arrived, or some other occurrence that the user might want to be informed about.


