Exploring Blender's modeling tools
Let's take a look at the 3D modeling tools that we will use in our practical tutorials during the next four chapters. This section serves as a reference and is not meant to be a practical tutorial.
Note
In the Further reading section, you will find a link to download Additional Content Volume 1 – More Blender Tools and Modifiers.pdf. This is a document where I have covered a few more modeling tools and modifiers.
When using Blender's modeling tools, either click outside the mesh in the 3D Viewport to apply the current tool, or press Alt + A to deselect the active edit; this will also apply the tool.
Extrude region
This tool extrudes a face, edge, or vertex, thus increasing the volume of the mesh and adding new geometry to it.
To use this tool, switch to Edit Mode by pressing Tab. Then, either select the Extrude Region tool icon from the toolbar or use the E shortcut to extrude:

Figure 1.11 – (Left) Using the Extrude tool; (Right) The Extrude Region tool icon
If you're using the icon, left-click and drag the plus sign (or handle) to extrude the selected face/s out in a straight path.
Click and drag on the white circle to extrude in the screen space's direction (perpendicular to your current view).
Bevel
The Bevel tool is used to bevel your selected edge, vertex, or face. A bevel is used to smooth out edges and corners, as shown in the following screenshot.
To use this function, select the Bevel tool icon and the object's components that you wish to bevel. Then, click and drag on the yellow handle. The minimized Operator panel will appear in the bottom left of your 3D Viewport (below your mesh). It shows additional options when it is expanded (it is minimized by default). If you want to use a shortcut to bevel, press Ctrl + B:

Figure 1.12 – (Left) Applying a bevel with a varying number of segments; (Right) The Bevel tool icon
The default Bevel contains one segment, but after completing your first bevel, you can add more segments inside the Operator panel to make the bevel more rounded.
If you've used the shortcut (Ctrl + B) to bevel, you can use your mouse's scroll wheel to increase or decrease the number of segments, without needing to use the Operator panel. If you beveled using the Bevel tool icon from the toolbar, then you must use the Operator panel to add more segments.
Note
The Operator panel only appears once. If you left-click outside the Operator panel in the 3D Viewport, the Operator panel will disappear, so make sure you've made all the edits that you want to in the Operator panel before it closes.
Loop Cut
The Loop Cut tool is used to add an Edge Loop to your mesh (an encircling loop of edges that connects back to its starting point):

Figure 1.13 – (Left) Using the Loop Cut tool; (Right) The Loop Cut tool icon
To use this tool, select the Loop Cut tool icon from the toolbar, or use the Ctrl + R shortcut and follow these steps:
- Click on the area you wish to add the Edge Loop to. A yellow edge will appear indicating that your Edge Loop is still in Edit Mode.
- Click and drag the yellow Edge Loop to an area where you wish to place it.
- Press Alt + A to deselect and apply the Loop Cut.
Let's move on to the next tool now.
Inset Faces
The Inset Faces tool is similar to the Extrude tool, but all the faces it creates are on the surface of the selected face and do not change the mesh's surface shape. To use this tool, either press I on your keyboard or select the Inset Faces tool icon from the toolbar:

Figure 1.14 – (Left) Using the Inset Face tool; (Right) The Inset Faces tool icon
Merging faces, edges, and vertices
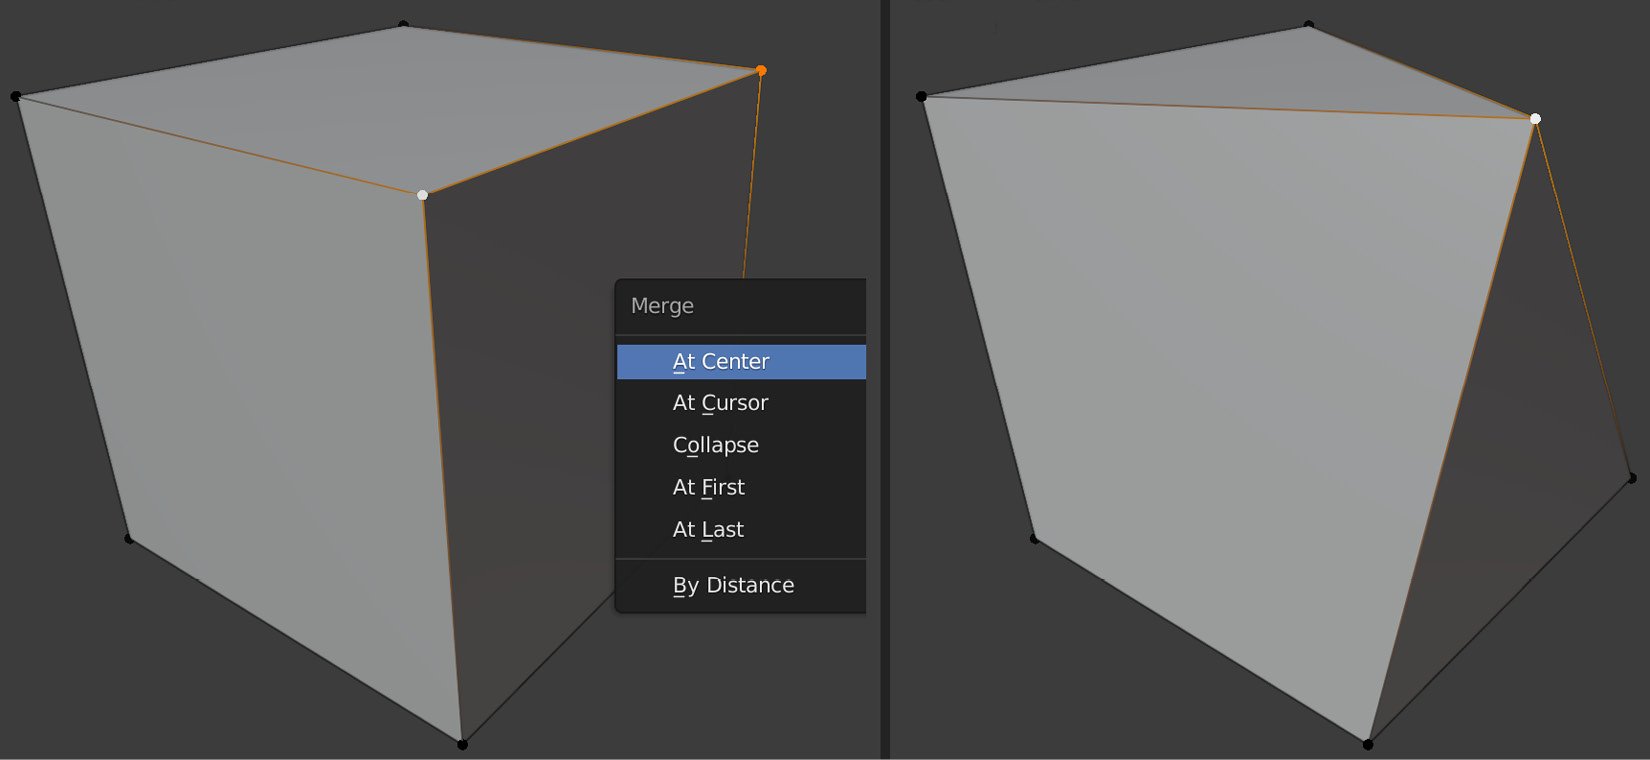
To collapse faces, edges, and vertices down to a single point, use the Merge function by pressing the M shortcut and choosing At Center:

Figure 1.15 – Merging vertices
Proportional Editing
Blender has a great function to modify mesh components with a soft fall-off. If you manipulate a component in your mesh with Proportional Editing enabled, the mesh components will move with a soft fall-off:

Figure 1.16 – (A) Selecting Proportional Editing; (B) Moving a vertex with Proportional Editing turned on; (C) Adjusting the fall-off
In the preceding screenshot, we can see what happens when we enable Proportional Editing in the Header bar. Alternatively, you can press O to toggle Proportional Editing on/off.
Immediately after your first modification, an Operator panel will appear in the bottom left of your 3D Viewport, with options to adjust the fall-off interactively.
In this section, you learned about different 3D modeling tools and Proportional Editing mode, which is used during 3D asset creation in Blender. These tools will come in very handy during our practical tutorial in Chapter 2, Modeling a Robot Drone Character.
Blender also has some other useful functions that give you more flexibility and options when you create 3D assets. These are called modifiers. We'll look at them in the next section.


