Implementing the LED-blinking example
In the previous section, we used an interpreter to write our program. An interpreter can be helpful when testing code or finding out more information about the modules being imported. In this example, we will discuss writing a script that runs automatically on powering the Pico. We will discuss the "hello world" example of getting started with electronics where we will blink an LED at a 1-second interval.
The Pico comes with a green LED on the board and its location is shown in the following image:
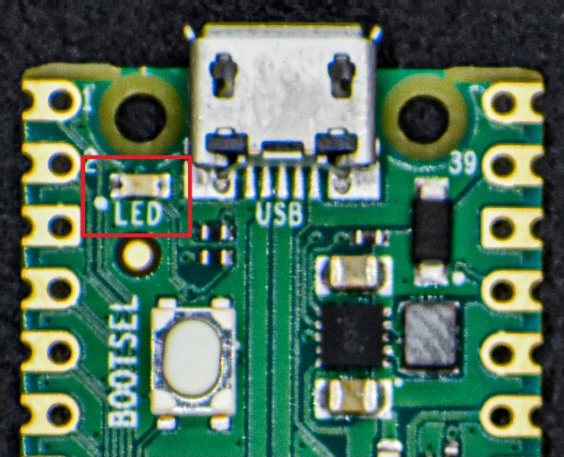
Figure 1.21 – Pico LED location
We will make this LED blink at a 1-second interval—that is, we will turn it on and off for a second. In order to write this program, we will need the machine and utime modules.
According to the Pico datasheet, the onboard LED is connected to general-purpose I/O (GPIO) pin number 25. We will proceed as follows:
- We will use the
Pinclass from themachinemodule to control the LED. - We will be using the
utimemodule to introduce the delay between turning ON and turning OFF the LED.
You will now need to take the following steps:
- Let's take a look at the following code sample:
from machine import Pin
import utime
led = Pin(25, Pin.OUT)
while True:
    led.toggle()
    utime.sleep(1)
Exercise
Develop a practice of actively using an interpreter while you are writing code. In the interpreter, import the
machineandutimemodules, try executinghelp(machine),help(utime), and find out for yourself. - Create a new file and enter the preceding code snippet shown in Step 1. Set the file location as Raspberry Pi Pico, as seen in the following screenshot to the right:
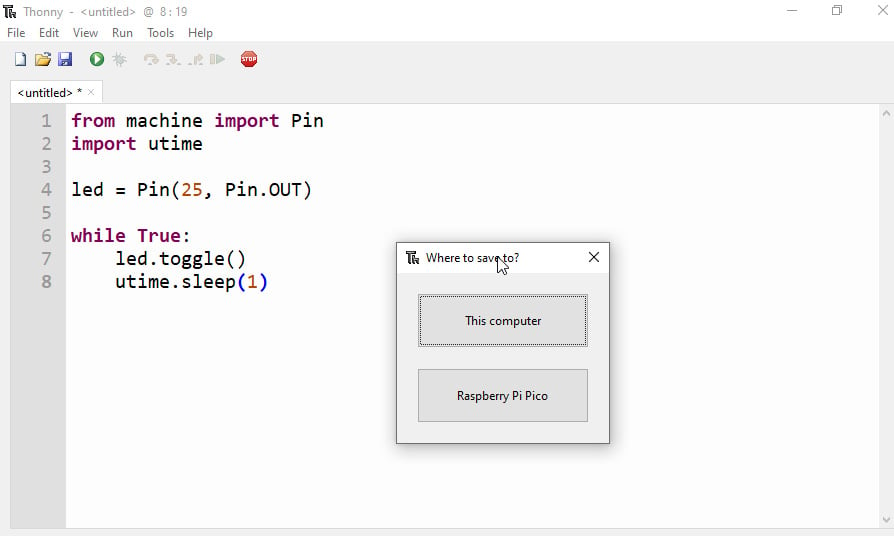
Figure 1.22 – File location
- Save the file as
main.pyand your code should automatically begin execution. - Try disconnecting the USB cable and reconnecting it. You will notice that the script starts running automatically.
- To stop the code execution, click on the STOP button located on the toolbar, as shown in the following screenshot:
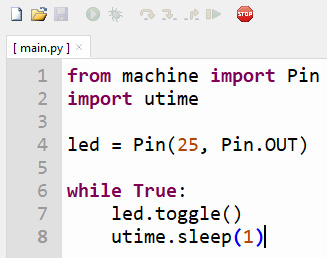
Figure 1.23 – Pressing STOP to interrupt execution
- To resume execution, click the Run Current Script button, which is indicated by the green play button indicated at the top of the page, as shown in the following screenshot:

.
Figure 1.24 – Clicking Run Current Script to resume execution
In the next section, we will take a closer look at the code.
Description of the code sample
In this section, we will discuss in detail the code sample shown previously, as follows:
- We get started by importing the
utimemodule and thePinclass from themachinemodule, as follows:from machine import Pin import utime
GPIO
A GPIO pin can be used as an input pin or an output pin. When you use a GPIO pin as an output pin, you can set it to
HIGHorLOW. Likewise, when you use it as an input pin, you can read whether the pin isHIGHorLOW. In this example, we are turning the LED on/off by alternating betweenHIGHandLOWstates. - Next, we declare the GPIO pin 25 as an output pin using an object belonging to the
Pinclass. The first argument in the following code snippet refers to the pin number (pin25), while the second argument sets the pin as an output pin:led = Pin(25, Pin.OUT)
- Now, we need to blink an LED at a 1-second interval. We are going to do this inside an infinite loop.
- The
ledobject has atoggle()function that toggles the pin between the ON and OFF states. - We will introduce a 1-second delay by calling the
sleepfunction after toggling the pin, as follows:while True: led.toggle() utime.sleep(1)
Congratulations on your first step with the Raspberry Pi Pico! Now, we will discuss the same example in CircuitPython.
CircuitPython example
In this section, we will discuss using CircuitPython for programming the Pico. We will discuss the same LED-blinking example using Pico. We will also install the Mu IDE to the program by using CircuitPython.
Flashing the CircuitPython binary
In this section, we will flash the CircuitPython binary onto the Pico. The installation process is the same as for MicroPython. The binary can be downloaded from https://bit.ly/31pnLI4.
Once you have downloaded the binary, follow the instructions from the MicroPython section.
Coding with Mu
In this section, we will install the Mu IDE. The IDE is available for download from https://bit.ly/3ruxDKW. The IDE is available for Windows, Linux, and Mac operating systems.
Raspberry Pi installation
On a Raspberry Pi, Mu can be installed as follows:
- Go to Menu | Preferences | Recommended Software | Select Mu to choose Mu from the list of software to install.
- Mu can be launched from Menu | Programming | Mu.
In the next section, we will review writing our first program with Mu.
Launching Mu
The steps to writing a program with Mu include the following:
- Connect the Pico to your computer/Raspberry Pi using a USB cable.
- Once Mu is launched, we need to set the programming mode. Since we are programming in CircuitPython, we will set it to CircuitPython, as shown in the following screenshot:
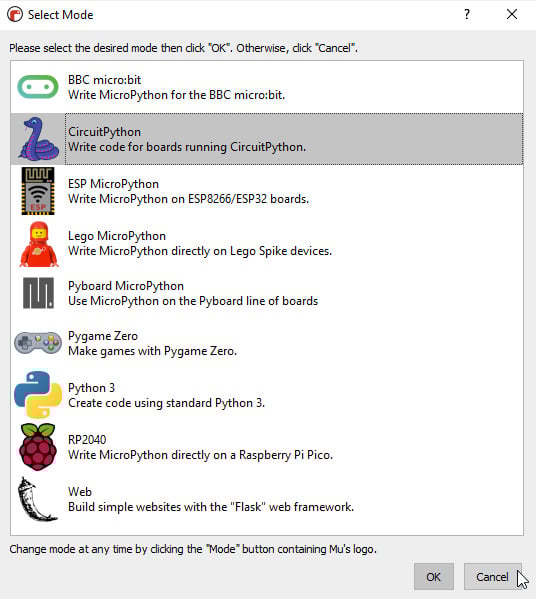
Figure 1.25 – Selecting programming mode
- You can also change the programming mode from the main window of the IDE, as shown in the following screenshot:
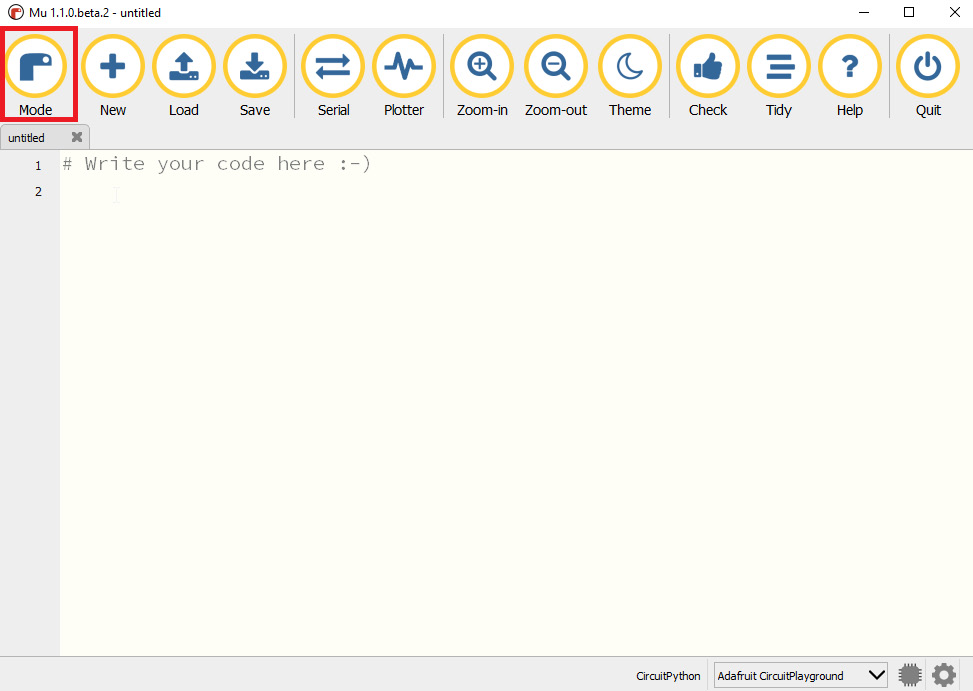
Figure 1.26 – Changing Python mode
Note the Pico being automatically detected in the preceding screenshot.
- Click the Serial button to launch access to the Python interpreter, as shown here:

Figure 1.27 – Serial button location
- Launch the Python interpreter by pressing Ctrl + C, and it should take you to the >>> REPL prompt, as shown toward the bottom of the following screenshot:
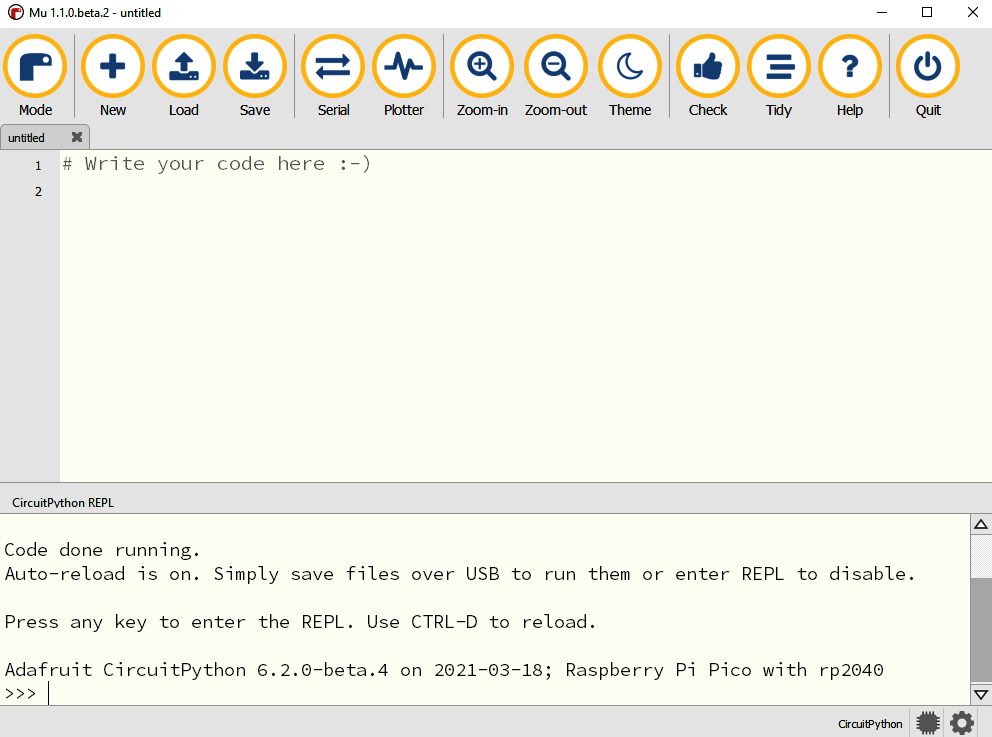
Figure 1.28 – CircuitPython interpreter on Pico
Finally, in this process, repeat the Hello World! example from the MicroPython section by using the interpreter.
Second LED-blinking example
We will discuss the same LED-blinking example using CircuitPython and observe the differences between the two flavors of Python. Let's take a quick look at the following code snippet:
import time
import board
import digitalio

led = digitalio.DigitalInOut(board.LED)
led.direction = digitalio.Direction.OUTPUT

while True:
    led.value = True
    time.sleep(1)
    led.value = False
    time.sleep(2)
Let's review the code sample, as follows:
- We get started by importing the
time,board, anddigitaliomodules. Thetimemodule is used to introduce a delay between turning the LED ON and OFF. - The
boardmodule contains definitions of the pins and peripherals specific to the board. In this example, we are making use of theLEDconstant from theboardmodule to drive the onboard LED on the Raspberry Pi Pico. - The
digitaliomodule provides access to the Pico's peripherals. In this example, we need to declare the LED pin (GPIO pin 25) as an output pin:led = digitalio.DigitalInOut(board.LED) led.direction = digitalio.Direction.OUTPUT
- In the first line of the preceding code snippet, we are declaring
ledas an instance of theDigitalInOutclass. - In the second line, we are setting the direction of the
ledpin to be an output pin. We are making use of theDirectionclass from thedigitaliomodule. - Next, we enter an infinite loop where we turn the LED on/off, as follows:
while True:
    led.value = True
    time.sleep(1)
    led.value = False
    time.sleep(2)
- In the first line of the
whileloop, we set the value to beTrue. This turns ON the LED. This is followed by a 1-second delay. This is achieved by callingtime.sleep(1). - In the third line of the
whileloop, we set the value to beFalse. This turns OFF the LED. This is also followed by a 1-second delay. - We want the script to launch upon reset. Load the
code.pyfile located on the Pico that is currently enumerated on your computer as a storage device. The Load button is located on the top toolbar. - Type the code sample we discussed into
code.pyand save it. - Press Ctrl + D from the CircuitPython interpreter and you should notice the LED blinking on the Pico.
Congratulations on writing your first CircuitPython program for the Raspberry Pi Pico!
CircuitPython or MicroPython?
In this chapter, we discussed examples with both CircuitPython and MicroPython. The examples were somewhat identical and share a similar structure. What are their differences and which flavor of Python should you use for your development?
The short answer is that it is up to you. For the sake of consistency, we will be discussing all examples in CircuitPython using the Mu IDE.
Both implementations have a wide user base and libraries for add-on hardware. CircuitPython was spun off MicroPython by Adafruit. CircuitPython can be helpful while using sensor breakout boards from Adafruit Industries.
Thonny versus Mu IDE
In this chapter, you might have noticed that we used Thonny for the MicroPython example and Mu for the CircuitPython example. We wanted to demonstrate the various tools available for the Raspberry Pi Pico. You can even use a simple text editor for your development. We will show you how to save and upload your code to the Pico.
In the next section, we will discuss add-on hardware for the Pico.


