OpenCV has simple and clear way to handle input from a keyboard. This functionality is organically built into the cv2.waitKey function. Let's see how we can use it.
Handling user input from a keyboard
Getting ready
You need to have OpenCV 3.x installed with Python API support.
How to do it...
You will need to perform the following steps for this recipe:
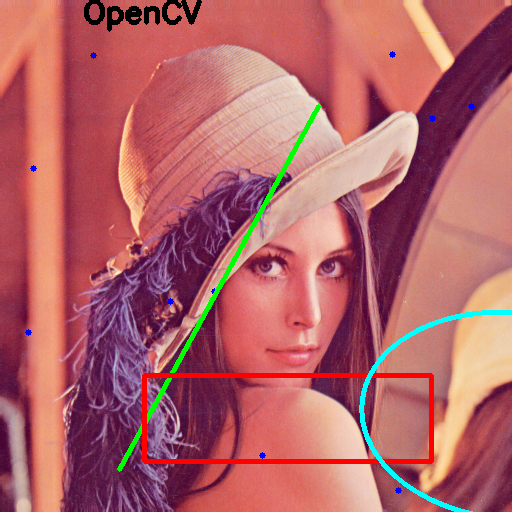
- As done previously, open an image and get its width and height. Also, make a copy of the original image and define a simple function that returns a random point with coordinates inside our image:
import cv2, numpy as np, random

image = cv2.imread('../data/Lena.png')
w, h = image.shape[1], image.shape[0]
image_to_show = np.copy(image)

def rand_pt():
 return (random.randrange(w),
 random.randrange(h))
- Now when the user presses P, L, R, E, or T draw points, lines, rectangles, ellipses, or text, respectively. Also, we will clear an image when the user hits C and closes the application when the Esc key is pushed:
finish = False
while not finish:
    cv2.imshow("result", image_to_show)
    key = cv2.waitKey(0)
    if key == ord('p'):
        for pt in [rand_pt() for _ in range(10)]:
            cv2.circle(image_to_show, pt, 3, (255, 0, 0), -1)
    elif key == ord('l'):
        cv2.line(image_to_show, rand_pt(), rand_pt(), (0, 255, 0), 3)
    elif key == ord('r'):
        cv2.rectangle(image_to_show, rand_pt(), rand_pt(), (0, 0, 255), 3)
    elif key == ord('e'):
        cv2.ellipse(image_to_show, rand_pt(), rand_pt(), random.randrange(360), 0, 360, (255, 255, 0), 3)
    elif key == ord('t'):
        cv2.putText(image_to_show, 'OpenCV', rand_pt(), cv2.FONT_HERSHEY_SIMPLEX, 1, (0, 0, 0), 3)
    elif key == ord('c'):
        image_to_show = np.copy(image)
    elif key == 27:
        finish = True
How it works...
As you can see, we just analyze the waitKey() return value. If we set a duration and no key is pressed, waitKey() would return -1.
After launching the code and pressing the P, L, R, E, and T keys a few times, you will get an image close to the following: