Just after you implement your first computer vision algorithm, you will want to see its results. OpenCV has a considerable number of drawing functions to let you highlight any feature in an image.
Drawing 2D primitives—markers, lines, ellipses, rectangles, and text
Getting ready
You need to have OpenCV 3.x installed with Python API support.
How to do it...
- Open an image and get its width and height. Also, define a simple function that returns a random point inside our image:
import cv2, random

image = cv2.imread('../data/Lena.png')
w, h = image.shape[1], image.shape[0]


def rand_pt(mult=1.):
    return (random.randrange(int(w*mult)),
            random.randrange(int(h*mult)))
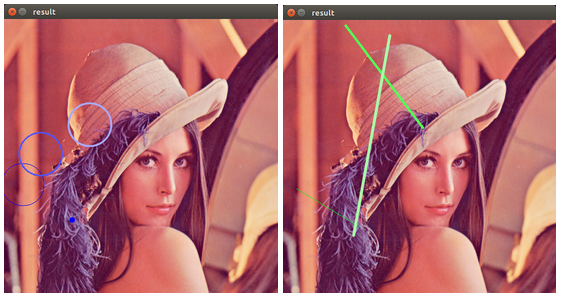
- Let's draw something! Let's go for circles:
cv2.circle(image, rand_pt(), 40, (255, 0, 0))
cv2.circle(image, rand_pt(), 5, (255, 0, 0), cv2.FILLED)
cv2.circle(image, rand_pt(), 40, (255, 85, 85), 2)
cv2.circle(image, rand_pt(), 40, (255, 170, 170), 2, cv2.LINE_AA)
- Now let's try to draw lines:
cv2.line(image, rand_pt(), rand_pt(), (0, 255, 0))
cv2.line(image, rand_pt(), rand_pt(), (85, 255, 85), 3)
cv2.line(image, rand_pt(), rand_pt(), (170, 255, 170), 3, cv2.LINE_AA)
- If you want to draw an arrow, use the arrowedLine() function:
cv2.arrowedLine(image, rand_pt(), rand_pt(), (0, 0, 255), 3, cv2.LINE_AA)
- To draw rectangles, OpenCV has the rectangle() function:
cv2.rectangle(image, rand_pt(), rand_pt(), (255, 255, 0), 3)
- Also, OpenCV includes a function to draw ellipses. Let's draw them:
cv2.ellipse(image, rand_pt(), rand_pt(0.3), random.randrange(360), 0, 360, (255, 255, 255), 3)
- Our final drawing-related function is for placing text on the image:
cv2.putText(image, 'OpenCV', rand_pt(), cv2.FONT_HERSHEY_SIMPLEX, 1, (0, 0, 0), 3)
How it works...
First, cv2.circle gives the thinnest and darkest blue primitive. The second invocation draws a dark blue point. The third call produces a lighter blue circle with sharp edges. The last call, cv2.circle, reveals the lightest blue circle with smooth borders.
The cv2.circle function takes the image as first parameter, and the position of center in (x, y) format, radius of the circle, and the color as mandatory arguments. Also you can specify line thickness (the FILLED value gives a filled circle) and line type (LINE_AA gives aliasing-free borders).
The cv2.line function takes an image, start and end points, and color of the image (as in first call). Optionally you can pass line thickness and line type (again, to suppress aliasing).
We will get something like this (positions may vary due to randomness):
The parameters of the cv2.arrowedLine function are the same as those for cv2.line.
The parameters that cv2.rectangle takes are the image that is to be drawn upon, the upper-left corner, bottom-right corner, and the color. Also, it's possible to specify thickness (or make the rectangle filled with the FILLED value).
cv2.ellipse takes the image, the position of the center in (x, y) format, half axis lengths in (a, b) format, the rotation angle, the start angle of drawing, the end angle of drawing, and color and thickness of line (you can also draw a filled ellipse) as parameters.
Arguments of the cv2.putText function are the image, the text being placed, the position of the bottom-left corner of the text, the name of the font face, the scale of symbols, and color and thickness.