Finishing the walk cycle
We’re done with the hardest part of the walk cycle. Now we can relax and animate those less-than-essential limbs so that Rain’s walk cycle looks natural and complete. This stage mostly involves animating FK bones that are governed by simpler relationships, such as the FK bones for Rain’s toes and arms.
FK toes
Before we can say Rain’s feet are completely animated, we ought to finish by animating the toes. We’ll have them extend back as the heel strikes the ground:
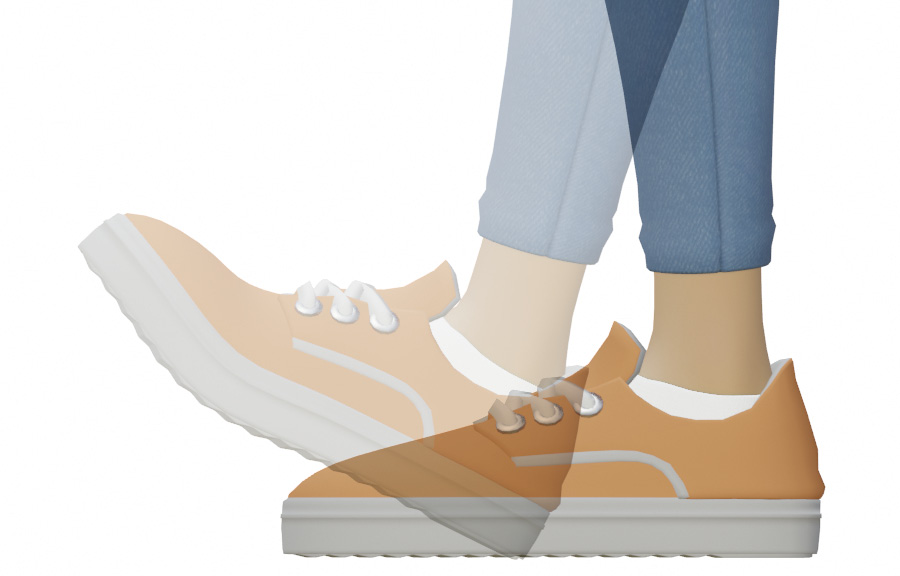
Figure 8.41: Toe of front foot extending and flattening
On some later frames, you’ll have noticed that Rain’s toes automatically bend due to the effects of ball roll. This is nice to have right up until the foot is picked up, after which it looks a bit odd. We can curl the toe bone in the other direction to cancel out this effect after the foot has left the ground:
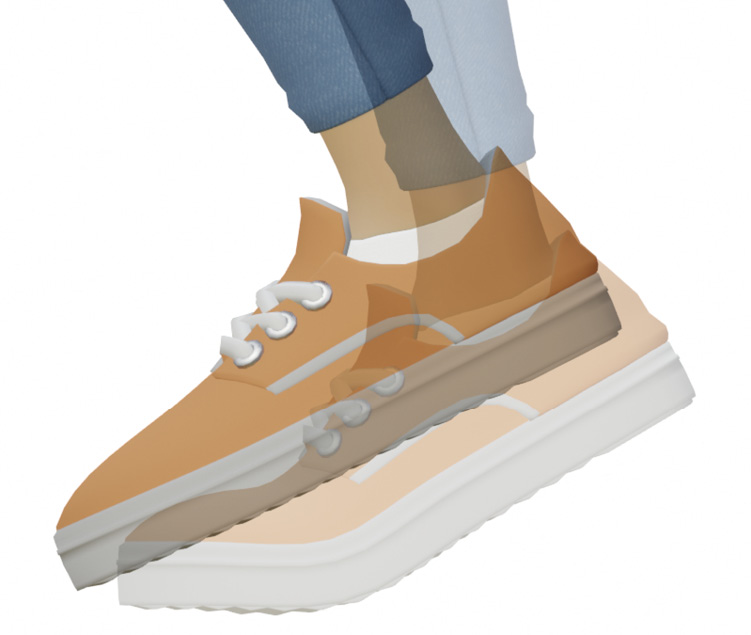
Figure 8.42: Toes of the rear foot going straight, relative to the rest of the foot
Try it now. The bones for the toes are in the FK layer:
- Enable the FK armature layer.
- Using
FK-Toe.L
, animate Rain’s toe flexing and extending over a 24-frame period. - Copy the keyframes to the other toe and move them
12
frames, as you did for the feet in the previous section.
Here’s my F-curve. Yours may require a bit of extra tweaking to curl the toes without letting them pass through the ground right after:
Figure 8.43: X Euler Rotation of FK-Toe.L
With our work on Rain’s bottom half concluded, we can tackle the limbs we hid at the beginning of the chapter.
FK arms
In a walk cycle, the arms swing at the sides of the body in opposition to the legs:
Figure 8.44: Initial key poses of the arms, seen from above
Like many movements using FK arms, the timing of the motion should begin at the shoulders and travel down the arms like a delayed signal. Think back to the waving motion we did in the previous chapter.
- Go to CloudRig | Outfits and unhide Rain’s arms.
- In CloudRig | FK Settings | FK Hinge, set Left Arm and Right Arm to
1.0
. - At frame
3
(Left Low), key the FK bones of the arms at their extreme rotations, with the right arm forward and the left arm back. - At frame
15
(Right Low), key the flipped pose of the arms. - Use the Dope Sheet to stagger the motion of the arm bones to your liking.
Tip
Do Rain’s hands pass through her body as they swing? Go to the frame at which this occurs and key one more pose to repel them outward. See if you can keep the F-curves as smooth as possible after the correction.
Final touches?
What else does the walk cycle need? If you’re like me, you’ll want to relax the pose of Rain’s hands, fix her hair and scarf, or maybe add a little 12-frame bounce to her neck and shoulders. You could also explore how her other secondary bones might be useful for layering additional motion without affecting the F-curves you already have.
Perhaps you’re still not satisfied with how the legs look or would like to see what a faster or slower walk cycle would look like. If that’s the case, keep these rules in mind while editing your animation.
For bone-pairs with .L
and .R
in their names, edit their keyframes in tandem:
Figure 8.45: Adjusting the Z Location animation for both IK feet
You can alter the stride length, but you’ll need to find all the Y Location channels we keyed in the initial stage and scale them all together on the Y axis of the Graph Editor:
Figure 8.46: Scaling the stride length in the Graph Editor
And if you want to change the period of the whole walk cycle, select all your keyframes and scale them on the X axis:
Figure 8.47: Slowing down the walk cycle by scaling everything in the Dope Sheet
One more thing: remember to save your work! Later, I’ll show you how to integrate this walk cycle into other animations.